
Car repair AvtoVAZ Car repair Renault Car repair Hyundai Car repair Ford Car repair Volkswagen Car repair Audi Car repair Chevrolet
English Русский
Български
Беларускі
Український
Српски
Hrvatski
Română
Polski
Slovenský
Magyar
articles sitemap contacts bookmark
LadaMan.ru


Kalina Granta Priora Vesta Largus XRAY
Priora 1 (2007-2018, VAZ-2170)

Replacing camshaft seals (Priora 2170)

  • Main
  • Priora
  • Priora 1
  • Power unit
  • Engine repair
  • Replacing camshaft seals
0
If traces of oil leakage through the camshaft seals are detected, first check whether the crankcase ventilation system is clogged or whether its hoses are pinched, and correct the faults if necessary. If the oil leak does not stop, replace the seals.

You will need: all the tools needed to remove the timing drive (see "Replacing the timing belt and tension roller"), as well as a 17 mm wrench, a device for fixing the camshafts from turning, a flat-blade screwdriver, and a hammer.

1. Disconnect the wire from the negative terminal of the battery.

2. Set the piston of the 1st cylinder to the TDC position of the compression stroke (see "Setting the piston of the first cylinder to the TDC position of the compression stroke").

3. Remove the timing belt (see "Replacing the timing belt and tension roller").

4. Remove the camshaft pulleys (see "Replacing the cylinder head gasket").
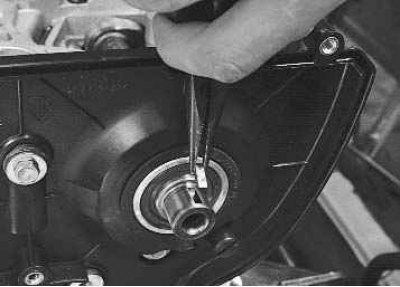
5. Remove the keys from the camshaft grooves.
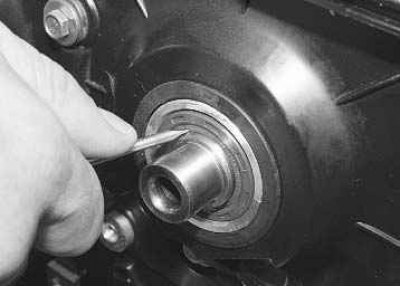

5. Remove the keys from the camshaft grooves.

6. Using a screwdriver, remove the seals.
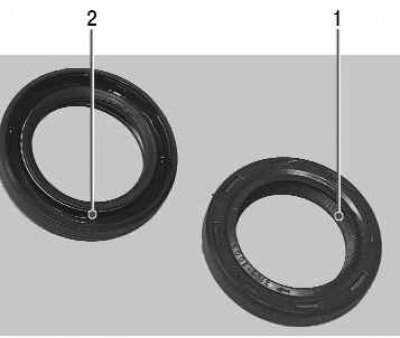

6. Using a screwdriver, remove the seals.


7. Before installing new seals, inspect the working edges 1. They should be smooth, without tears,…


7. Before installing new seals, inspect the working edges 1. They should be smooth, without tears, dents or rubber build-up. The springs of the 2 oil seals must be intact and not stretched. Lubricate the working edges with engine oil.

Note: To make it easier to press in the seals, make small chamfers on their seating edges using a file or emery wheel.
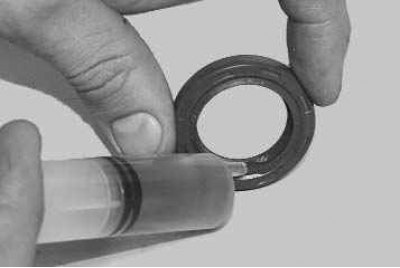

8. Lubricate the working lips of the oil seals with engine oil.
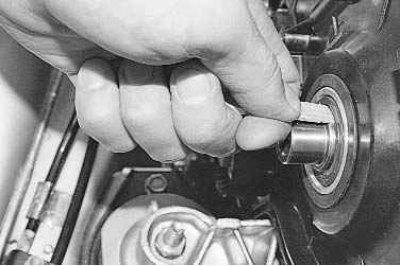

8. Lubricate the working lips of the oil seals with engine oil.

9. Install the oil seals with the working edges inside the cylinder head, carefully tuck the…


9. Install the oil seals with the working edges inside the cylinder head, carefully tuck the working edges onto the camshafts using a wooden stick...
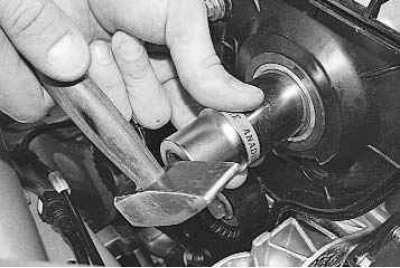


10. ...and press it in until it stops using a suitable mandrel. A suitable sized head from the tool…


10. ...and press it in until it stops using a suitable mandrel. A suitable sized head from the tool kit can be used as a mandrel.
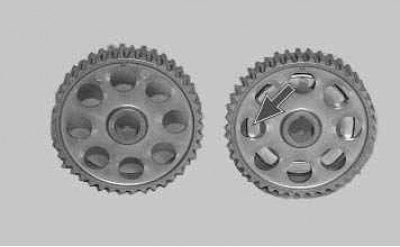
11. Install all parts in the reverse order of removal. In this case, install the inlet camshaft…


11. Install all parts in the reverse order of removal. In this case, install the inlet camshaft pulley with the disk that ensures the operation of the phase sensor facing the engine. Install the exhaust camshaft pulley in the same manner. Adjust the timing belt tension (see "Replacing the timing belt and tension roller") and the generator drive belt (see "Replacing the alternator drive belt").


This article is available at russian, bulgarian, belarusian, ukrainian, serbian, croatian, romanian, polish, slovak, hungarian
This article has been reviewed: Vladislav Voloshin
Share with friends:
◀ Previous
Lada Priora 1: Engine repair
Next ▶

Replacing valve stem seals
Replacing the cylinder head gasket
Replacing the cylinder head cover gasket
Features of engine disassembly
Replacing the powertrain mounts
Replacing the front crankshaft oil seal
Replacing the rear crankshaft oil seal
Replacing the oil pan gasket
Replacing the intake manifold sealing rings
Replacing the catalytic converter gasket
More articles with information from manuals for Lada:

• Camshaft Seals — Replacement Lada Kalina Hatchback (2004-2013, VAZ-1119)
• Replacing the remote control battery Lada Granta 1 (2011-2023, VAZ-2190)
• Camshaft Seals — replacement Lada Vesta 1 (2015-2023, VAZ-2180)
• Checking the level and replacing the engine oil and filter Lada Largus 1 (2012-2023)
• Bleeding the hydraulic brake system, replacing the fluid Lada X-Ray 1 (2015-2022)
Link to this article in various formats
Reviews and comments of visitors
No comments yet


Add up two numbers: 27 + 22


Priora 1 (2007-2018) 
  • General information
  • Vehicle device
  • User manual
  • Faults en route
  • Maintenance
  • Power unit
  • Engine repair
  • Cooling and lubrication system
  • Supply system
  • Exhaust system
  • Transmission
  • Clutch
  • Car gearbox
  • Drive shafts
  • Chassis (running gear)
  • Car suspension
  • Steering
  • Brake system
  • Body and interior
  • Exterior (external elements)
  • Interior (internal elements)
  • Doors, locks and windows
  • Electrical equipment
  • Equipment and devices
  • Power devices
  • Lighting and signaling
  • Cooling and heating
  • Electrical circuits
LadaMan.ru © 2018–2026 | Mobile version | About Lada | Sitemap: EN BG BY UA RS HR RO PL SK HU | Contacts with admin | | Add to bookmarks
Kalina Hatchback (2004-2013) | Kalina Sedan (2004-2013) | Granta 1 (2011-2023) | Priora 1 (2007-2018) | Vesta 1 (2015-2023) | Largus 1 (2012-2023) | X-Ray 1 (2015-2022) |
This site uses cookies to ensure everything runs smoothly.