
Car repair AvtoVAZ Car repair Renault Car repair Hyundai Car repair Ford Car repair Volkswagen Car repair Audi Car repair Chevrolet
English Русский
Български
Беларускі
Український
Српски
Hrvatski
Română
Polski
Slovenský
Magyar
articles sitemap contacts bookmark
LadaMan.ru


Kalina Granta Priora Vesta Largus XRAY
Priora 1 (2007-2018, VAZ-2170)

Checking the compression in the cylinders (Priora 2170)

  • Main
  • Priora
  • Priora 1
  • Power unit
  • Engine repair
  • Checking the compression in the cylinders
0
Compression (compression stroke end pressure) in cylinders - the most important indicator for diagnosing the condition of the engine without disassembling. Based on its average value and the difference in values in individual cylinders, it is possible to determine with sufficient accuracy the degree of general wear of the engine connecting rod and piston group parts, and to identify faults in this group and valve mechanism parts.

Compression is checked with a special device - a compression meter, which can now be freely purchased in large auto parts stores.
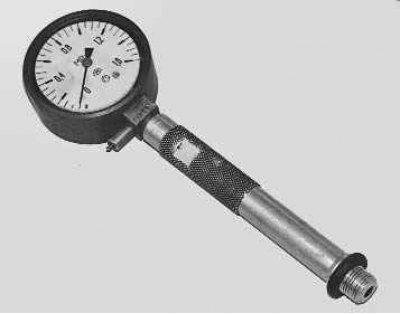
Note: This is what the compression gauge used to illustrate this book looks like. There are…


Note: This is what the compression gauge used to illustrate this book looks like. There are versions of compression gauges that have a rubber tip installed instead of a spark plug instead of a threaded fitting for screwing in. When checking compression, such compression gauges are simply pressed hard against the spark plug hole.


Attention! Important conditions for correct readings when checking compression are the serviceability of the starter and its electrical circuits, as well as the full charge of the battery.


1. Start the engine and warm it up to operating temperature.


2. Reduce the pressure in the fuel system (see "Loss of fuel pressure in the engine fuel system"). After the pressure has dropped, do not replace the fuel pump fuse to disable the fuel pump.

3. Remove the ignition coils and unscrew all the spark plugs (see "Replacing and servicing spark plugs").
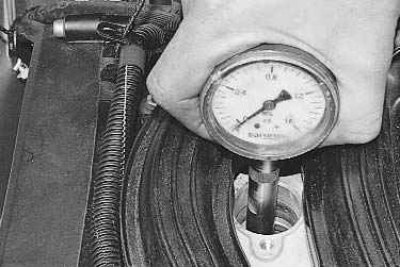
4. Screw the compression gauge into the spark plug hole of the cylinder being tested.


4. Screw the compression gauge into the spark plug hole of the cylinder being tested.

5. Press the accelerator pedal all the way down to fully open the throttle valve.

6. Turn on the starter and turn the engine crankshaft until the pressure in the cylinder stops increasing. This corresponds to approximately four compression strokes.

Note: To obtain correct compression tester readings, the crankshaft must rotate at 180–200 min⁻¹ or higher, but not more than 350 min⁻¹.
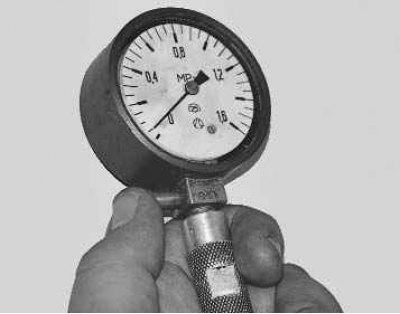

7. After recording the compression gauge readings, set its arrow to zero by pressing the air…


7. After recording the compression gauge readings, set its arrow to zero by pressing the air release valve.


Note: Compression gauges of other designs may reset their readings in other ways (in accordance with the instructions for the device).


8. Repeat steps 4–7 for the remaining cylinders. The pressure should not be lower than 1.0 MPa and should not differ in different cylinders by more than 0.1 MPa. Reduced compression in individual cylinders may occur as a result of loose valve seating, damage to the cylinder head gasket, or broken or burnt piston rings. Low compression in all cylinders indicates wear of the piston rings.
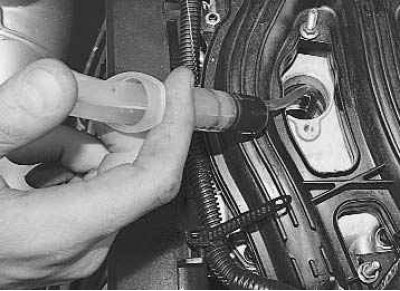
9. To determine the reasons for insufficient compression, pour about 20 cm³ of clean motor oil into…


9. To determine the reasons for insufficient compression, pour about 20 cm³ of clean motor oil into the cylinder with low compression and measure the compression again. If the compression gauge readings have increased, the piston rings are most likely faulty. If the compression value remains unchanged, it means that the valve plates are not tightly seated on the seats or the cylinder head gasket is damaged.

Note: The cause of insufficient compression can also be determined by supplying compressed air to the cylinder, in which the piston is pre-set to TDC of the compression stroke. To do this, remove the tip from the compression gauge and attach the compressor hose to it. Insert the tip into the spark plug hole and supply air to the cylinder under a pressure of 0.2–0.3 MPa. To prevent the engine crankshaft from turning, engage the highest gear and brake the car with the parking brake. The output (leakage) of air through the throttle assembly indicates a leak in the intake valve, and through the muffler-a leak in the exhaust valve. If the cylinder head gasket is damaged, air will escape through the expansion tank neck in the form of bubbles or into the adjacent cylinder, which is detected by a characteristic hissing sound.


This article is available at russian, bulgarian, belarusian, ukrainian, serbian, croatian, romanian, polish, slovak, hungarian
This article has been reviewed: Vladislav Voloshin
Share with friends:
◀ Previous
Lada Priora 1: Engine repair
Next ▶

Useful tips for engine repair
Possible engine malfunctions
Design features of the VAZ-21126 engine
Removal and installation the decorative engine cover
Removal and installation the engine mudguard
Setting the piston of the first cylinder to the TDC position
Replacing the timing belt and tension roller
Replacing the powertrain mounts
More articles with information from manuals for Lada:

• Checking the compression in the cylinders Lada Kalina Sedan (2004-2013, VAZ-1118)
• Compression in engine cylinders — check Lada Granta 1 (2011-2023, VAZ-2190)
• Compression in engine cylinders — check Lada Vesta 1 (2015-2023, VAZ-2180)
• Checking the compression in the engine cylinders Lada Largus 1 (2012-2023)
• Checking the oil level in the engine oil pan Lada X-Ray 1 (2015-2022)
Link to this article in various formats
Reviews and comments of visitors
No comments yet


Add up two numbers: 33 + 39


Priora 1 (2007-2018) 
  • General information
  • Vehicle device
  • User manual
  • Faults en route
  • Maintenance
  • Power unit
  • Engine repair
  • Cooling and lubrication system
  • Supply system
  • Exhaust system
  • Transmission
  • Clutch
  • Car gearbox
  • Drive shafts
  • Chassis (running gear)
  • Car suspension
  • Steering
  • Brake system
  • Body and interior
  • Exterior (external elements)
  • Interior (internal elements)
  • Doors, locks and windows
  • Electrical equipment
  • Equipment and devices
  • Power devices
  • Lighting and signaling
  • Cooling and heating
  • Electrical circuits
LadaMan.ru © 2018–2026 | Mobile version | About Lada | Sitemap: EN BG BY UA RS HR RO PL SK HU | Contacts with admin | | Add to bookmarks
Kalina Hatchback (2004-2013) | Kalina Sedan (2004-2013) | Granta 1 (2011-2023) | Priora 1 (2007-2018) | Vesta 1 (2015-2023) | Largus 1 (2012-2023) | X-Ray 1 (2015-2022) |
This site uses cookies to ensure everything runs smoothly.