
Car repair AvtoVAZ Car repair Renault Car repair Hyundai Car repair Ford Car repair Volkswagen Car repair Audi Car repair Chevrolet
English Русский
Български
Беларускі
Український
Српски
Hrvatski
Română
Polski
Slovenský
Magyar
articles sitemap contacts bookmark
LadaMan.ru


Kalina Granta Priora Vesta Largus XRAY
Vesta 1 (2015-2023, VAZ-2180)

Compression in engine cylinders — check (Vesta 2180)

  • Main
  • Vesta
  • Vesta 1
  • Power unit
  • Engine repair
  • Compression in engine cylinders — check
0
To perform the work you will need a compression gauge.

We perform the work with an assistant.

Sequence of execution


1. Prepare the car for work (see "Preparing the car for maintenance and repair").

2. Warm up the engine to operating temperature and turn off the ignition.

3. Remove the fuses of the ECU and engine control system circuits (see "Fuse and relay mounting block").

4. Relieve the fuel pressure (see "Fuel Line - Pressure Relief").

5. Unscrew the spark plugs (see "Spark plugs - replacement").

6. Install the compression gauge into the spark plug hole of one of the engine cylinders.
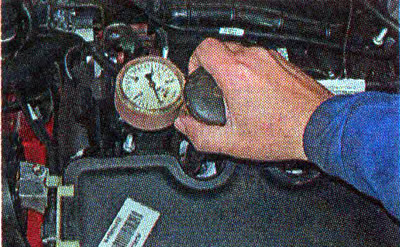
6. Install the compression gauge into the spark plug hole of one of the engine cylinders.


7. The assistant presses the gas pedal all the way to the floor (to fully open the throttle valve) and turns on the starter for 5-10 s.

Note: Measurements must be taken with a fully charged battery, otherwise the readings will be incorrect.


8. Remember or write down the compression meter readings and reset the device.

9. Similarly, we measure the compression in the three remaining cylinders.

In a serviceable engine, the compression in the cylinders should be at least 1.0 MPa (10 bar), and the difference in compression between the cylinders should be no more than 0.1 MPa (1.0 bar).


10. If the compression is lower, then using a medical syringe or oiler, pour about 10 cm³ of motor oil into the spark plug holes of the cylinders of the engine with low compression.

[The original was published on the portal: LADAman]

11. Repeat the compression test. If the compression has increased, the rings may be stuck or the piston group may be worn out (see "Piston rings and connecting rod bearings - replacement"). Otherwise, the valves do not close tightly or the cylinder head gasket is faulty.

Recommendation. You can try to eliminate valve sticking with special preparations poured into the fuel tank or directly into the engine cylinders (see the "Instructions" for the preparation). The tightness of the valves can be checked with compressed air under a pressure of 0.2-0.3 MPa (2-3 bar), supplied through the spark plug holes. Air must be supplied when the camshaft is in a position where both valves of the cylinder being tested are closed. If the exhaust valve is faulty, air will escape through the exhaust system, and if the intake valve is faulty, air will escape through the throttle body. If the piston group is faulty, air will escape through the oil filler neck. Air bubbles escaping through the coolant in the expansion tank indicates a faulty cylinder head gasket.


This article is available at russian, bulgarian, belarusian, ukrainian, serbian, croatian, romanian, polish, slovak, hungarian
This article has been reviewed: Kirill Dementyev
Share with friends:
◀ Previous
Lada Vesta 1: Engine repair
Next ▶

Oil pressure — check
Checking the engine by external signs
Engine — technical condition check
Cleaning the engine and engine compartment
Description of the design of the engine 21129
Engine oil consumption — check
Engine oil level — check
Engine Oil and Oil Filter — replacement
Engine trim panel — removal and installation
Engine Mudguard — Removal and Installation
More articles with information from manuals for Lada:

• Compression in engine cylinders — check Lada Kalina Hatchback (2004-2013, VAZ-1119)
• Compression in engine cylinders — check Lada Granta 1 (2011-2023, VAZ-2190)
• Checking the compression in the cylinders Lada Priora 1 (2007-2018, VAZ-2170)
• Checking the compression in the engine cylinders Lada Largus 1 (2012-2023)
• Troubleshooting Engine Troubleshooting Lada X-Ray 1 (2015-2022)
Link to this article in various formats
Reviews and comments of visitors
No comments yet


Add up two numbers: 44 + 37


Vesta 1 (2015-2023) 
  • General information
  • Governing bodies
  • User manual
  • Maintenance
  • Troubleshooting
  • Power unit
  • Engine repair
  • Control system
  • Supply system
  • Cooling system
  • Exhaust system
  • Transmission
  • Clutch
  • Mechanical gearbox
  • Automatic gearbox
  • Drive shafts
  • Chassis (running gear)
  • Wheels, tires and hubs
  • Front suspension
  • Rear suspension
  • Steering
  • Brake system
  • Body and interior
  • Exterior (external elements)
  • Doors, locks and windows
  • Heating and ventilation
  • Electrical equipment
  • Equipment and devices
  • Power devices
  • Breakers and switches
  • Lighting and signaling
  • Electrical circuits
LadaMan.ru © 2018–2026 | Mobile version | About Lada | Sitemap: EN BG BY UA RS HR RO PL SK HU | Contacts with admin | | Add to bookmarks
Kalina Hatchback (2004-2013) | Kalina Sedan (2004-2013) | Granta 1 (2011-2023) | Priora 1 (2007-2018) | Vesta 1 (2015-2023) | Largus 1 (2012-2023) | X-Ray 1 (2015-2022) |
This site uses cookies to ensure everything runs smoothly.