
Car repair AvtoVAZ Car repair Renault Car repair Hyundai Car repair Ford Car repair Volkswagen Car repair Audi Car repair Chevrolet
English Русский
Български
Беларускі
Український
Српски
Hrvatski
Română
Polski
Slovenský
Magyar
articles sitemap contacts bookmark
LadaMan.ru


Kalina Granta Priora Vesta Largus XRAY
Kalina Sedan (2004-2013, VAZ-1118) Kalina Hatchback (2004-2013, VAZ-1119)

Checking the technical condition of the power supply system (Kalina 1119)

  • Main
  • Kalina
  • Kalina Hatchback
  • Power unit
  • Supply system
  • Checking the technical condition of the power supply system
0
To perform the work you will need a special fuel pressure gauge.

Sequence of execution


1. Prepare the car for work (see "Preparing the car for maintenance and repair").

2. Unscrew the protective cap of the diagnostic connector of the fuel rail.
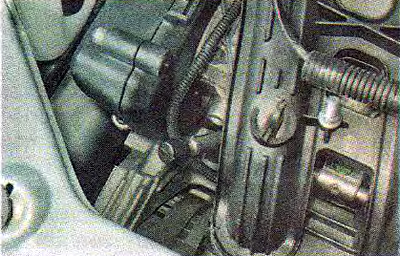
2. Unscrew the protective cap of the diagnostic connector of the fuel rail.


3. Connect the tip of the pressure gauge hose to the diagnostic fitting of the fuel rail. We tighten the end of the hose using an open-end wrench.

Main material on the website LADAMAN.ru

If necessary, the pressure in the fuel rail can be measured with a homemade device made from a pressure gauge from a foot pump. Before connecting such a pressure gauge, it is necessary to relieve the fuel pressure. After this, unscrew the valve from the fuel rail fitting. This can be done with a metal wheel valve cap. To connect the pressure gauge to the fuel rail fitting, use a piece of fuel-resistant hose of a suitable diameter. The ends of the hoses must be securely fastened with clamps.

4. Turn on the ignition. The fuel pump will operate for a few seconds. After waiting for the pump to stop working, turn off the ignition.

5. To remove air from the pressure gauge, lower the end of the drain tube into a small container, unscrew the pressure gauge bleeder nipple by ⅓-½ turn and release excess gasoline pressure from the fuel rail. This will remove air from the pressure gauge hose.
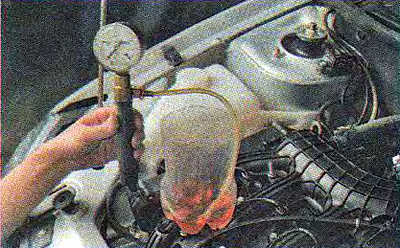


5. To remove air from the pressure gauge, lower the end of the drain tube into a small container,…


6. Tighten the bleed nipple until it stops.

We start the engine and measure the operating pressure in the fuel rail at different crankshaft rotation speeds. For a serviceable engine it should be within 378-390 kPa (3.8-3.9 bar).

7. Turn off the ignition.

8. After lowering the end of the tube into the container, open the fitting and release the pressure from the fuel line.

9. Disconnect the pressure gauge from the diagnostic fitting of the fuel rail.

10. Screw the protective cap onto the fuel rail fitting.

Recommendation. If the operating pressure in the fuel rail is unstable or higher than normal, then the fuel pressure regulator is faulty. Low pressure (below normal) it can also be caused by a faulty regulator. The fuel pump mesh filter may be clogged, or the fuel pump may not be producing the required pressure. To clean the mesh filter you need to remove the fuel module. You can verify that the pressure regulator and fuel pump are faulty by replacing them with known good ones. It is also possible to replace the fuel module assembly.


This article is available at russian, bulgarian, belarusian, ukrainian, serbian, croatian, romanian, polish, slovak, hungarian
This article has been reviewed: Polina Kudryashova
Share with friends:
◀ Previous
Lada Kalina Hatchback: Supply system
Next ▶

Description of the power supply system design
Power supply system reference data
Air filter — replacing the filter element
Air filter — removal and installation
Throttle valve — drive adjustment
Throttle Cable Replacement
Throttle assembly — removal, gasket replacement and installation
More articles with information from manuals for Lada:

• Checking the technical condition of the power supply system Lada Granta 1 (2011-2023, VAZ-2190)
• Features of the design of the engine power supply system Lada Priora 1 (2007-2018, VAZ-2170)
• Power supply system — technical condition check Lada Vesta 1 (2015-2023, VAZ-2180)
• Description of the power supply system design Lada Largus 1 (2012-2023)
• Checking the condition and replacing the power steering pump drive… Lada X-Ray 1 (2015-2022)
Link to this article in various formats
Reviews and comments of visitors
No comments yet


Add up two numbers: 25 + 33


Kalina Sedan (2004-2013) 
  • General information
  • Vehicle device
  • Operation and maintenance
  • Faults en route
  • Power unit
  • Engine repair
  • Cooling and lubrication system
  • Exhaust system
  • Supply system
  • Ignition and control
  • Transmission
  • Clutch and drive shafts
  • Car gearbox
  • Chassis (running gear)
  • Front suspension
  • Rear suspension
  • Steering
  • Brake system
  • Body and interior
  • Exterior (external elements)
  • Interior (internal elements)
  • Doors, locks and windows
  • Electrical equipment
  • Equipment and devices
  • Power devices
  • Lighting and signaling
  • Heating and ventilation
Kalina Hatchback (2004-2013) 
  • General information
  • Vehicle Details
  • Maintenance
  • Troubleshooting
  • Power unit
  • Engine repair
  • Cooling system
  • Supply system
  • Control system
  • Exhaust system
  • Transmission
  • Clutch
  • Car gearbox
  • Drive shafts
  • Chassis (running gear)
  • Wheels and tires
  • Front suspension
  • Rear suspension
  • Steering
  • Brake system
  • Body and interior
  • Exterior (external elements)
  • Interior (internal elements)
  • Doors, locks and windows
  • Electrical equipment
  • Equipment and devices
  • Power devices
  • Lighting and signaling
  • Electrical circuits
LadaMan.ru © 2018–2026 | Mobile version | About Lada | Sitemap: EN BG BY UA RS HR RO PL SK HU | Contacts with admin | | Add to bookmarks
Kalina Hatchback (2004-2013) | Kalina Sedan (2004-2013) | Granta 1 (2011-2023) | Priora 1 (2007-2018) | Vesta 1 (2015-2023) | Largus 1 (2012-2023) | X-Ray 1 (2015-2022) |
This site uses cookies to ensure everything runs smoothly.