
Car repair AvtoVAZ Car repair Renault Car repair Hyundai Car repair Ford Car repair Volkswagen Car repair Audi Car repair Chevrolet
English Русский
Български
Беларускі
Український
Српски
Hrvatski
Română
Polski
Slovenský
Magyar
articles sitemap contacts bookmark
LadaMan.ru


Kalina Granta Priora Vesta Largus XRAY
Kalina Sedan (2004-2013, VAZ-1118) Kalina Hatchback (2004-2013, VAZ-1119)

Ignition coil of the 1.6i engine — checking and replacement (Kalina 1119)

  • Main
  • Kalina
  • Kalina Hatchback
  • Power unit
  • Engine repair
  • Ignition coil of the 1.6i engine — checking and replacement
0
Tip: To quickly check the serviceability of the ignition system, you can use a spark indicator for engines with fuel injection. It is placed on the spark plug and a high-voltage wire is connected to it. When checking, please follow the instructions supplied with the device.
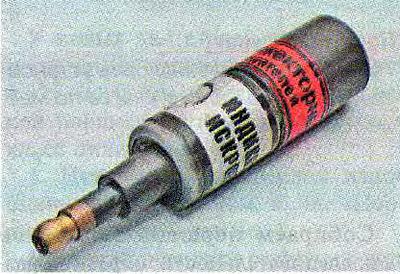

Tip: To quickly check the serviceability of the ignition system, you can use a spark indicator for…


To complete the work you will need a multimeter (in voltmeter and ohmmeter mode).

Sequence of execution


1. Prepare the car for work (see "Preparing the car for maintenance and repair"), turn off the ignition.

2. Having released the retainer, we disconnect the wiring harness block 1 from the terminals of the ignition module 2.
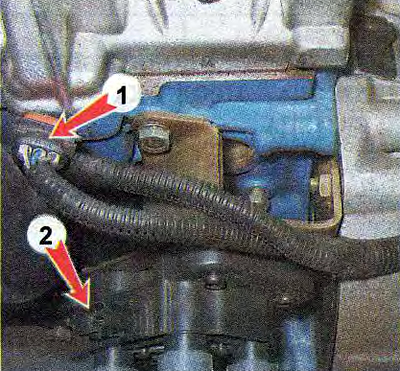
2. Having released the retainer, we disconnect the wiring harness block 1 from the terminals of the…


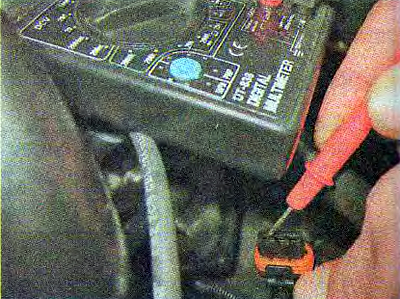
3. Turn on the ignition and use a voltmeter to measure the voltage between terminal 15 and the ground of the wiring harness block.


(The source is located on the website: www.ladaman.ru)

3. Turn on the ignition and use a voltmeter to measure the voltage between terminal 15 and the…


Recommendation. The voltage must be at least 12 V. If the voltage does not reach the connector or is less than 12 V, then the battery is discharged, the power supply circuit is faulty, or the ECU is faulty.


Warning! After taking measurements, turn off the ignition.


4. Disconnect the high-voltage wires from the spark plugs (see "High Voltage Wires - Checking and Replacing").

5. Using a 13 mm socket wrench, unscrew the two bolts of the upper mounting of the ignition coil bracket.
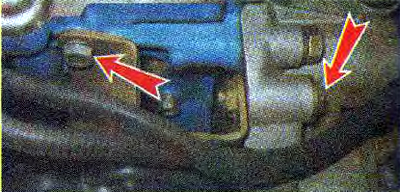
5. Using a 13 mm socket wrench, unscrew the two bolts of the upper mounting of the ignition coil…


6. Using a 17 mm wrench, loosen the lower bolt securing the ignition coil bracket and remove the bracket together with the coil.
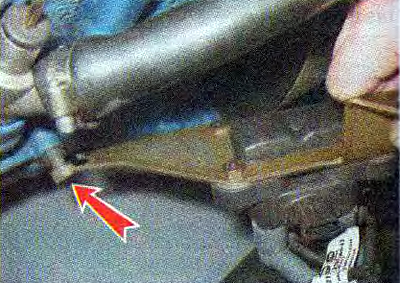
6. Using a 17 mm wrench, loosen the lower bolt securing the ignition coil bracket and remove the…


7. Disconnect the high-voltage wires from the ignition coil.


8. Using an ohmmeter, measure the electrical resistance between the central terminal 15 and the body (bracket). The device should show the absence of a short circuit of the primary winding of the coil to the "ground". We measure the electrical resistance between the central terminal 15 and the outer terminals - 1a and 1b. The resistance of each of the primary windings of the coil should be about 0.5 Ohm.
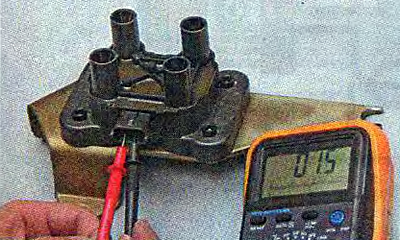
8. Using an ohmmeter, measure the electrical resistance between the central terminal 15 and the…


Note: When measuring small values of electrical resistance (about 1 Ohm) it is necessary to take into account the internal resistance of the device, which can be determined by short-circuiting the ohmmeter probes.


9. Using an ohmmeter, measure the resistance between the high-voltage terminals of coil 1 and 4, and then 2 and 3. The resistance of the windings should be about 5.4 kOhm.
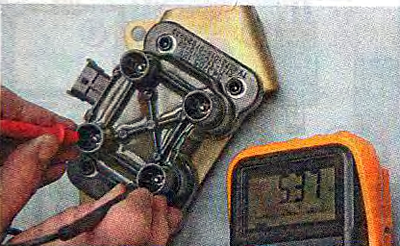
9. Using an ohmmeter, measure the resistance between the high-voltage terminals of coil 1 and 4,…


Recommendation. A faulty ignition coil must be replaced.


10. Using a 5 mm Allen key, unscrew the four screws securing the coil to the bracket and remove the coil.

11. Install the ignition coil in the reverse order of removal.

We connect the high-voltage wires in accordance with the cylinder numbers printed on each wire and on the module body next to the terminals.
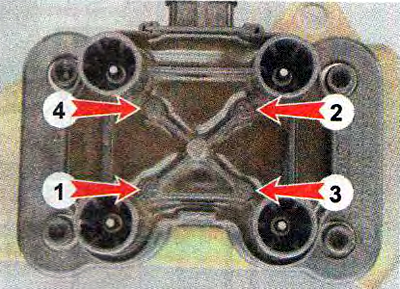
We connect the high-voltage wires in accordance with the cylinder numbers printed on each wire and…


Tip: Since the terminal numbers on the coil installed on the engine are not visible, it is better to connect the high-voltage wires to the ignition coil terminals before installing it on the engine.


This article is available at russian, bulgarian, belarusian, ukrainian, serbian, croatian, romanian, polish, slovak, hungarian
This article has been reviewed: Polina Kudryashova
Share with friends:
◀ Previous
Lada Kalina Hatchback: Engine repair
 

1.6i Engine Spark Plugs — Replacement
High Voltage Wires — Checking and Replacing
Piston and connecting rod of the 1.6i engine — replacement
Piston rings and connecting rod bearings for 1.6i engine — replacement
Cylinder head of the 1.6i engine — removal and installation
 
More articles with information from manuals for Lada:

• Ignition Coil — Checking and Replacing Lada Granta 1 (2011-2023, VAZ-2190)
• Checking the engine ignition system Lada Priora 1 (2007-2018, VAZ-2170)
• Ignition Coil — Checking and Replacing Lada Vesta 1 (2015-2023, VAZ-2180)
• Checking the level and replacing the engine oil and filter Lada Largus 1 (2012-2023)
• Checking the oil level in the engine oil pan Lada X-Ray 1 (2015-2022)
Link to this article in various formats
Reviews and comments of visitors
No comments yet


Add up two numbers: 41 + 23


Kalina Sedan (2004-2013) 
  • General information
  • Vehicle device
  • Operation and maintenance
  • Faults en route
  • Power unit
  • Engine repair
  • Cooling and lubrication system
  • Exhaust system
  • Supply system
  • Ignition and control
  • Transmission
  • Clutch and drive shafts
  • Car gearbox
  • Chassis (running gear)
  • Front suspension
  • Rear suspension
  • Steering
  • Brake system
  • Body and interior
  • Exterior (external elements)
  • Interior (internal elements)
  • Doors, locks and windows
  • Electrical equipment
  • Equipment and devices
  • Power devices
  • Lighting and signaling
  • Heating and ventilation
Kalina Hatchback (2004-2013) 
  • General information
  • Vehicle Details
  • Maintenance
  • Troubleshooting
  • Power unit
  • Engine repair
  • Cooling system
  • Supply system
  • Control system
  • Exhaust system
  • Transmission
  • Clutch
  • Car gearbox
  • Drive shafts
  • Chassis (running gear)
  • Wheels and tires
  • Front suspension
  • Rear suspension
  • Steering
  • Brake system
  • Body and interior
  • Exterior (external elements)
  • Interior (internal elements)
  • Doors, locks and windows
  • Electrical equipment
  • Equipment and devices
  • Power devices
  • Lighting and signaling
  • Electrical circuits
LadaMan.ru © 2018–2026 | Mobile version | About Lada | Sitemap: EN BG BY UA RS HR RO PL SK HU | Contacts with admin | | Add to bookmarks
Kalina Hatchback (2004-2013) | Kalina Sedan (2004-2013) | Granta 1 (2011-2023) | Priora 1 (2007-2018) | Vesta 1 (2015-2023) | Largus 1 (2012-2023) | X-Ray 1 (2015-2022) |
This site uses cookies to ensure everything runs smoothly.