
Car repair AvtoVAZ Car repair Renault Car repair Hyundai Car repair Ford Car repair Volkswagen Car repair Audi Car repair Chevrolet
English Русский
Български
Беларускі
Український
Српски
Hrvatski
Română
Polski
Slovenský
Magyar
articles sitemap contacts bookmark
LadaMan.ru


Kalina Granta Priora Vesta Largus XRAY
Vesta 1 (2015-2023, VAZ-2180)

Electric cooling fan — removal, inspection and replacement (Vesta 2180)

  • Main
  • Vesta
  • Vesta 1
  • Power unit
  • Cooling system
  • Electric cooling fan — removal, inspection and replacement
0
Removing the fan is necessary when replacing it, as well as for cleaning or replacing the cooling system radiator.

Warning! The electric fan turns on automatically regardless of the position of the key in the ignition switch. To avoid injury when performing work, do not allow hands or other body parts to enter the rotation zone of the electric fan impeller. Before working near an electric fan, it is recommended to disconnect the wire terminal from the negative terminal of the battery (see "Preparing the car for maintenance and repair").


To complete the work you will need two pieces of wire 0.5-0.7 m long and two thin pieces of PVC tube 10 mm long, a multimeter.

It is more convenient to carry out the work on an inspection ditch or overpass.

Checking the fan motor


1. Place the vehicle on an inspection ditch or overpass and prepare it for work (see "Preparing the car for maintenance and repair").

2. Make sure that fuse F79 (40A) of the electric fan power supply circuit installed in the engine compartment is in good condition (see "Fuse and relay box").
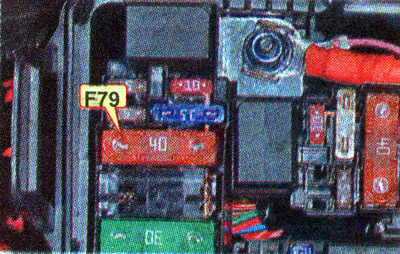
2. Make sure that fuse F79 (40A) of the electric fan power supply circuit installed in the engine…


3. Remove the engine splash guard (see "Engine Mudguard - Removal and Installation").


4. Disconnect the wire harnesses from the electric fan casing.
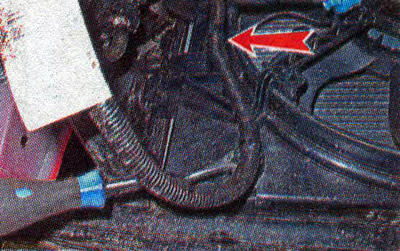
4. Disconnect the wire harnesses from the electric fan casing.


5. After releasing the lock...
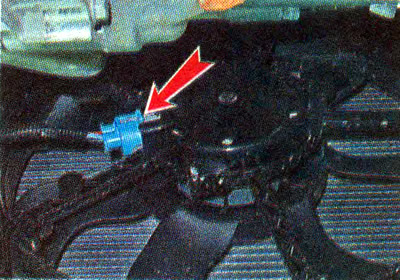
5. After releasing the lock...


...disconnect the wiring harness from the electric fan.
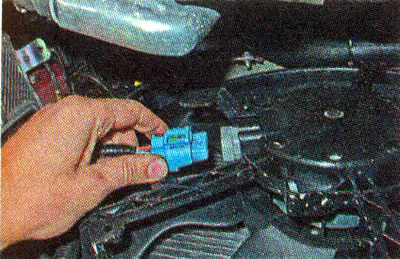
...disconnect the wiring harness from the electric fan.


6. We check the condition of the terminal block by visual inspection. If oxides are detected, we treat the terminals with a cleaning agent to protect electrical contacts.


7. Disconnect the wire connectors from the control unit (see above).
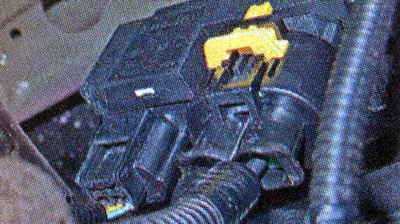
7. Disconnect the wire connectors from the control unit (see above).


8. On the right side of the electric fan casing, press the lock...
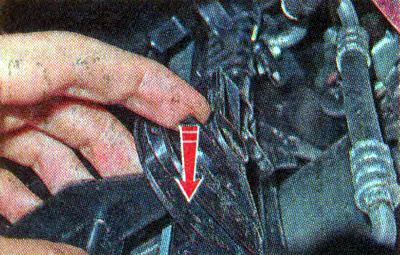
8. On the right side of the electric fan casing, press the lock...


...we move the casing back and then up, disengaging it from the radiator on the right.
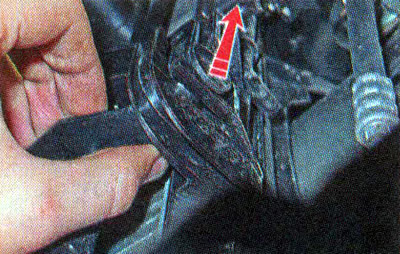
...we move the casing back and then up, disengaging it from the radiator on the right.


9. In a similar manner, disconnect the electric fan casing from the radiator.
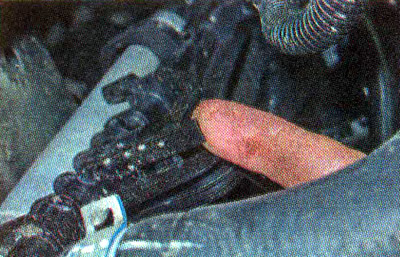
9. In a similar manner, disconnect the electric fan casing from the radiator.


10. Remove the electric fan downwards together with the casing.
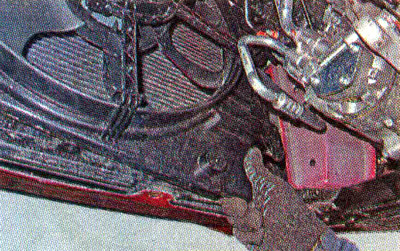


10. Remove the electric fan downwards together with the casing.


11. Place sections of PVC tube onto the terminals of the electric fan and connect the two bare ends of the wire to the terminals of the fan electric motor block.

12. Having connected the other ends of the wires to the terminals of the battery, we apply a voltage of 12 V to the terminals of the block.

Note: If after applying voltage to the block, the electric fan does not start working, then its electric motor is faulty. If the electric motor starts working, then the supply voltage is not supplied to the wiring harness block. Most likely, the electric fan relay circuit is faulty (see "Fuse and relay mounting block").


Note: Depending on the configuration, two fan relays may be installed in the vehicle's electrical circuit: one relay is designed to turn on the fan at low speed, and the second one at high speed.


Note: It is also possible that the electric fan does not turn on because there is no signal from the engine management system ECU to the on relay (see "Checking the technical condition of the engine management system").


13. Replace the faulty electric fan as an assembly (see below).
14. Install the electric fan in the reverse order. At the same time, we insert the electric fan casing into the grooves on the radiator at the top and bottom.
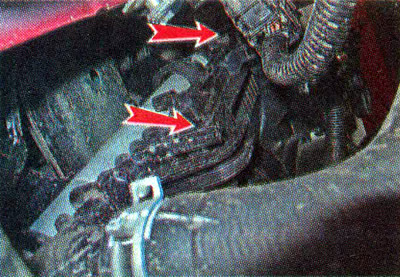


14. Install the electric fan in the reverse order. At the same time, we insert the electric fan…


Note: The electric fan in the original configuration is supplied as a complete spare part.


15. Make sure that the fan impeller does not touch the radiator while rotating.

Recommendation. If there is no clearance, the impeller will rub against the radiator, which may cause a malfunction. To move the electric fan away from the radiator a little, you can place washers under its casing, putting them on the mounting screws.


16. Install the engine mudguard (see "Engine Mudguard - Removal and Installation").


This article is available at russian, bulgarian, belarusian, ukrainian, serbian, croatian, romanian, polish, slovak, hungarian
This article has been reviewed: Kirill Dementyev
Share with friends:
◀ Previous
Lada Vesta 1: Cooling system
Next ▶

Electric Fan Control Unit — replacement
Coolant Pump — replacement
Thermostat — replacement
Expansion tank — removal and installation
Coolant — replacement
Engine cooling system radiator — removal and installation
More articles with information from manuals for Lada:

• Design of the electric fan of the cooling system Lada Kalina Sedan (2004-2013, VAZ-1118)
• Engine cooling system Lada Granta 1 (2011-2023, VAZ-2190)
• Design of the electric fan of the engine cooling system Lada Priora 1 (2007-2018, VAZ-2170)
• Electric fan of the engine cooling system Lada Largus 1 (2012-2023)
• Locking and unlocking doors with electric door lock drives deactivated Lada X-Ray 1 (2015-2022)
Link to this article in various formats
Reviews and comments of visitors
No comments yet


Add up two numbers: 17 + 42


Vesta 1 (2015-2023) 
  • General information
  • Governing bodies
  • User manual
  • Maintenance
  • Troubleshooting
  • Power unit
  • Engine repair
  • Control system
  • Supply system
  • Cooling system
  • Exhaust system
  • Transmission
  • Clutch
  • Mechanical gearbox
  • Automatic gearbox
  • Drive shafts
  • Chassis (running gear)
  • Wheels, tires and hubs
  • Front suspension
  • Rear suspension
  • Steering
  • Brake system
  • Body and interior
  • Exterior (external elements)
  • Doors, locks and windows
  • Heating and ventilation
  • Electrical equipment
  • Equipment and devices
  • Power devices
  • Breakers and switches
  • Lighting and signaling
  • Electrical circuits
LadaMan.ru © 2018–2026 | Mobile version | About Lada | Sitemap: EN BG BY UA RS HR RO PL SK HU | Contacts with admin | | Add to bookmarks
Kalina Hatchback (2004-2013) | Kalina Sedan (2004-2013) | Granta 1 (2011-2023) | Priora 1 (2007-2018) | Vesta 1 (2015-2023) | Largus 1 (2012-2023) | X-Ray 1 (2015-2022) |
This site uses cookies to ensure everything runs smoothly.