Car repair AvtoVAZ Car repair Renault Car repair Hyundai Car repair Ford Car repair Volkswagen Car repair Audi Car repair Chevrolet
English Русский
Български
Беларускі
Український
Српски
Hrvatski
Română
Polski
Slovenský
Magyar
articles sitemap contacts bookmark
LadaMan.ru


Kalina Granta Priora Vesta Largus XRAY
Vesta 1 (2015-2023, VAZ-2180)

Low Brake Fluid Sensor — Checking and Replacing (Vesta 2180)

  • Main
  • Vesta
  • Vesta 1
  • Electrical equipment
  • Equipment and devices
  • Low Brake Fluid Sensor — Checking and Replacing
0
The brake fluid level sensor is installed in the master cylinder reservoir. When the brake fluid level drops below the permissible minimum, the sensor signals and the corresponding indicator lamp on the instrument panel is turned on (see "Instrument panel").

It is necessary to make sure that the sensor is working properly if it is found that when the brake fluid level drops to the MIN mark and below, the control lamp does not light up, and if it is faulty, replace it. The sensor is replaced together with the brake master cylinder reservoir.

It is advisable to check the functionality of the brake fluid level sensor at each vehicle service performed in accordance with the maintenance schedule. If the lamp remains constantly lit despite a sufficient brake fluid level, it is necessary to check the electrical circuit connecting the sensor to the instrument panel (see "Checking and repairing electrical circuits").

To complete the work you will need a multimeter.

Sequence of execution


1. Prepare the car for work (see "Preparing the car for maintenance and repair").

2. Make sure that the parking brake is released (see "Parking brake lever").

3. If the level in the tank is below the MIN mark (see "Checking the brake fluid level") turn on the ignition, the indicator light for the parking brake and brake system malfunction should light up on the instrument panel.

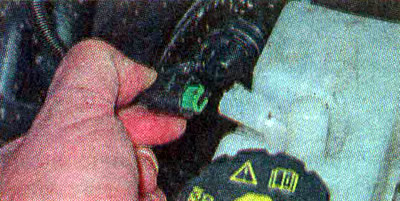
4. If the indicator lamp does not light, press the lock and disconnect the wiring harness connector from the sensor. Using a piece of wire, we close the contacts of the wiring harness connector. If the lamp lights up, the sensor is faulty. If the lamp does not light, the sensor power supply circuit is faulty (open circuit).


4. If the indicator lamp does not light, press the lock and disconnect the wiring harness connector…


5. If the brake fluid level is normal (see "Checking the brake fluid level"). Turn on the ignition, the indicator lamp for the parking brake and brake system malfunction on the instrument panel should light up for two seconds and go out.

6. If the lamp continues to burn, press the lock and disconnect the wiring harness connector from the sensor. If the lamp goes out after this, then the sensor is faulty.

If the lamp continues to burn, then the instrument panel is probably faulty, the electrical circuit is faulty (short circuit) connections to the instrument panel.

7. Using a rubber bulb, remove the brake fluid from the reservoir. To prevent air from entering the brake system, do not press the brake pedal if there is no fluid in the reservoir.

8. Using the TORX E7 key, unscrew the fastening screw, remove it and remove the tank.
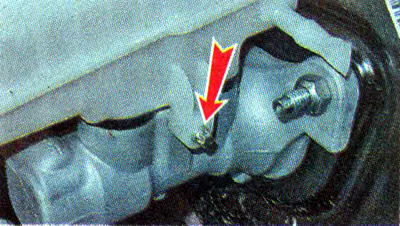
8. Using the TORX E7 key, unscrew the fastening screw, remove it and remove the tank.


9. Install a new reservoir and add brake fluid to it.


This article is available at russian, bulgarian, belarusian, ukrainian, serbian, croatian, romanian, polish, slovak, hungarian
This article has been reviewed: Kirill Dementyev
Share with friends:
◀ Previous
Lada Vesta 1: Equipment and devices
Next ▶

Oil Pressure Sensor — replacement
Control and measuring instruments and sensors
Replacing fuses and relays
Fuse and relay mounting block
Checking the relay for proper operation
Outside Air Temperature Sensor — Removal and Installation
Windscreen wiper and washer — general information
Windscreen wiper — troubleshooting
Windscreen wiper — removal and installation
Windscreen washer pump — removal and installation
More articles with information from manuals for Lada:

• Low Brake Fluid Sensor — Checking and Replacing Lada Kalina Hatchback (2004-2013, VAZ-1119)
• Low Brake Fluid Sensor — Checking and Replacing Lada Granta 1 (2011-2023, VAZ-2190)
• Checking the level and adding brake fluid to the master cylinder… Lada Priora 1 (2007-2018, VAZ-2170)
• Replacing brake fluid Lada Largus 1 (2012-2023)
• Checking the fluid level in the brake hydraulic reservoir Lada X-Ray 1 (2015-2022)
Link to this article in various formats
Reviews and comments of visitors
No comments yet


Add up two numbers: 13 + 35


Vesta 1 (2015-2023) 
  • General information
  • Governing bodies
  • User manual
  • Maintenance
  • Troubleshooting
  • Power unit
  • Engine repair
  • Control system
  • Supply system
  • Cooling system
  • Exhaust system
  • Transmission
  • Clutch
  • Mechanical gearbox
  • Automatic gearbox
  • Drive shafts
  • Chassis (running gear)
  • Wheels, tires and hubs
  • Front suspension
  • Rear suspension
  • Steering
  • Brake system
  • Body and interior
  • Exterior (external elements)
  • Doors, locks and windows
  • Heating and ventilation
  • Electrical equipment
  • Equipment and devices
  • Power devices
  • Breakers and switches
  • Lighting and signaling
  • Electrical circuits
LadaMan.ru © 2018–2026 | Mobile version | About Lada | Sitemap: EN BG BY UA RS HR RO PL SK HU | Contacts with admin | | Add to bookmarks
Kalina Hatchback (2004-2013) | Kalina Sedan (2004-2013) | Granta 1 (2011-2023) | Priora 1 (2007-2018) | Vesta 1 (2015-2023) | Largus 1 (2012-2023) | X-Ray 1 (2015-2022) |
This site uses cookies to ensure everything runs smoothly.