
Car repair AvtoVAZ Car repair Renault Car repair Hyundai Car repair Ford Car repair Volkswagen Car repair Audi Car repair Chevrolet
English Русский
Български
Беларускі
Український
Српски
Hrvatski
Română
Polski
Slovenský
Magyar
articles sitemap contacts bookmark
LadaMan.ru


Kalina Granta Priora Vesta Largus XRAY
Priora 1 (2007-2018, VAZ-2170)

Replacing the working fluid in the brake system (Priora 2170)

  • Main
  • Priora
  • Priora 1
  • General information
  • Maintenance
  • Replacing the working fluid in the brake system
0
Replace the brake fluid in the brake hydraulic drive every 45 thousand km or 3 years of operation (whichever comes first).

To fill the system, use glycol brake fluids with parameters according to FMVSS 116 not lower than DOT-3.

Before replacing the brake fluid, check the hydraulic drive for leaks (see "Checking the tightness of the brake hydraulic drive") and troubleshoot.

You will need: an 8 mm spanner, brake fluid, a flexible tube, a container for collecting brake fluid, and a clean rag.

Warning! 1. Take precautions when working with brake fluid: it is toxic. If brake fluid gets on wires, plastic or painted body parts, it may cause damage. Therefore, always place clean rags underneath when pouring. If liquid gets on parts, wipe them off immediately with a clean cloth.


Caution! 2. Use only brake fluid recommended by the manufacturer.


Attention! 3. Do not reuse the fluid drained from the system: it is contaminated, saturated with air and moisture. Always add only new fluid of the same brand that was previously added to the system.


Attention! 4. Brake fluid is hygroscopic (absorbs moisture from the surrounding air), therefore it cannot be stored in an open container.
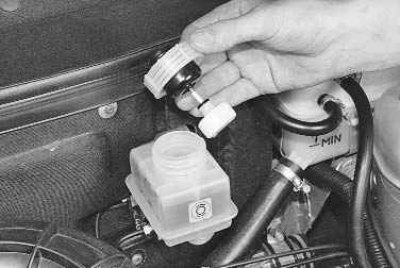

1. Unscrew the cap of the master cylinder reservoir and wipe the float with a clean cloth. Be…


1. Unscrew the cap of the master cylinder reservoir and wipe the float with a clean cloth. Be careful: brake fluid may drip from the float.
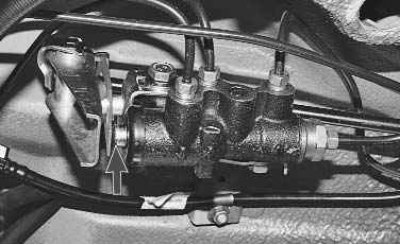


2. If the rear wheels are raised, first unlock the rear brake pressure regulator by inserting a…


2. If the rear wheels are raised, first unlock the rear brake pressure regulator by inserting a screwdriver between the plate and the piston. Don't forget to take it out when you're done.
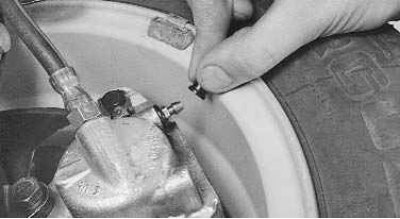
3. Clean the right rear brake release valve from dirt. Remove the rubber protective cap from the…


3. Clean the right rear brake release valve from dirt. Remove the rubber protective cap from the valve.

4. Put on the rubber hose (it is recommended to use a transparent hose to see the state of the flowing liquid) onto the valve nipple and immerse the end of the hose in a clean transparent container.

5. The assistant should press the brake pedal sharply 4-5 times (with an interval of 1-2 seconds between presses). After the last pumping, the pedal should be kept pressed.
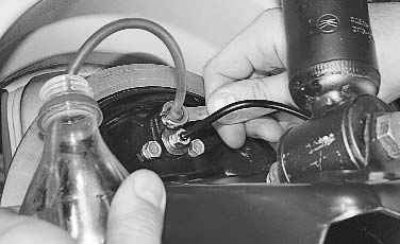
6. Loosen the air release valve 1/2–3/4 of a turn. Old (dirty) brake fluid will start to flow out…


Material was taken from the website LadaMan


6. Loosen the air release valve 1/2–3/4 of a turn. Old (dirty) brake fluid will start to flow out of the hose. In this case, the brake pedal should smoothly reach the stop. Once the liquid stops flowing, close the air release valve.
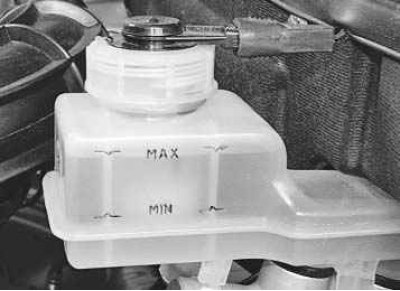
7. Constantly monitor the fluid level in the reservoir, not allowing it to fall below the «MIN»…


7. Constantly monitor the fluid level in the reservoir, not allowing it to fall below the "MIN" mark, and add new brake fluid if necessary. Repeat steps 5 and 6 until new (clean) brake fluid begins to flow out of the hose.

8. In the same way, replace the brake fluid in the left front brake mechanism, and then in the second circuit (first in the left rear brake mechanism, then in the right front).

9. Press the brake pedal several times. The pedal travel and resistance should be constant with each press. If these conditions are not met, then air has entered the brake system and it needs to be bled (see "Bleeding the hydraulic brake system").

10. After replacing the brake fluid, be sure to put the protective caps on the air release valves.

11. Add brake fluid to the reservoir up to the "MAX" mark and tighten the cap.


This article is available at russian, bulgarian, belarusian, ukrainian, serbian, croatian, romanian, polish, slovak, hungarian
This article has been reviewed: Vladislav Voloshin
Share with friends:
◀ Previous
Lada Priora 1: Maintenance
Next ▶

Gearbox oil change
Replacing the coolant
Cleaning the crankcase ventilation system
Changing engine oil and oil filter
Replacing the timing belt
Replacing the air filter element
Replacing the fuel filter
Replacing the filter of the ventilation and heating system of the cabin
Replacement and maintenance of spark plugs
Checking and adjusting the parking brake drive
More articles with information from manuals for Lada:

• Low Brake Fluid Sensor — Checking and Replacing Lada Kalina Hatchback (2004-2013, VAZ-1119)
• Low Brake Fluid Sensor — Checking and Replacing Lada Granta 1 (2011-2023, VAZ-2190)
• Replacing brake fluid Lada Vesta 1 (2015-2023, VAZ-2180)
• Replacing brake fluid Lada Largus 1 (2012-2023)
• Bleeding the hydraulic brake system, replacing the fluid Lada X-Ray 1 (2015-2022)
Link to this article in various formats
Reviews and comments of visitors
No comments yet


Add up two numbers: 17 + 15


Priora 1 (2007-2018) 
  • General information
  • Vehicle device
  • User manual
  • Faults en route
  • Maintenance
  • Power unit
  • Engine repair
  • Cooling and lubrication system
  • Supply system
  • Exhaust system
  • Transmission
  • Clutch
  • Car gearbox
  • Drive shafts
  • Chassis (running gear)
  • Car suspension
  • Steering
  • Brake system
  • Body and interior
  • Exterior (external elements)
  • Interior (internal elements)
  • Doors, locks and windows
  • Electrical equipment
  • Equipment and devices
  • Power devices
  • Lighting and signaling
  • Cooling and heating
  • Electrical circuits
LadaMan.ru © 2018–2026 | Mobile version | About Lada | Sitemap: EN BG BY UA RS HR RO PL SK HU | Contacts with admin | | Add to bookmarks
Kalina Hatchback (2004-2013) | Kalina Sedan (2004-2013) | Granta 1 (2011-2023) | Priora 1 (2007-2018) | Vesta 1 (2015-2023) | Largus 1 (2012-2023) | X-Ray 1 (2015-2022) |
This site uses cookies to ensure everything runs smoothly.