
Car repair AvtoVAZ Car repair Renault Car repair Hyundai Car repair Ford Car repair Volkswagen Car repair Audi Car repair Chevrolet
English Русский
Български
Беларускі
Український
Српски
Hrvatski
Română
Polski
Slovenský
Magyar
articles sitemap contacts bookmark
LadaMan.ru


Kalina Granta Priora Vesta Largus XRAY
Priora 1 (2007-2018, VAZ-2170)

Replacing the fuel filter (Priora 2170)

  • Main
  • Priora
  • Priora 1
  • General information
  • Maintenance
  • Replacing the fuel filter
0
The manufacturer recommends replacing the fine fuel filter every 30,000 km. However, its condition depends on the quality of the gasoline: the dirtier the gasoline, the faster the filter becomes clogged. Jerks when driving a car, first at high speeds and then at low speeds, most likely indicate a clogged filter. The increased noise level of the electric fuel pump also indicates a decrease in the filter's throughput capacity.

The fuel filter is installed at the bottom in a bracket fixed to the fuel tank, so it is more convenient to work on a vehicle installed on a lift or inspection pit.

You will need a 10 mm wrench.

1. Reduce the pressure in the fuel supply system (see "Loss of fuel pressure in the engine fuel system").
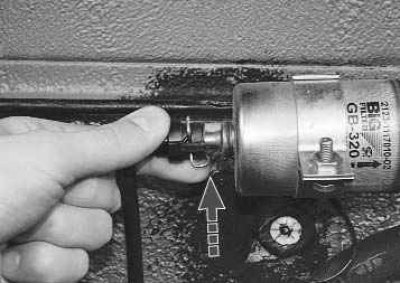
2. After pressing the spring lock…
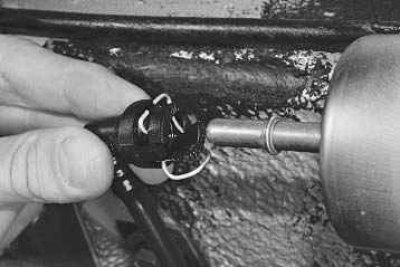

2. After pressing the spring lock…

3. …disconnect the fuel pipe tip from the fuel filter fitting on one side…
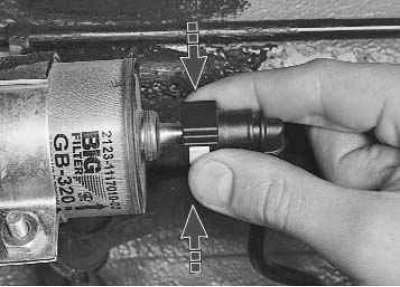

3. …disconnect the fuel pipe tip from the fuel filter fitting on one side…


4. …and, squeezing the plastic fasteners on both sides…
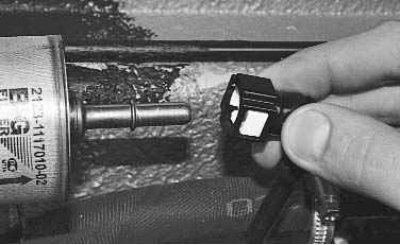

4. …and, squeezing the plastic fasteners on both sides…

5. …disconnect the tip of the second fuel pipe from the second fuel filter fitting on the other…


5. …disconnect the tip of the second fuel pipe from the second fuel filter fitting on the other side.

Caution! Place a container under the tips to catch any leaking gasoline.


6. Check the condition of the sealing rings in the tube ends. Replace rings that are torn or have lost elasticity.

Note: The o-rings are located deep in the tips. In addition, the tips are made of rather brittle plastic, so sometimes they break when trying to remove the sealing rings. Therefore, if the sealing rings become loose, we recommend replacing the tubes together with the tips.
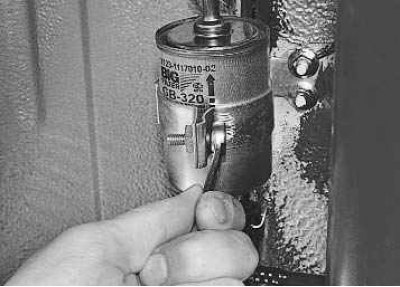

7. Loosen the tightening bolt of the fuel filter mounting bracket…
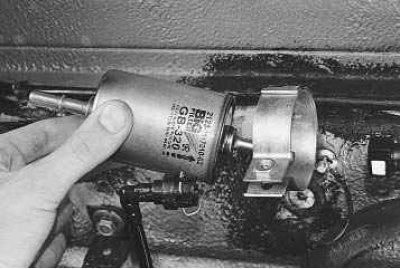

7. Loosen the tightening bolt of the fuel filter mounting bracket…


8. …and remove the filter from the bracket.
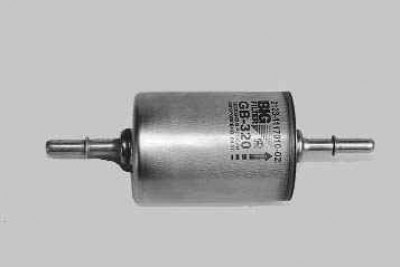

8. …and remove the filter from the bracket.

Note: Purchase a new filter exactly the same as the old one (pay attention to the markings),…


[Taken from the website ladaman.ru]

Note: Purchase a new filter exactly the same as the old one (pay attention to the markings), because there are filters on sale with different designs of fittings for connecting hoses.
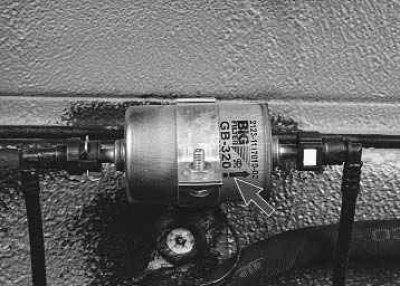

9. Install the new fuel filter in the reverse order of removal, so that the arrow on its housing…


9. Install the new fuel filter in the reverse order of removal, so that the arrow on its housing points in the direction of fuel flow. Connect the fuel hose tips to the filter by moving along the fittings until the spring clamps snap into place.

Attention! After installing the fuel filter, be sure to check with the engine running for any gasoline leaks in the connections of the fuel filter to the fuel pipes and, if necessary, repeat the operation of connecting the pipes until they are securely fixed. If after this the leaks from the connections are not eliminated, replace the rubber sealing rings of the fuel pipe ends. It should be noted that the ends of the tubes are quite fragile and sometimes break when trying to remove the sealing rings from them. Therefore, we recommend replacing the hose assemblies to eliminate fuel leaks.


This article is available at russian, bulgarian, belarusian, ukrainian, serbian, croatian, romanian, polish, slovak, hungarian
This article has been reviewed: Vladislav Voloshin
Share with friends:
◀ Previous
Lada Priora 1: Maintenance
Next ▶

Replacing the air filter element
Replacing the working fluid in the brake system
Gearbox oil change
Replacing the coolant
Cleaning the crankcase ventilation system
Replacing the filter of the ventilation and heating system of the cabin
Replacement and maintenance of spark plugs
Checking and adjusting the parking brake drive
Checking and adjusting the throttle cable
Checking and adjusting the clutch release drive
More articles with information from manuals for Lada:

• Replacing the fuel filter Lada Kalina Sedan (2004-2013, VAZ-1118)
• Air filter — replacing the filter element Lada Granta 1 (2011-2023, VAZ-2190)
• Air filter — replacing the filter element Lada Vesta 1 (2015-2023, VAZ-2180)
• Replacing the fuel filter, pump and fuel level sensor Lada Largus 1 (2012-2023)
• Replacing the fuel filter Lada X-Ray 1 (2015-2022)
Link to this article in various formats
Reviews and comments of visitors
No comments yet


Add up two numbers: 49 + 10


Priora 1 (2007-2018) 
  • General information
  • Vehicle device
  • User manual
  • Faults en route
  • Maintenance
  • Power unit
  • Engine repair
  • Cooling and lubrication system
  • Supply system
  • Exhaust system
  • Transmission
  • Clutch
  • Car gearbox
  • Drive shafts
  • Chassis (running gear)
  • Car suspension
  • Steering
  • Brake system
  • Body and interior
  • Exterior (external elements)
  • Interior (internal elements)
  • Doors, locks and windows
  • Electrical equipment
  • Equipment and devices
  • Power devices
  • Lighting and signaling
  • Cooling and heating
  • Electrical circuits
LadaMan.ru © 2018–2026 | Mobile version | About Lada | Sitemap: EN BG BY UA RS HR RO PL SK HU | Contacts with admin | | Add to bookmarks
Kalina Hatchback (2004-2013) | Kalina Sedan (2004-2013) | Granta 1 (2011-2023) | Priora 1 (2007-2018) | Vesta 1 (2015-2023) | Largus 1 (2012-2023) | X-Ray 1 (2015-2022) |
This site uses cookies to ensure everything runs smoothly.