
Car repair AvtoVAZ Car repair Renault Car repair Hyundai Car repair Ford Car repair Volkswagen Car repair Audi Car repair Chevrolet
English Русский
Български
Беларускі
Український
Српски
Hrvatski
Română
Polski
Slovenský
Magyar
articles sitemap contacts bookmark
LadaMan.ru


Kalina Granta Priora Vesta Largus XRAY
Granta 1 (2011-2023, VAZ-2190)

Air filter — replacing the filter element (Granta 2190)

  • Main
  • Granta
  • Granta 1
  • Power unit
  • Supply system
  • Air filter — replacing the filter element
0
According to the manufacturer's recommendation, we replace the air filter element after every 30,000 km.

Sequence of execution


1. Prepare the car for repairs ("Preparing the car for maintenance and repair").

2. Using a Phillips screwdriver, unscrew the four screws securing the air filter cover.
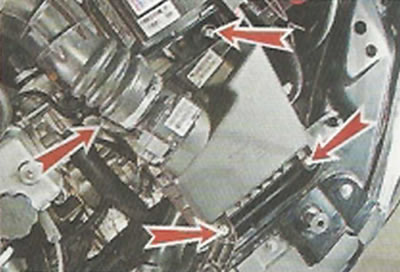
2. Using a Phillips screwdriver, unscrew the four screws securing the air filter cover.


3. Lift the lid and remove the filter element from the lid.

4. Clean the inside of the filter housing from dust.

5. Insert the new filter element into the filter housing.
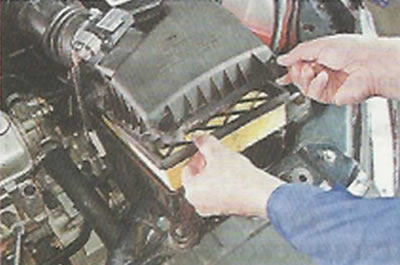
5. Insert the new filter element into the filter housing.


Warning! The filter element corrugations must be positioned along the arrows marked on the inner surface of the air filter housing.


6. Put the cover back in place.

7. Tighten the screws securing the cover.

Advice: To ensure that the housing cover tightly compresses the filter element seal, the screws should be tightened evenly, half a turn at a time, in several steps.


This article is available at russian, bulgarian, belarusian, ukrainian, serbian, croatian, romanian, polish, slovak, hungarian
This article has been reviewed: Polina Kudryashova
Share with friends:
◀ Previous
Lada Granta 1: Supply system
Next ▶

Checking the technical condition of the power supply system
Engine power supply system diagram
Description of the engine power supply system
Reference data on the engine power supply system
Air filter — removal and installation
Intake manifold receiver — removal, replacement of seals and installation
Fuel Line — Pressure Relief
Fuel filter — replacement
Fuel rail — removal, disassembly, assembly and installation
More articles with information from manuals for Lada:

• Air filter — replacing the filter element Lada Kalina Hatchback (2004-2013, VAZ-1119)
• Replacing the air filter element Lada Priora 1 (2007-2018, VAZ-2170)
• Air filter — replacing the filter element Lada Vesta 1 (2015-2023, VAZ-2180)
• Checking the level and replacing the engine oil and filter Lada Largus 1 (2012-2023)
• Replacing the air filter element Lada X-Ray 1 (2015-2022)
Link to this article in various formats
Reviews and comments of visitors
No comments yet


Add up two numbers: 40 + 30


Granta 1 (2011-2023) 
  • User manual
  • Governing bodies
  • Vehicle operation
  • Maintenance
  • Radio receiver
  • Radio receiver (option)
  • Power unit
  • Engine repair
  • Control system
  • Supply system
  • Cooling system
  • Exhaust system
  • Transmission
  • Clutch
  • Car gearbox
  • Drive shafts
  • Chassis (running gear)
  • Wheels, tires and hubs
  • Front suspension
  • Rear suspension
  • Steering
  • Brake system
  • Body and interior
  • Exterior (external elements)
  • Interior (internal elements)
  • Doors, locks and windows
  • Heating and ventilation
  • Electrical equipment
  • Equipment and devices
  • Power devices
  • Breakers and switches
  • Lighting and signaling
  • Electrical circuits
LadaMan.ru © 2018–2026 | Mobile version | About Lada | Sitemap: EN BG BY UA RS HR RO PL SK HU | Contacts with admin | | Add to bookmarks
Kalina Hatchback (2004-2013) | Kalina Sedan (2004-2013) | Granta 1 (2011-2023) | Priora 1 (2007-2018) | Vesta 1 (2015-2023) | Largus 1 (2012-2023) | X-Ray 1 (2015-2022) |
This site uses cookies to ensure everything runs smoothly.