



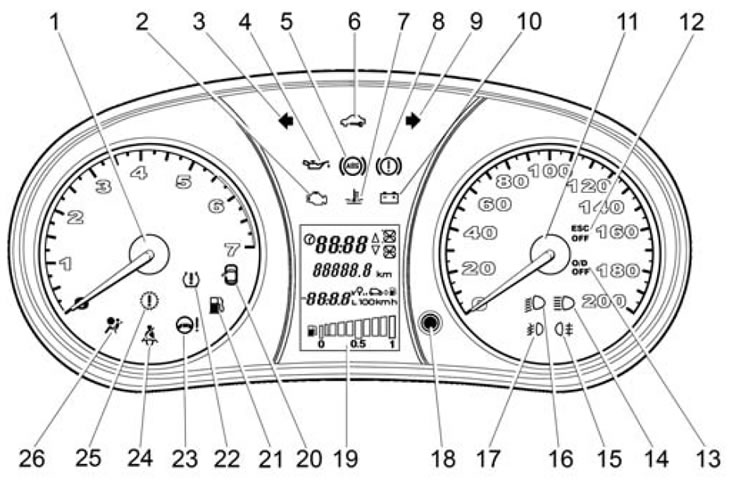
Figure 29. Instrument cluster
1 - tachometer. Shows the engine crankshaft speed (x1000 min⁻¹).
When the tachometer needle is in the red scale area, it warns of increased engine speed. To prevent engine damage, the maximum engine speed is limited by the engine's electronic control system software. When approximately 6200 min⁻¹ is exceeded, the fuel supply will be limited. Possible interruptions in engine operation and jolts in the movement of the car are not a malfunction. When the engine speed decreases, fuel supply will resume.
Also, do not allow the engine to operate when starting or while driving with the engine crankshaft speed below 800 min⁻1.
Warning! It is prohibited to operate the engine in a dangerous mode (at engine crankshaft speeds above 6200 min⁻¹ and below 800 min⁻¹).
2 - "Engine" indicator. Lights up yellow when the ignition is turned on and goes out after the engine starts.
When the engine is running, the indicator light does not mean that the engine should be stopped immediately - the controller has backup modes that allow the engine to operate in conditions close to normal.
Attention! However, the cause of the malfunction must be eliminated by a certified PSSS as quickly as possible.
3 - left turn signal indicator. Lights up with a green flashing light when the left turn signal is turned on.
4 - oil pressure alarm. Lights up red when the ignition is turned on and goes out after the engine starts.
When the engine is running, a lit indicator and an intermittent buzzer signal indicate insufficient pressure in the engine lubrication system.
Attention! If the oil pressure warning light comes on while the engine is running, stop driving immediately, turn off the engine and contact a certified service center to fix the problem, as insufficient pressure in the lubrication system will cause the engine to fail.
5 - Anti-lock braking system indicator (in a variant design). Lights up yellow when the ignition is turned on and goes out when the ABS self-test mode is complete (about 3 seconds).
Attention! In all other cases, the indicator light indicates a malfunction, the elimination of which must be carried out only at a certified PSNS.
6 - immobilizer indicator. Lights up yellow and displays the status of the immobilizer and vehicle security mode.
7 - coolant temperature indicator. When the ignition is turned on, the red light automatically lights up for 2 seconds to confirm that the alarm is working properly.
In the variant version, automatic checking is absent. In this case, confirmation of serviceability is checked in the testing mode as follows: press the reset button of the daily mileage counter (18), without releasing the button, turn on the ignition, release the button - the alarms, liquid crystal indicator and instruments should turn on for 25 seconds. If the indicator does not light up or if it turns on intermittently, it indicates that the electrical circuit needs to be checked.
Operating a vehicle with a faulty alarm is prohibited. When the operating temperature of the coolant is exceeded (more than 115°C), the indicator lights up red continuously, and the buzzer also sounds a short intermittent sound signal. Do not allow the engine to operate in overheating mode.
Warning! Do not operate a vehicle with an overheated engine. The vehicle must be taken to a certified service center to determine and eliminate the cause of engine overheating.
8 - "Brake failure" indicator. Lights up red when the ignition is turned on for about 2 seconds and goes out when the ABS system self-test mode is complete (in a variant design). The flashing mode of the indicator indicates that the parking brake is engaged. A constantly lit indicator indicates a low brake fluid level in the brake hydraulic reservoir or a failure of the electronic brake force distribution function of the ABS system (in this case it is switched on together with the ABS indicator).
When the engine is running, the activation of the indicator is duplicated by a short intermittent sound signal from the buzzer.
Warning! Do not operate the vehicle with the indicator constantly lit. In this case, you need to contact a certified PSSS.
9 - right turn signal indicator. Lights up with a green flashing light when the right turn signals are turned on.
10 - low battery indicator. Lights up red when the ignition is turned on and goes out after the engine starts.
When the engine is running, the indicator light and the buzzer sound intermittently indicate a malfunction of the vehicle's electrical system and indicate a fault in the battery charging system, weak tension or a break in the alternator drive belt, or a fault in the alternator itself.
Attention! In this case, you must contact a certified PSSS.
11 - speedometer. Shows the vehicle speed (km/h).
12 - ESC (in a variant design). Electronic stability control (ESC) indicator. Lights up yellow when the ignition is turned on for about 2 seconds and goes out when the ABS-ESC self-test mode is complete. When the vehicle is moving, it lights up and flashes 2-3 times per second if the electronic stability control or traction control function is activated. The ESC OFF indicator comes on in yellow when the electronic stability control and traction control functions are turned off, and goes out when the functions are turned on.
Attention! In all other cases, the indicator light indicates a malfunction, the elimination of which must be carried out only at a certified PSNS.
13 - O/D OFF (in a variant design). Automatic transmission upshift prohibition indicator (see section "Features of driving a car with an automatic transmission"). Lights up yellow.
14 - high beam indicator. Lights up blue when the high beam headlights are turned on.
15 - rear fog light indicator. Lights up yellow when the rear fog lights are turned on.
16 - low beam headlight indicator. Lights up green when the low beam headlights are turned on.
17 - Front fog light indicator (in a variant design). Lights up green when the front fog lights are turned on.
18 - button for switching mileage counters, resetting the daily mileage counter and turning on the time correction mode.
The mileage counters are switched by a single short press of the button (for the "standard" version, switching occurs along the "ODO" ring - "TRIP A" - "TRIP B"). To reset the daily mileage counter, press and hold the button for 2 seconds in the daily mileage indication mode (for the "standard" version, the current "TRIP A" or "TRIP B" counter is reset).
Setting the clock (standard version)
Switching to the clock setting mode is done by pressing and holding the button on the front panel of the instrument cluster for 2 seconds when the total mileage is displayed. Pressing the button on the front panel of the instrument cluster once increases the clock reading by one unit; holding the button for more than 1 second increases the clock reading by 4 units per second. If the button is not pressed for more than 5 seconds, the mode switches to minute correction (changing the minutes is similar to adjusting the clock). Further absence of pressing the button results in exiting the correction mode into the clock reading mode.
Setting the clock (standard and luxury versions)
Switching to the clock setting mode is done by pressing and holding the button on the front panel of the instrument cluster for 2 seconds when the total mileage is displayed. Time correction is performed using the ▲ buttons (minute correction) and ▼ (clock correction) on the steering column switch. To exit the correction mode, press the button on the front panel of the instrument cluster or do not press the buttons on the steering column switch for more than 5 seconds.
Attention! Rotation of the button is not allowed!
19 - liquid crystal indicator (see section "Liquid crystal display").
20 - open door alarm. Lights up red if the driver's door is fully open or (in a variant design) any of the passenger doors of a vehicle. When the door lock is opened to the first fixed position, the open door indicator in the instrument cluster may not operate, which is not a malfunction.
21 - Fuel reserve indicator. Lights up yellow when refueling is required to avoid interruptions in engine operation.
The fuel reserve indicator lights up when two or less segments of the fuel gauge are illuminated. The activation of the light indicator is accompanied by intermittent (2 repeated on/off cycles of 0.5 seconds) with a buzzer sound signal.
Simultaneous flashing of the indicator and "empty" contours of the fuel gauge segments indicates a malfunction of the fuel level sensor circuit.
22 - Tire pressure emergency warning light (in a variant design). Lights up yellow when tire pressure drops.
23 - Electric power steering indicator (in a variant design). Lights up yellow when the ignition is turned on and goes out after the engine starts.
Attention! In all other cases, the indicator light indicates a malfunction, the elimination of which must be carried out only at a certified PSNS.
24 - Seat belt warning light (in a variant design). Lights up red when the ignition is turned on if the seat belts are not fastened.
When the vehicle is moving at a speed of more than 10 km/h, the light indicator is immediately duplicated by an intermittent light (cycles of on/off/on for 0.5/0.25/0.25 seconds respectively for 90 seconds or until the seat belt is fastened or the ignition is turned off) with a buzzer sound signal; at speeds up to 10 km/h, the sound signal will turn on after 60 seconds of non-stop movement.
Warning! When driving a car, always wear a seat belt and do not transport passengers who are not wearing a seat belt!
25 - Transmission malfunction indicator (in a variant design).
26 - Airbag indicator (in a variant design). Lights up yellow when the ignition is turned on and goes out at the end of the airbag system self-test mode (in 3 seconds).
Attention! In all other cases, the indicator light indicates a malfunction, the elimination of which must be carried out only at a certified PSNS.
The instrument cluster has a self-test mode. To enable the self-test mode, you need to press the mileage counter switch button, then turn on the ignition without releasing the button (Do not start the internal combustion engine).
After turning on the ignition, the arrows of the indicating instruments (tachometer and speedometer) will begin to move from zero to maximum value (4 times), while all segments will light up on the LCD and all alarms controlled by the instrument cluster microcontroller will turn on (For the variant version of the instrument cluster without an on-board computer (the LCD display only shows the time and total/daily mileage)):
- reserve fuel, low brake fluid/handbrake, low battery, emergency oil pressure, seat belts not fastened, airbag malfunction, engine malfunction, engine overheating, immobilizer.
For the variant version of the instrument cluster with an on-board computer without displaying the outside temperature:
- overdrive warning light, ABS, transmission fault, tire fault, doors not closed.
For the variant version of the instrument cluster with an on-board computer and outside temperature display:
- high beam, low beam, ESC, ESC OFF.
If you press the mileage counter switch button in self-test mode, the LCD will display the instrument cluster software number on the top line of the LCD and the instrument cluster number on the middle line. The self-test mode will end 25 seconds after it has started or when a speed or engine crankshaft speed signal appears.