
Car repair AvtoVAZ Car repair Renault Car repair Hyundai Car repair Ford Car repair Volkswagen Car repair Audi Car repair Chevrolet
English Русский
Български
Беларускі
Український
Српски
Hrvatski
Română
Polski
Slovenský
Magyar
articles sitemap contacts bookmark
LadaMan.ru


Kalina Granta Priora Vesta Largus XRAY
Granta 1 (2011-2023, VAZ-2190)

Fuel tank cap (Granta 2190)

  • Main
  • Granta
  • Granta 1
  • User manual
  • Governing bodies
  • Fuel tank cap
0
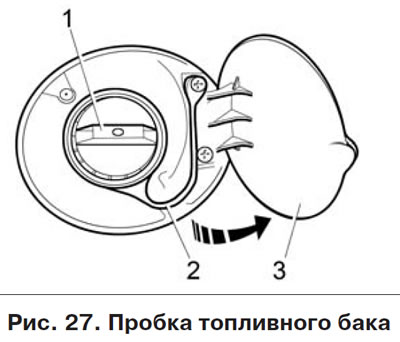
To access the plug 1 (figure 27) fuel tank, open cover 3, which is located on the right side of the car. The plug opens by turning it counterclockwise. The plug should be screwed in clockwise until characteristic clicks appear.

To access the plug 1 (figure 27) fuel tank, open cover 3, which is located on the right side of the…


Warning! When opening the fuel tank cap, fuel may be released, open slowly!


Flexible leash 2 eliminates the possibility of losing the cap when refueling the car and does not allow the lid to be closed if the cap is not screwed into the fuel tank neck. To avoid dirt getting into the fuel tank, after unscrewing, position the plug so that its inner part does not touch the dirty surface of the car body.

Warning!
  • Gasoline and its vapors are poisonous and flammable! Observe safety precautions and fire safety rules! Avoid gasoline contact with skin and clothing, and gasoline vapors - inhalation. When refueling your vehicle, avoid getting gasoline on the paintwork and rubber products.
  • It is not permitted to refuel the vehicle's fuel tank after the fuel valve has automatically shut off or after gasoline appears in the fuel tank filler neck when refueling using a valve that is not equipped with an automatic shut-off system. Failure to follow this recommendation may result in excess gasoline spilling from the fuel tank when the vehicle is parked.


This article is available at russian, bulgarian, belarusian, ukrainian, serbian, croatian, romanian, polish, slovak, hungarian
This article has been reviewed: Polina Kudryashova
Share with friends:
◀ Previous
Lada Granta 1: Governing bodies
Next ▶

Trunk lid/tailgate
Opening the hood
Salon equipment
Door control
Installation of child restraints
Instrument panel
Instrument cluster
Instrument cluster with navigation
Liquid crystal display
Gear shift indicator function
More articles with information from manuals for Lada:

• Fuel tank — removal and installation Lada Kalina Hatchback (2004-2013, VAZ-1119)
• Replacing the fuel tank and its filler pipe Lada Priora 1 (2007-2018, VAZ-2170)
• Increased fuel consumption Lada Vesta 1 (2015-2023, VAZ-2180)
• Fuel tank — removal and installation Lada Largus 1 (2012-2023)
• Fuel tank — removal and installation Lada X-Ray 1 (2015-2022)
Link to this article in various formats
Reviews and comments of visitors
No comments yet


Add up two numbers: 17 + 48


Granta 1 (2011-2023) 
  • User manual
  • Governing bodies
  • Vehicle operation
  • Maintenance
  • Radio receiver
  • Radio receiver (option)
  • Power unit
  • Engine repair
  • Control system
  • Supply system
  • Cooling system
  • Exhaust system
  • Transmission
  • Clutch
  • Car gearbox
  • Drive shafts
  • Chassis (running gear)
  • Wheels, tires and hubs
  • Front suspension
  • Rear suspension
  • Steering
  • Brake system
  • Body and interior
  • Exterior (external elements)
  • Interior (internal elements)
  • Doors, locks and windows
  • Heating and ventilation
  • Electrical equipment
  • Equipment and devices
  • Power devices
  • Breakers and switches
  • Lighting and signaling
  • Electrical circuits
LadaMan.ru © 2018–2026 | Mobile version | About Lada | Sitemap: EN BG BY UA RS HR RO PL SK HU | Contacts with admin | | Add to bookmarks
Kalina Hatchback (2004-2013) | Kalina Sedan (2004-2013) | Granta 1 (2011-2023) | Priora 1 (2007-2018) | Vesta 1 (2015-2023) | Largus 1 (2012-2023) | X-Ray 1 (2015-2022) |
This site uses cookies to ensure everything runs smoothly.