



 |
 |
 |
 |
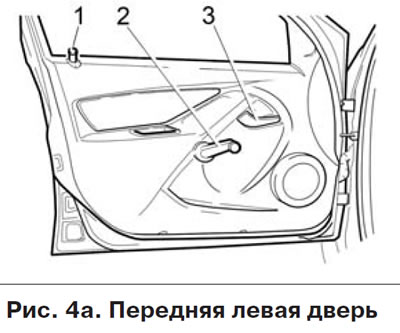
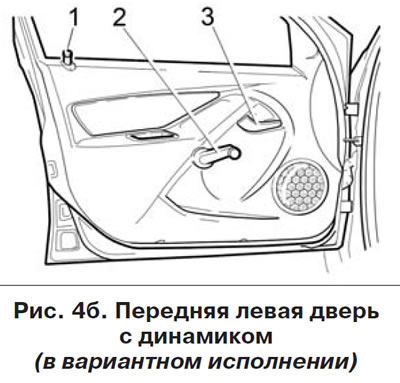
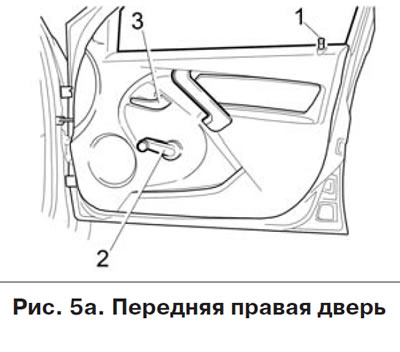
Button in the driver's door module (in a variant design) serves to simultaneously lock or unlock the car doors. Pressing this button changes the state of the door locks. For example, if the car doors were unlocked, then after pressing this button the doors are locked, and vice versa.
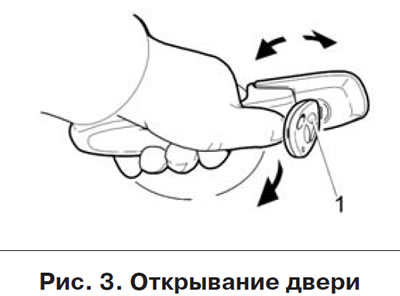
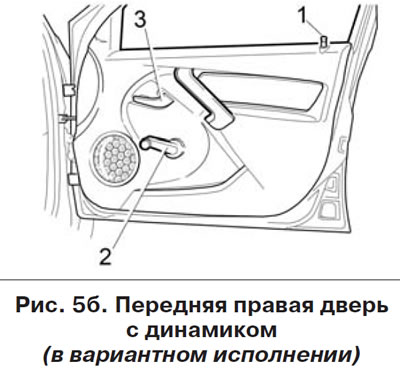
The doors are opened: from the outside - by the handle in the direction of the arrow, and from the inside - by turning the inner handle 3 towards you. If the door lock is locked, the handle has an idle stroke.
To lower and raise the front door glass, mechanical window lifters are used, which are operated by handle 2.
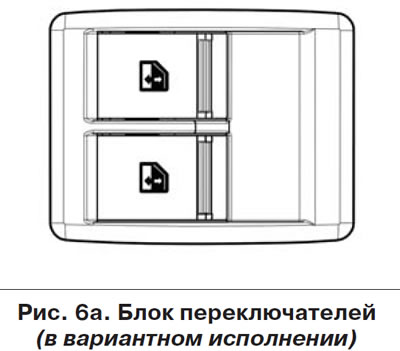
In the absence of a handle (in a variant design) electric windows are used. To raise the window you need, pull the edge of the corresponding power window switch upwards (figure 6a). To lower the window you need, press the edge of the corresponding power window switch down. After you stop pressing the key, it will automatically move to the middle position and the glass will stop in any position you choose.
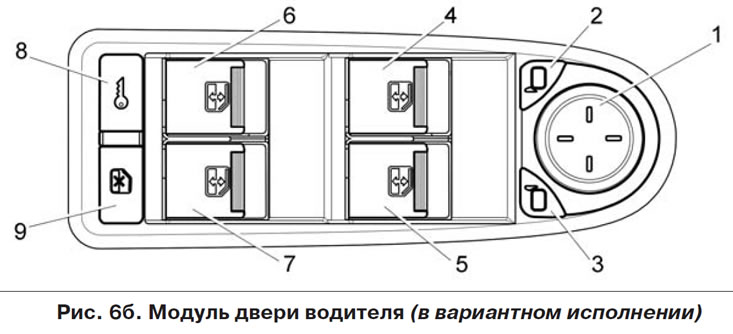
Driver's door module
Assignment of the switches of the driver's door module (DDM) in accordance with the figure 6b:
- 1 - switch (joystick) for controlling the electric drives of the outside mirrors in horizontal and vertical directions;
- 2, 3 - mirror selection buttons for control (right or left);
- 4, 7 - window lift control keys (correspond to the location of the windows in the car);
- 8 - button for locking or unlocking the side doors of the car;
- 9 - button for turning on or off the power supply for the rear window lifters.
To control the mirrors, you need to turn on the ignition and press the corresponding mirror selection button. Button 2 with the symbol
 - if you need to control the left mirror, or button 3 with the symbol
  - if you need to control the right mirror. When you press the button, the symbol in it will start to glow orange for some time, this means that you can control the selected mirror. If the backlight goes out, it means that the mirror control has stopped; if necessary, press the button again. After the ignition is switched off, the mirror can still be controlled for approximately 90 seconds if no door is opened. In any case, mirror control is only possible when buttons 2 or 3 are illuminated.
The mirror position must be controlled using joystick 1. The required mirror position must be achieved by pressing one of the marks in turn.
Operation of the window lifts with the ignition off and the door open is only possible using the remote control (see the section "Remote control system").
Raising/lowering the glass from the key in the passenger door is similar to the operation from the DMV keys with the following limitations:
- only the glass of the door in which the key is located is controlled;
- control from the key in the passenger door is prohibited at all times while the same glass or another glass on the same side with the DMV is being controlled;
- control from the rear passenger door keys is not possible if the mode for disabling their operation is enabled (see below).
To disable the power window control from the switches located in the rear doors (in a variant design) you should press button 9 in the DVM, the symbol in the button will be highlighted in orange. To restore the ability to control the electric windows from the switches located in the rear doors, press button 9 in the DMV again. The orange illumination of the symbol in the button will go out. The rear door key prohibition mode remains after the ignition is turned off/on and the system power is disconnected/connected.
It is possible to simultaneously control two electric windows located on different sides of the vehicle.
Automatic mode of raising/lowering windows from the DMV keys*.
* Automatic window lifting/lowering mode is implemented initially in the factory delivery of MDV. It is possible to disable the automatic control mode of the driver's door window lifter using a diagnostic tester at the PSSS stations.
If you press the driver's window control button in the up/down mode for no more than 1.5 seconds, then after you stop pressing the button, the window stops. If the exposure time exceeds 1.5 seconds, then after the exposure stops, the glass continues to move automatically until an obstacle is detected (see next subsection), but for a period of no more than 10 seconds.
The automatic glass movement mode stops when the glass is raised to the stop or until an obstacle is detected, when any window lift control button on the DMV is pressed, and when the ignition is turned off.
Raising/lowering the glass from the key in the passenger door is similar to the operation from the DMV keys with the following limitations:
- only the glass of the door in which the key is located is controlled;
- control from the key in the passenger door is prohibited at all times while the same glass or another glass on the same side with the DMV is being controlled;
- control from the rear passenger door keys is not possible if the mode for disabling their operation is enabled (see below).
To disable the power window control from the switches located in the rear doors (in a variant design), you should press button 9 in the DVM, the symbol in the button will be highlighted in orange. To restore the ability to control the electric windows from the switches located in the rear doors, press button 9 in the DMV again. The orange illumination of the symbol in the button will go out. The rear door key prohibition mode remains after the ignition is turned off/on and the system power is disconnected/connected.
It is possible to simultaneously control two electric windows located on different sides of the vehicle.
Obstacle recognition
The system has a mechanism for recognizing obstacles when the glass is moving. If an obstacle is detected, the glass stops until the next control action is received.
If control actions on the same window lifter in the same direction occur more often than once every 5 seconds, the obstacle recognition mechanism becomes less sensitive, up to and including its complete shutdown. The obstacle recognition mechanism is restored 5 seconds after the last control action.
Warning!
- When closing power windows, fingers and other body parts may become pinched, which may result in serious injury. Therefore, be careful when using electric windows, especially if there are children in or near the vehicle. Make sure that the glass that is being lifted does not pinch anything. If the window becomes pinched, immediately stop raising the window and turn it down.
- The driver of the vehicle is responsible for the improper use of electric windows. He must explain to passengers the rules of use and warn them of the dangers of improper use of electric windows.
- Do not allow children to operate power window switches!
- When leaving the vehicle, be sure to remove the key from the ignition switch to disable the power windows and avoid accidental injury. As a warning that the ignition key has been left in place, the immobilizer buzzer will sound when the driver's door is opened. The trill will also sound, but in a different tone, if the ignition key is removed but the parking lights are left on.
- Do not stick your hands or other body parts out of open car windows; make sure that children do not do this.
(Full article on the website: www.ladaman.ru)
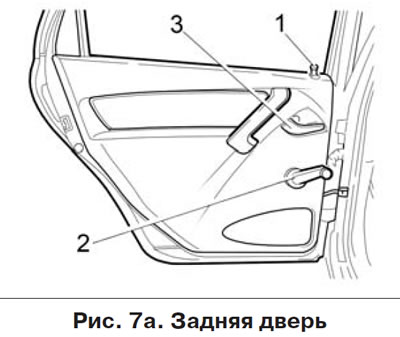
Rear doors are locked from inside the cabin by pressing the lock button 1 ("push-in") (figure 7a) in the door both when the door is open and when the door is closed.
 |
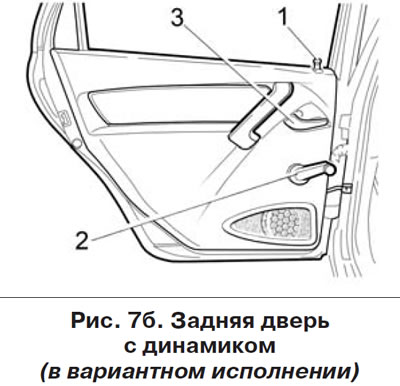 |
To lower and raise the rear door glass, mechanical window lifters are used, which are operated by handle 2.
In the absence of a handle (in a variant design) electric windows are used (see above).
The rear door glass does not go down completely.
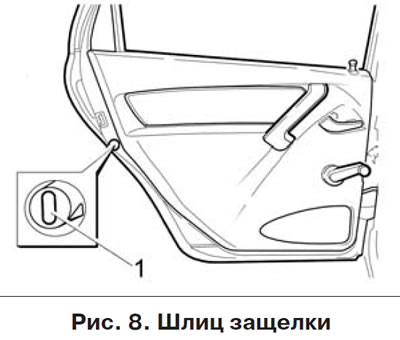
If there are children in the rear seat, we recommend using a key to turn the latch slot 1 (figure 8) approximately 450 until it stops. Moreover, in the right door the latch must be turned counterclockwise, and in the left door - clockwise. In this case, with the lock button raised, the door opens only from the outside, and the inner handle has free play. To enable the doors to be opened from the inside, turn the latch slot in the opposite direction.