



Exterior mirrors
The outside mirrors are adjusted with handle 1 (figure 16). Before starting to move, it is necessary to ensure optimal rear visibility.
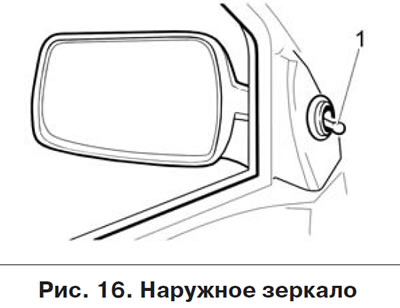
In the variant version, handle 1 is missing and the outside mirrors are adjusted by switch 1 (see figure 6b) in the driver's door module (see subsection "Driver's door module").
In the variant version, when the rear window heating is switched on, the heating of the outside mirrors is also switched on.
Interior mirror
The interior rearview mirror is adjusted by turning it around the pivot head. If you are blinded by the headlights of a vehicle moving behind you, set the mirror to the anti-glare position by pressing lever 1 (figure 17).
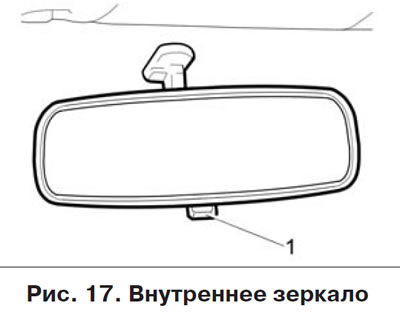
In the variant version, an internal mirror is installed without a lever 1, with a coating that provides an anti-glare effect.
Interior light
Operating mode of the interior light (figure 18a) depends on the position of switch 1.
 — the lamp is on and remains lit continuously until it is turned off. In the middle position of switch 1, the lamp is turned off.
 — the interior light turns on when the driver's door is opened and turns off when it is closed.
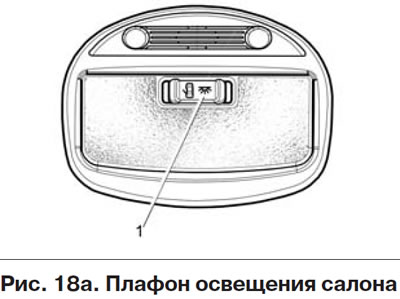
In the variant version:
— the lamp is on and remains lit continuously until it is turned off. In the middle position of switch 1, the lamp is turned off.
— the lampshade operates according to the following algorithm:
- When the ignition is on, the interior light turns on smoothly when the driver's door is opened (any of the passenger doors - in a variant design) and smoothly turns off when the driver's door is closed (all doors - in optional design).
- When the ignition is turned off, the lamp turns on and smoothly goes out after 15 seconds* if the driver's door (none of the doors are in the variant version) did not open.
When the ignition is off, the interior light comes on if the driver's door is open (any of the doors - in a variant design). After closing the driver's door (all doors - in optional design) lampshade:
- continues to burn for 25 seconds (off delay**), then gradually goes out;
- smoothly goes out when the ignition is turned on;
- smoothly goes out when the security mode is turned on (in a variant design).
* The function can be disabled on certified PSSS.
** Programmable from 0 to 60 seconds using special equipment on certified PSSS.
In the variant version, a cabin lighting unit is installed instead of the lampshade (figure 18b), which includes sections for individual lighting of the driver and front passenger seats, and a section for general interior lighting. The left and right sections of individual lighting are switched on/off by pressing the left 1 or right 3 buttons respectively.
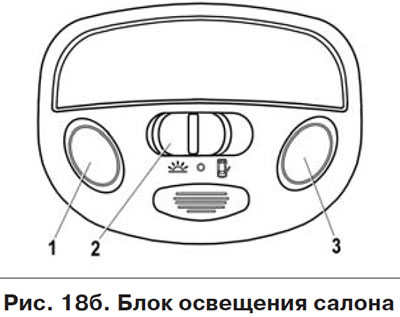
The operating mode of the interior lighting unit depends on the position of switch 2.
— the lamp is on and remains lit continuously until it is turned off.
O — the general lighting section is off.
— the lampshade operates according to the algorithm described above.
In the variant version, the cars have an energy-saving function for interior lighting devices (lamps for interior lighting, storage side box and luggage compartment), which turns off the power to these devices approximately 10 minutes after the ignition is turned off.
Sun visors
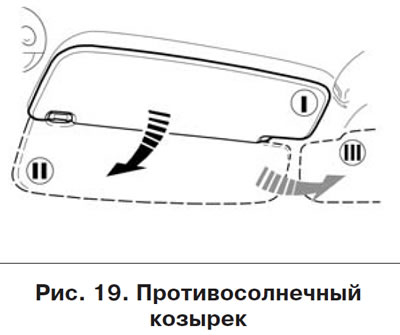
Depending on the direction of the sun's rays, the sun visors can be set from position I (figure 19) in positions II or III. In the variant version, the passenger sun visor has a cosmetic mirror on the inside.
Glove box
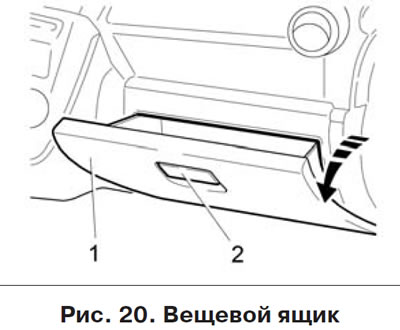
To open the glove compartment lid, pull button 2 towards you (figure 20) lock and then open cover 1.
Cartridge for connecting additional electrical equipment
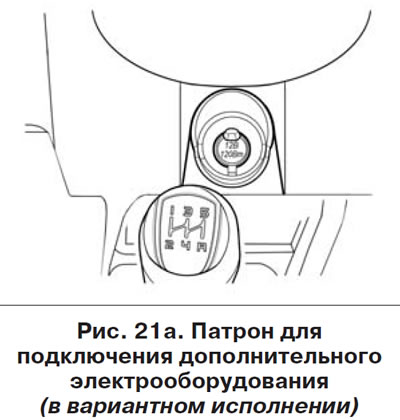
In the variant version, a socket for connecting additional electrical equipment is installed on the vehicles (figure 21a), which is used to connect only 12-volt electrical appliances with a power of no more than 120 watts.
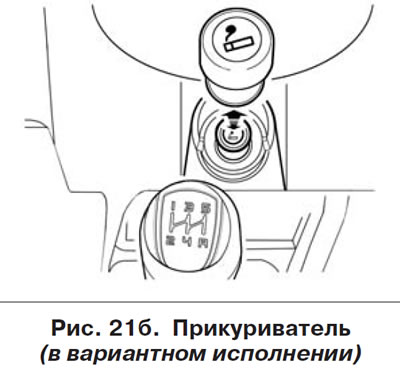
In a variant version, instead of a socket for connecting additional electrical equipment, a cigarette lighter is installed on the vehicles (figure 21b). To use the cigarette lighter, press the socket button until it locks into place. After approximately 20 seconds, the cartridge automatically returns to its original position, ready for use.
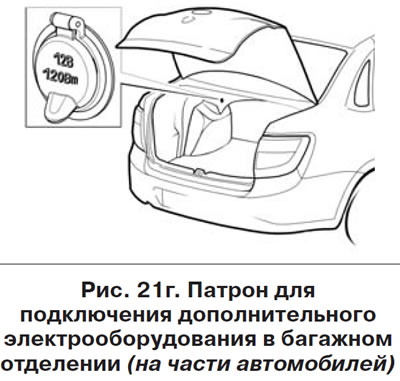
In the variant version, some vehicles are additionally equipped with a socket for connecting additional electrical equipment in the luggage compartment.
ATTENTION!
- 1. Do not insert anything into the cigarette lighter socket other than the standard moving part of the cigarette lighter.
- 2. Do not use more than one electrical appliance. Do not use dual (or more) adapters to connect vehicle electrical accessories.
- 3. Do not forcefully hold the cigarette lighter in the pressed position, this may cause it to overheat and burn out the coil. This will trip the cigarette lighter's bimetallic fuse, causing the fuse in the vehicle's fuse box to blow.
- 4. Do not clean the spiral of the moving part of the cigarette lighter with metal objects, this may damage it.
- 5. Always check that the cigarette lighter is disconnected.
- 6. When replacing, use only the types of cigarette lighters recommended for this vehicle.
- 7. The cartridge for connecting additional electrical equipment is intended for connecting only 12-volt electrical appliances with a power of no more than 120 W (10 A).
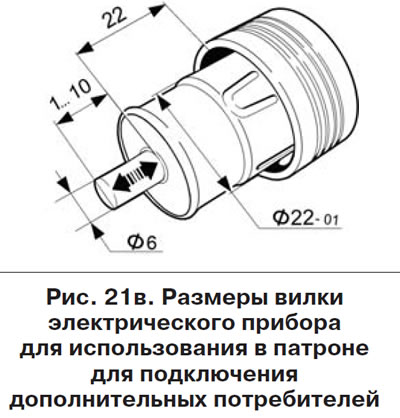
- 8. If the plug (connector) of an electrical appliance fits too loosely or too tightly into the cigarette lighter socket, this may result in poor contact or cause the plug (connector) to become stuck. Use electrical appliances only with the appropriate plugs (connectors) as shown in the figure 21st century.
- 9. Overloading the cartridge and poor contact of the plug in the cartridge may cause the fuse built into the cartridge to trip, which will temporarily disconnect the electrical accessory. If the fuse trips again, disconnect the electrical accessory to check its compliance with point 7 and figure 21c.
- 10. Using accessories that do not comply with paragraph 7 and Figure 21c may cause a short circuit in the vehicle circuit.
- 11. When leaving children unattended in a vehicle, as a precaution, always remove the moving part of the cigarette lighter from the socket.
- 12. Always insert the movable part of the cigarette lighter into the cigarette lighter socket after use.
- 13. Do not leave electrical appliances connected to the socket if the driver and passengers leave the vehicle or if the vehicle is parked (stored) for a long time.
Taken from the website: LADAman
Warning!
- 1. Do not touch the heating element of the cigarette lighter with your hands, this may cause a burn or damage the heating element.
- 2. The outlet and plug may be hot during or immediately after use.
 |
 |