



To adjust the headlights on a car, you need a hex «by 5».
1. Pre-check the air pressure in the tires and, if necessary, bring it to normal.
2. Install the car perpendicular to a smooth wall (e.g. garage) at a distance of 5 m. Place an additional weight of 75 kg on the driver's seat. Mark the screen on the wall as shown in fig. 9.5, and draw vertical lines on it: axial ABOUT and lines A, IN, passing through the points corresponding to the centers of the dipped beam lamps. These lines must be symmetrical about the center line of the vehicle. On high h, corresponding to the distance of the headlight centers from the floor, draw a line 1 and below it by 75 mm line 2 centers of light spots.
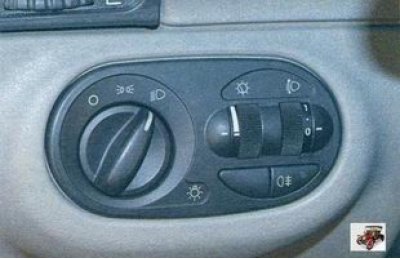
3. Turn on the dipped beam and turn the headlight control knob to the position «0» (this position corresponds to the load of a car with one driver).
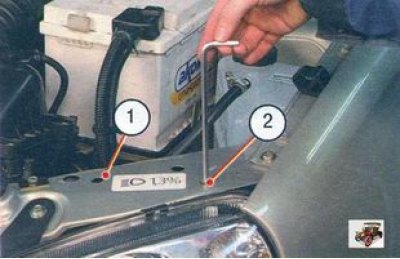
4. Open the hood and adjust with screws 1 (in the horizontal plane) and 2 (in the vertical plane) manual adjustment of the beam of light position of the light spot for each headlight on the screen, if the location of the light spots on the screen does not correspond to the figure.
5. Adjust the direction of the light spot for each headlight separately. During adjustment, cover the second headlight with an opaque material or disconnect the connector with wires from it.
6. The headlights are considered adjusted if the upper border of the left parts of the light spots coincides with the line 2, and the vertical lines A and IN pass through the intersection points of horizontal and inclined sections of light spots.
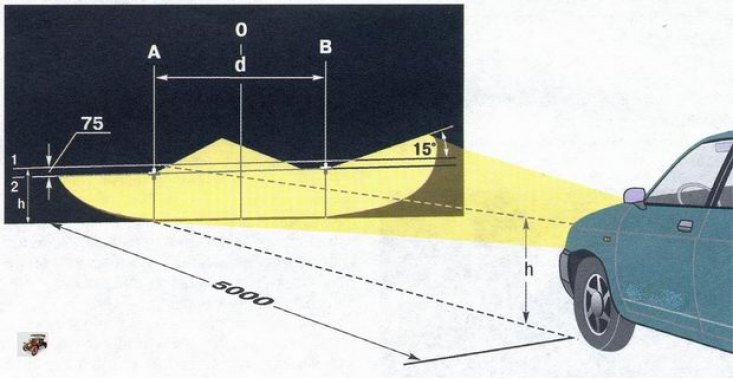
Pic. 9.5. Scheme for adjusting the headlights on a car: 1 - a horizontal line corresponding to the centers of the headlights; 2 - line passing through the centers of light spots; A, B - vertical lines corresponding to the centers of the headlights; O - center line; h is the distance from the centers of the headlights to the floor; d - distance between the centers of the headlight bulbs