
Car repair AvtoVAZ Car repair Renault Car repair Hyundai Car repair Ford Car repair Volkswagen Car repair Audi Car repair Chevrolet
English Русский
Български
Беларускі
Український
Српски
Hrvatski
Română
Polski
Slovenský
Magyar
articles sitemap contacts bookmark
LadaMan.ru


Kalina Granta Priora Vesta Largus XRAY
Granta 1 (2011-2023, VAZ-2190)

Headlight unit — light adjustment (Granta 2190)

  • Main
  • Granta
  • Granta 1
  • Electrical equipment
  • Lighting and signaling
  • Headlight unit — light adjustment
0
To complete the work you will need an assistant, as well as:
  • flat horizontal area (preferably near the wall of a house, fence or gate);
  • 5m tape measure;
  • sheet of cardboard (to cover the headlight when adjusting).

Note: It is advisable to perform adjustments at night. The car must be in running order (fully fueled and without additional cargo). Since it is not easy to find a suitable surface as a screen, it is easier to use a 1x2 m plywood board with markings applied to it. In this case, it is necessary to prepare a support or stand to install the shield vertically.


Sequence of execution


1. Place the car on a flat horizontal surface perpendicular to the surface selected as a screen and at a distance of 5 m from it.

2. Mark the screen according to the drawing.
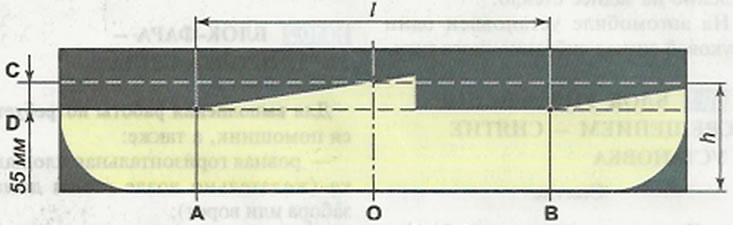
Screen layout diagram for adjusting the headlights: A - vertical line indicating the location of…

Screen layout diagram for adjusting the headlights: A - vertical line indicating the location of the center of the low beam lamp of the left headlight; B - vertical line indicating the location of the low beam lamp of the right headlight; C - horizontal line indicating the location of the low/high beam headlights; D - line indicating the height of the horizontal boundary of the light beams; O - center line; l - distance between low beam headlights; h - the distance from the surface of the platform on which the car is installed to the center of the low-beam headlights.


Note: The necessary measurements can be taken using a tape measure.


3. Check the tire pressure and, if necessary, bring it up to normal.

4. Turn the headlight corrector drive handle to position 0, which corresponds to the minimum load on the vehicle.

5. The assistant sits in the driver's seat.

Material was taken from the website: LadaMan.ru

6. Turn on the low beam headlights and cover one of the headlights, for example the right one, with a sheet of cardboard.

7. By turning the adjusting screw 1 of the left headlight, we bring the horizontal line of the light beam to line D on the screen.
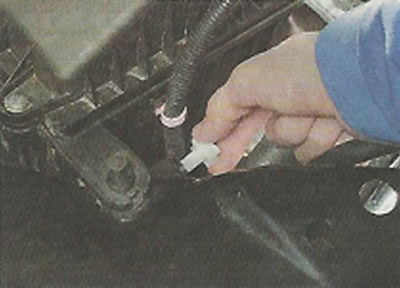
7. By turning the adjusting screw 1 of the left headlight, we bring the horizontal line of the…


Then, through the hole in the body panel, using a 6 mm Allen key, turning the adjusting screw 2, we align the break in the boundary of the light beam with line A.
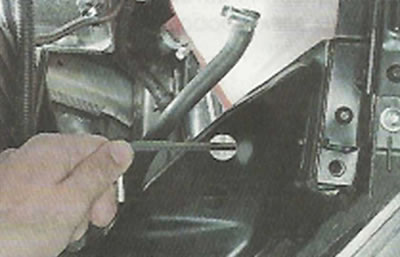
Then, through the hole in the body panel, using a 6 mm Allen key, turning the adjusting screw 2, we…


This article is available at russian, bulgarian, belarusian, ukrainian, serbian, croatian, romanian, polish, slovak, hungarian
This article has been reviewed: Polina Kudryashova
Share with friends:
◀ Previous
Lada Granta 1: Lighting and signaling
Next ▶

Lighting control unit — removal and installation
Lighting, light and sound signaling
Headlight — replacing bulbs
Headlight — removal and installation
Side turn signal — removal, bulb replacement and installation
Tail light — replacing bulbs
Tail light — removal and installation
More articles with information from manuals for Lada:

• Headlight unit — light adjustment Lada Kalina Hatchback (2004-2013, VAZ-1119)
• Electronic engine control unit (controller) Lada Priora 1 (2007-2018, VAZ-2170)
• Headlight unit — adjustment Lada Vesta 1 (2015-2023, VAZ-2180)
• Location of Unit Identification Numbers and VIN Lada Largus 1 (2012-2023)
• Headlight corrector switch, electric mirror adjustment knob Lada X-Ray 1 (2015-2022)
Link to this article in various formats
Reviews and comments of visitors
No comments yet


Add up two numbers: 25 + 29


Granta 1 (2011-2023) 
  • User manual
  • Governing bodies
  • Vehicle operation
  • Maintenance
  • Radio receiver
  • Radio receiver (option)
  • Power unit
  • Engine repair
  • Control system
  • Supply system
  • Cooling system
  • Exhaust system
  • Transmission
  • Clutch
  • Car gearbox
  • Drive shafts
  • Chassis (running gear)
  • Wheels, tires and hubs
  • Front suspension
  • Rear suspension
  • Steering
  • Brake system
  • Body and interior
  • Exterior (external elements)
  • Interior (internal elements)
  • Doors, locks and windows
  • Heating and ventilation
  • Electrical equipment
  • Equipment and devices
  • Power devices
  • Breakers and switches
  • Lighting and signaling
  • Electrical circuits
LadaMan.ru © 2018–2026 | Mobile version | About Lada | Sitemap: EN BG BY UA RS HR RO PL SK HU | Contacts with admin | | Add to bookmarks
Kalina Hatchback (2004-2013) | Kalina Sedan (2004-2013) | Granta 1 (2011-2023) | Priora 1 (2007-2018) | Vesta 1 (2015-2023) | Largus 1 (2012-2023) | X-Ray 1 (2015-2022) |
This site uses cookies to ensure everything runs smoothly.