



Air conditioning system device
The air conditioning system consists of the following main elements: compressor, condenser, evaporator and piping. The structure of the air conditioning system is shown in Figure 2-1.
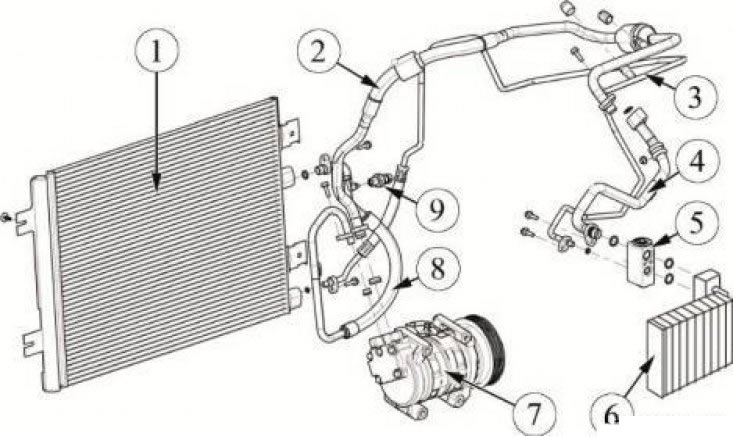
Figure 2-1 - Air conditioning system structure: 1 - capacitor; 2 - pipeline connecting the compressor to the evaporator (long part); 3 - pipeline connecting the condenser to the evaporator; 4 - pipeline connecting the compressor to the evaporator (short part); 5 - thermostatic valve; 6 - evaporator; 7 - compressor; 8 - pipeline connecting the compressor to the condenser; 9 - pressure sensor
The general diagram of the operation of the air conditioning and ventilation system circuit is shown here.
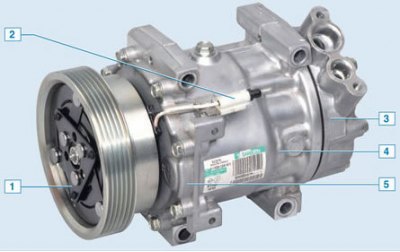
2.1. Compressor: 1 – pulley with electromagnetic clutch; 2 – output of electromagnetic clutch wires; 3 – back cover; 4 – body; 5 – front cover
Piston type compressor. The compressor creates the pressure necessary for the air conditioning system to operate and ensures the circulation of the refrigerant. The compressor is installed on the engine under the generator. Torque is transmitted to the compressor shaft from the crankshaft by a poly-V belt through an electromagnetic clutch.
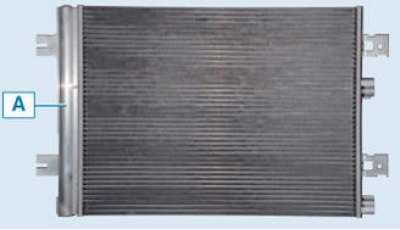
2.2. Capacitor: A – receiver-dryer
The condenser, through heat exchange with the surrounding air, cools the gaseous refrigerant, with high temperature and high pressure, condensing it into a liquid refrigerant. The condenser is installed on the radiator frame in front of the cooling system radiator.
2.3. Evaporator
The evaporator cools and dries the air in the car interior through heat exchange with the refrigerant. The evaporator unit is installed in the heater body in front of the heater radiator.
2.4. Receiver-dryer
The receiver-dryer is designed to accumulate the refrigerant in a liquid state, separating moisture and possible mechanical particles from it. The receiver-dryer is mounted on the condenser. The receiver has a built-in removable filter-dryer.
2.5. Pipelines
Pipelines connect the elements of the air conditioning system to each other using flange connections.
2.6. Thermostatic expansion valve
To regulate the flow of refrigerant from the condenser to the evaporator, a thermostatic expansion valve (TEV) is installed in front of the evaporator.
2.7. Pressure sensor
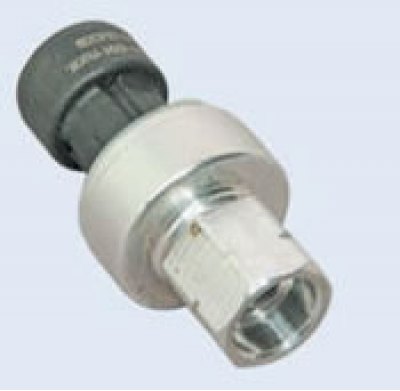
The pressure sensor (PS) is installed in the pipeline connecting the compressor and condenser. DD gives a signal to the ECU to turn the compressor off/on when there is a deviation (increase or decrease) pressure from the working value.
The source is located on the website www.LadaMan.ru
2.8. Heating, air conditioning and ventilation control unit
The air conditioning system is controlled by the heating, air conditioning and ventilation control unit (HVAC) located in the lower part of the central console of the instrument panel. The location and purpose of the control units of the control unit are shown in Figure 2-2.
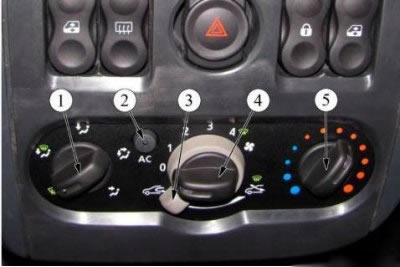
Figure 2-2 - Purpose of the controls of the heating, air conditioning and ventilation control unit: 1 - air flow direction control handle; 2 - air conditioner on/off button; 3 - recirculation control handle; 4 - air flow speed control handle; 5 - air flow temperature control handle
Caution: Only personnel who have undergone appropriate training should work on the air conditioning system.
When performing work, it is permissible to use standardized equipment and tools that are functionally similar to those specified in the manual, the use of which ensures the required productivity, safety and quality of work.
When carrying out any type of work on a vehicle that involves depressurizing the air conditioning system, completely unload the refrigerant and then load the system. Work on unloading, loading and detecting refrigerant leaks must be carried out in accordance with the operating instructions for the service equipment and leak detector.
When the engine is not running, the refrigerant must be loaded through the high-pressure circuit. The mass of the refrigerant (R134a) charged into the system is 475±35 g. If the system is not fully loaded with refrigerant, top up with the engine running and the air conditioning system switched on through the low-pressure circuit with gaseous refrigerant.
To prevent damage to the filling equipment or injury, it is strictly forbidden to open the valves on the high-pressure circuit (red service hose) when loading a working air conditioning system with refrigerant. All work with refrigerant must be performed wearing glasses with side protection.
When replacing elements of the air conditioning system, do not remove the technological plugs from the fittings until each of the elements is prepared for connection. Care should be taken when removing process plugs from air conditioning system fittings to avoid injury, as they are filled with nitrogen gas under pressure.
Attention: When replacing any of the air conditioning system components (condenser, evaporator, etc.) be sure to replace the sealing rings.
When carrying out welding work on a vehicle in close proximity to air conditioning system elements, completely discharge the refrigerant from the system.