Car repair AvtoVAZ Car repair Renault Car repair Hyundai Car repair Ford Car repair Volkswagen Car repair Audi Car repair Chevrolet
English Русский
Български
Беларускі
Український
Српски
Hrvatski
Română
Polski
Slovenský
Magyar
articles sitemap contacts bookmark
LadaMan.ru


Kalina Granta Priora Vesta Largus XRAY
Largus 1 (2012-2023)

Coolant Pressure Sensor — Removal and Installation (Largus 1)

  • Main
  • Largus
  • Largus 1
  • Body and interior
  • Heating and ventilation
  • Coolant Pressure Sensor — Removal and Installation
0
Contents: Removal ⇣ Installation ⇣
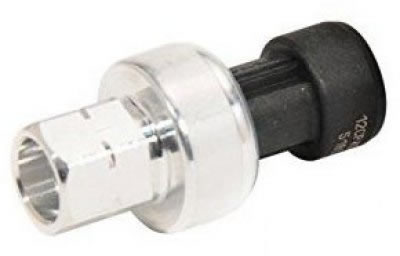
The pressure sensor is installed on the pipeline between the compressor and the air conditioner condenser. Based on the sensor signals, the engine ECU switches off the air conditioning compressor when the system is depressurized (i.e. when the pressure in the system drops to 2.0 bar) or an emergency increase in pressure in it (up to 27.0 bar) in order to protect the compressor from overloads.

The pressure sensor is installed on the pipeline between the compressor and the air conditioner…


A shut-off valve is installed in the pipeline fitting, under the pressure sensor, which closes when the sensor is unscrewed. Therefore, when replacing the pressure sensor, there will be no refrigerant leakage from the air conditioning system.

Sensor catalog number see here.

Removal


Raise the car on a lift to a height sufficient for comfortable work.

NOTE: When removing the pressure sensor, there is no need to discharge the refrigerant, since the refrigeration circuit is isolated from the environment by a shut-off valve.

Remove the front bumper (see here).

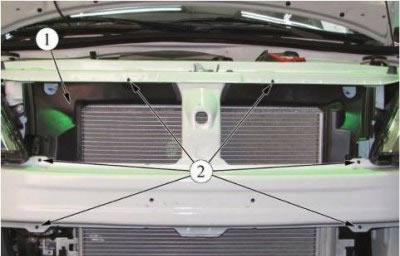
Disconnect the air deflector fastening elements 1, Figure 5-1, (screwdriver, Torx T30 bit). Remove the air deflector.

Figure 5-1

Figure 5-1


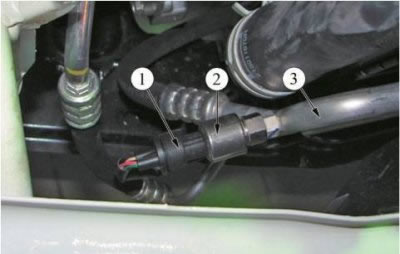
Disconnect the connector 1, Fig. 5-10, of the refrigerant pressure sensor 2 from the vehicle wiring harness (flat head screwdriver).

Figure 5-10 - Refrigerant pressure sensor: 1 - plug-in connector; 2 - refrigerant pressure sensor;…

Figure 5-10 - Refrigerant pressure sensor: 1 - plug-in connector; 2 - refrigerant pressure sensor; 3 - pipeline connecting the compressor to the condenser


Unscrew and remove the refrigerant pressure sensor (spanners 13 and 17).

Installation


Install the refrigerant pressure sensor in the reverse order of removal.

In this case:
  • before installing the pressure sensor, apply Sanden SP-10 compressor oil to the sealing ring;
  • tightening torque of the refrigerant pressure sensor on the pipeline connecting the condenser to the condenser - 9 N·m (0.9 kgf·m) (replaceable inserts 17, torque wrench).

Check the air conditioning system for refrigerant leaks (leak detector).

Check the operation of the air conditioning system.


This article is available at russian, bulgarian, belarusian, ukrainian, serbian, croatian, romanian, polish, slovak, hungarian
This article has been reviewed: Daniil Markelov
Share with friends:
◀ Previous
Lada Largus 1: Heating and ventilation
Next ▶

Air Conditioner Pipes — Removal and Installation
Air conditioning compressor — device, removal and installation
Air Conditioner Evaporator Unit — Removal and Installation
Air Conditioner Condenser — Removal and Installation
Air Conditioning Compressor Oil
The air conditioner does not work or does not turn on
Air conditioner troubleshooting (diagnostics)
Removal air conditioner condensate from the passenger compartment
More articles with information from manuals for Lada:

• Replacing the oil pressure drop indicator light sensor Lada Kalina Sedan (2004-2013, VAZ-1118)
• Coolant Temperature Sensor — Removal, Checking and Installation Lada Granta 1 (2011-2023, VAZ-2190)
• Replacing the oil pressure warning light sensor Lada Priora 1 (2007-2018, VAZ-2170)
• Coolant Temperature Sensor — Checking and Replacing Lada Vesta 1 (2015-2023, VAZ-2180)
• Checking the level and adding coolant Lada X-Ray 1 (2015-2022)
Link to this article in various formats
Reviews and comments of visitors
No comments yet


Add up two numbers: 49 + 41


Largus 1 (2012-2023) 
  • General information
  • Vehicle device
  • User manual
  • Maintenance
  • Power unit
  • Engine repair
  • Cooling and lubrication system
  • Supply system
  • Ignition system
  • Exhaust system
  • Spare parts catalog
  • Transmission
  • Clutch
  • Car gearbox
  • Drive shafts
  • Spare parts catalog
  • Chassis (running gear)
  • Suspension and wheels
  • Steering
  • Brake system
  • Spare parts catalog
  • Body and interior
  • Exterior (external elements)
  • Interior (internal elements)
  • Doors, locks and windows
  • Heating and ventilation
  • Spare parts catalog
  • Electrical equipment
  • Equipment and devices
  • Power devices
  • Lighting and signaling
  • Spare parts catalog
  • Electrical circuits
LadaMan.ru © 2018–2026 | Mobile version | About Lada | Sitemap: EN BG BY UA RS HR RO PL SK HU | Contacts with admin | | Add to bookmarks
Kalina Hatchback (2004-2013) | Kalina Sedan (2004-2013) | Granta 1 (2011-2023) | Priora 1 (2007-2018) | Vesta 1 (2015-2023) | Largus 1 (2012-2023) | X-Ray 1 (2015-2022) |
This site uses cookies to ensure everything runs smoothly.