



Piping connecting the compressor to the evaporator (short part)
Removing
Place the vehicle on a two-post lift, brake with the parking brake and disconnect the wire terminal "masses" from battery (wrench "on 10").
Drain the refrigerant from the vehicle's air conditioning system.
Loosen nut 3, figure 5-8, holder 4 of pipelines (interchangeable head 10, extension, crank). Remove holder 4 for pipes.
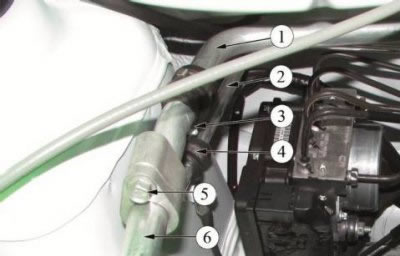
Figure 5-8 - Removing pipelines: 1 - pipeline connecting the compressor with the evaporator (short part); 2 - pipeline connecting the condenser to the evaporator; 3 - nut; 4 - pipeline holder; 5 - pipeline fastening bolt; 6 - pipeline connecting the compressor with the evaporator (long part)
Loosen bolt 3, figure 5-4, fasteners and disconnect pipe 1 connecting the compressor to the evaporator (short part) (wrench "at 13").
Loosen bolt 6, Figure 5-8, pipeline fastenings (wrench "at 13").
Disconnect the pipeline connecting the compressor to the evaporator (short part) from the pipeline connecting the compressor to the evaporator (long part).
Install technological plugs in the opening of the evaporator block and on the pipelines.
Remove the pipeline connecting the compressor to the evaporator (short part).
Installation
Install the pipeline in the reverse order of removal.
Wherein:
- before installation, top up the compressor or condenser with compressor oil according to table 5-1 (Compressor oil Sanden SP-10, graduated container);
- before installing the pipelines, replace the sealing rings with new ones. Apply compressor oil Sanden SP-10 to the sealing rings;
- tightening torque of the pipe fastening bolt connecting the compressor to the evaporator (short part) to the evaporator - 8 Nm (0.8 kgf·m) (interchangeable head 13, knob and extension, torque wrench);
- tightening torque of the pipe fastening bolt connecting the compressor to the evaporator (short part) to the pipeline connecting the compressor to the evaporator (long part) - 8 Nm (0.8 kgf·m) (interchangeable head 13, knob and extension, torque wrench).
Evacuate the air conditioning system and charge the system with refrigerant (refrigerant R134a, loading rate - 475±35 g).
Check the air conditioning system for refrigerant leaks (leak detector).
Check the operation of the air conditioning system.
Piping connecting the compressor to the evaporator (long part)
Removing
Place the vehicle on a two-post lift, brake with the parking brake and disconnect the wire terminal "masses" from battery (wrench "on 10").
Drain the refrigerant from the vehicle's air conditioning system.
Loosen nut 3, Figure 5-9, holder 4 of pipelines (interchangeable head 10, extension, crank). Remove pipe holder.
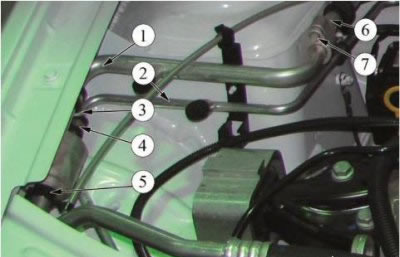
Figure 5-9 - Removing pipelines: 1 - pipeline connecting the compressor with the evaporator (long part); 2 - pipeline connecting the condenser to the evaporator; 3 - nut; 4 - pipeline holder; 5 - headlight adjustment cable holder; 6 - pipeline connecting the compressor with the evaporator (short part); 7 - pipeline fastening bolt
Loosen bolt 7, Figure 5-9, pipeline fastenings (wrench "at 13").
Disconnect the pipeline 6 connecting the compressor to the evaporator (short part) from pipeline 1 connecting the compressor to the evaporator (long part).
Unscrew bolt 4, figure 5-6, fixings and disconnect pipeline 2 connecting the compressor with the evaporator (long part) (wrench "at 13").
Install technological plugs in the compressor opening and on the pipelines.
Remove the pipeline connecting the compressor to the evaporator (long part).
Installation
Install the pipeline in the reverse order of removal.
Wherein:
- before installation, top up the compressor or condenser with compressor oil according to table 5-1 (Compressor oil Sanden SP-10, graduated container);
- before installing the pipelines, replace the sealing rings with new ones. Apply compressor oil Sanden SP-10 to the sealing rings;
- tightening torque of the pipe fastening bolt connecting the compressor to the evaporator (long part) to the compressor - 8 Nm (0.8 kgf·m) (interchangeable head 13, knob and extension, torque wrench);
- tightening torque of the pipe fastening bolt connecting the compressor to the evaporator (short part) to the pipeline connecting the compressor to the evaporator (long part) - 8 Nm (0.8 kgf·m) (interchangeable head 13, knob and extension, torque wrench).
Evacuate the air conditioning system and charge the system with refrigerant (refrigerant R134a, loading rate - 475±35 g).
Check the air conditioning system for refrigerant leaks (leak detector).
Check the operation of the air conditioning system.
Piping connecting the condenser to the evaporator
Removing
Place the vehicle on a two-post lift, brake with the parking brake and disconnect the wire terminal "masses" from battery (wrench "on 10").
Drain the refrigerant from the vehicle's air conditioning system.
Raise the vehicle to a height that is comfortable for the job.
Remove the front bumper.
Loosen nut 3, figure 5-8, holder 4 of pipelines (interchangeable head 10, extension, crank). Remove holder 4 for pipes.
Loosen nut 3, Figure 5-9, holder 4 of pipelines (interchangeable head 10, extension, crank). Remove holder 4 for pipes.
Unscrew bolt 4, figure 5-2, fastening pipeline 3 connecting the condenser and evaporator (interchangeable head 13, knob and extension).
Disconnect the piping from the condenser. Install technological plugs on the pipeline and in the condenser opening.
Unscrew bolt 3, figure 5-4, fastening pipeline 2 connecting the condenser to the evaporator, from the evaporator unit (wrench "at 13").
Disconnect the piping from the evaporator. Install technological plugs on the pipeline and in the opening of the evaporator block.
Remove the piping connecting the condenser to the evaporator.
Installation
Install the pipeline in the reverse order of removal.
Wherein:
- before installation, top up the compressor or condenser with compressor oil according to table 5-1 (Compressor oil Sanden SP-10, graduated container);
- before installing the pipelines, replace the sealing rings with new ones. Apply compressor oil Sanden SP-10 to the sealing rings;
- tightening torque of the bolt for fastening the pipeline connecting the condenser with the evaporator to the condenser - 8 Nm (0.8 kgf·m) (interchangeable head 13, knob and extension, torque wrench);
- tightening torque of the bolt for fastening the pipeline connecting the condenser with the evaporator to the evaporator unit - 8 Nm (0.8 kgf·m) (interchangeable head 13, knob and extension, torque wrench).
Evacuate the air conditioning system and charge the system with refrigerant (refrigerant R134a, loading rate - 475±35 g).
Check the air conditioning system for refrigerant leaks (leak detector).
Check the operation of the air conditioning system.
Piping connecting the compressor to the condenser
Removing
Place the vehicle on a two-post lift, brake with the parking brake and disconnect the wire terminal "masses" from battery (wrench "on 10").
Drain the refrigerant from the vehicle's air conditioning system.
Raise the vehicle to a height that is comfortable for the job.
Remove the front bumper.
Disconnect the fastening elements of the air baffle 1, Figure 5-1, (screwdriver, nozzle Torx T30). Remove air deflector.
Disconnect connector 1, Figure 5-10, refrigerant pressure sensor 2 from vehicle wiring harness (flat screwdriver).
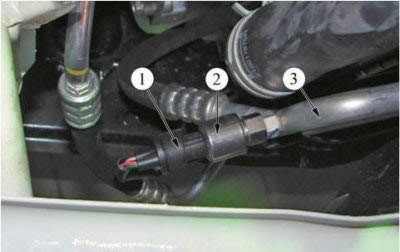
Figure 5-10 - Refrigerant pressure sensor: 1 - plug block; 2 - refrigerant pressure sensor; 3 - pipeline connecting the compressor with the condenser
Remove bolt 2, figure 5-2, fastening pipe 1 connecting the condenser to the compressor (interchangeable head 13, knob and extension).
Disconnect the piping from the condenser. Install technological plugs on the pipeline and in the condenser opening.
Remove bolt 4, Figure 5-6, fastening the pipeline connecting the compressor to the condenser (interchangeable head 13, knob and extension).
Disconnect the pipeline from the compressor. Install technological plugs on the pipeline and in the compressor opening.
Remove the piping connecting the compressor to the condenser.
Installation
Install the pipeline in the reverse order of removal.
Wherein:
- before installation, top up the compressor or condenser with compressor oil according to table 5-1 (Compressor oil Sanden SP-10, graduated container);
- before installing the pipelines, replace the sealing rings with new ones. Apply compressor oil Sanden SP-10 to the sealing rings;
- tightening torque of the pipeline fastening bolts connecting the compressor to the condenser - 8 Nm (0.8 kgf·m) (interchangeable head 13, knob and extension, torque wrench).
Evacuate the air conditioning system and charge the system with refrigerant (refrigerant R134a, loading rate - 475±35 g).
Check the air conditioning system for refrigerant leaks (leak detector).
Check the operation of the air conditioning system.