
Attention! Check the ECM with a scan tool before troubleshooting "Diagnostics of the ECM of the LADA LARGUS car" for fault codes related to the operation of the air conditioning system.
This section describes the diagnostic procedure used for the air conditioning system of the LADA LARGUS car.
Necessary diagnostic equipment and instruments:
- diagnostic device DST-12 (RF90 firmware);
- multimeter;
- universal contact board.
General instructions for diagnostics
To diagnose the air conditioning system, you must connect a diagnostic tool, turn on "ignition" and perform the necessary operations (checking for faults, monitoring the compliance of data transmitted by the controller) concerning the air conditioning system, " Diagnostics of the ECM of the LADA LARGUS car".
Troubleshooting algorithm (APN)
If no faults are found by checking with the diagnostic tool, but the fault persists, use the appropriate ALP to correct the fault.
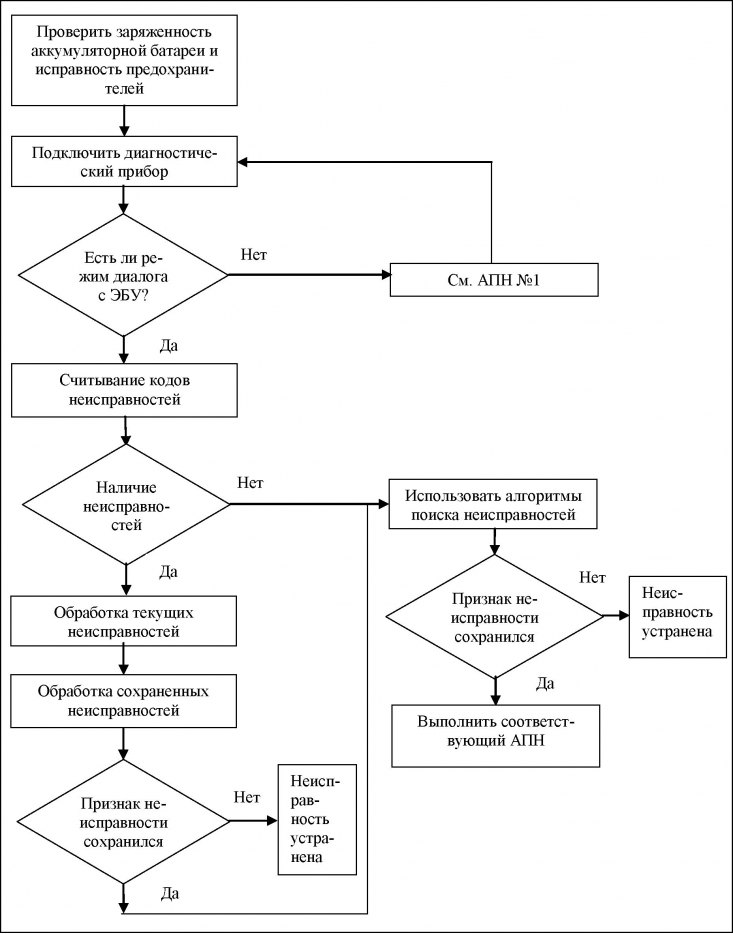
The general flow of diagnostics is shown in Figure 3-1 in the form of a flowchart.
Wiring check
Difficulties in diagnosis
By disconnecting the connectors and/or moving the wiring harnesses, the cause of the malfunction can be instantly corrected. Voltage, resistance and insulation resistance measurements usually give the correct measured values, especially if the fault is not present at the time of testing (is memorized).
Visual check
Look for signs of damage in the engine compartment and interior. Carefully check the protective covers, the integrity of the insulation and the correct routing of the wiring harnesses. Look for traces of oxidation.
Touch check
While wiggling or twisting the wiring harnesses, use a scan tool to determine when the fault transitioned from "saved" into a state "current". Make sure the connectors are securely fixed. Slightly "move" connectors. Twist the wiring harness. If there has been a change in the state of the fault, try to determine its cause.
Checking individual elements
Disconnect the connectors and check the condition of the clamps and contacts, as well as their crimping (there should be no signs of compression on the insulation). Check that the clamps and contacts are securely fixed in the sockets of the connector. Make sure that when connecting the connector, the clips and contacts are not squeezed out. Check the contact pressure of the clamps using a suitable type of contact lead.
Resistance test
First, check the integrity of the entire circuit, then in individual sections. Determine if there is a short circuit "mass", on + 12 V or with another wire.
If a fault is found, repair it or replace the wiring.
General scheme of diagnostics
Troubleshooting Algorithms
| Malfunctions found during the operation of the air conditioning system | APN number |
| No cooling | APN 2 |
| Insufficient cooling | APN 3 |
| Increased compressor noise | APN 4 |
| High discharge pressure | APN 5 |
| Low discharge pressure | APN 6 |
| Other malfunctions | |
| No communication with the ECM | APN 1 |
APN 1 | No communication with the ECM |
Diagnostic instructions | Missing |
Verify that the scan tool is not the cause of this fault by checking it when communicating with the ECU on another vehicle.
If the device is not the cause of this malfunction, but the dialogue mode is not established with any other ECU of the same vehicle, it is possible that one of the ECUs is malfunctioning, which is disrupting the diagnostic K-line.
Sequentially disconnect the computer connectors to determine which one is faulty. Troubleshoot if necessary.
Check the battery voltage and perform the necessary work to obtain the correct voltage (9.5 V
Check the presence of 12 V voltage on the contact "16" diagnostic connector. If necessary, repair the fault in the circuit up to the fuse. Check Availability "masses" on contacts "4" And "5" diagnostic socket.
Troubleshoot if necessary.
Using the universal contact board, check the absence of open and short circuits in the circuits:
- ECM, contact "28" - "weight";
- ECM, contact "33" - "weight";
- ECM, contact "3" - "weight";
- ECM, contact "56" - contact "7" diagnostic connector;
- ECM, contact "26" - contact "15" diagnostic connector;
- ECM, contact "29" - fuse;
- ECM, contact "30" - fuse.
Troubleshoot if necessary.
After troubleshooting, perform a system check using the diagnostic tool.
APN 2 | No cooling |
Diagnostic instructions | Perform after a complete check of the air conditioning system using a diagnostic tool. |
1. The heater fan does not work
Make sure the heater fan is working:
- check the fuses F36 and F39;
- check the serviceability of the additional resistor;
- check the correctness of the electrical wiring;
- check the operation of the heating, air conditioning and ventilation control unit.
If necessary, troubleshoot, replace faulty elements.
2. Compressor not working
Check fuse F01.
Check for open and short circuits in the circuits:
- heating, air conditioning and ventilation control unit, contact "5" - contact "46m ECM;
- fuse F01, contact "S" - contact "VZ" air conditioner compressor relay;
- air conditioning compressor relay, contact "AT 5" - contact "1" air conditioner electromagnetic clutch;
- air conditioning compressor relay, contact "AT 2" - contact "10" ECM;
- air conditioning compressor relay, contact "IN 1" - contact "A5" relay actuators;
Troubleshoot if necessary.
Check the operation of the compressor electromagnetic clutch.
Replace compressor if necessary.
3. Not enough refrigerant in the system
Make sure there is enough refrigerant in the air conditioning system:
- check the level of refrigerant charge;
- make sure there are no refrigerant leaks.
If necessary, repair refrigerant leaks, restore refrigerant level.
APN 3 | Insufficient cooling |
Diagnostic instructions | Perform after a complete check of the air conditioning system using a diagnostic tool. |
1. Dirty cabin air filter
Check that there is no dirt on the surface of the cabin air filter.
If necessary, clean or replace the cabin ventilation filter.
2. The heater fan does not work
Make sure the heater fan is working:
- check the fuses F36 and F39;
- check the serviceability of the additional resistor;
- check the correctness of the electrical wiring;
- check the operation of the heating, air conditioning and ventilation control unit.
If necessary, troubleshoot, replace faulty elements.
3. Accessory drive belt slip
Check for slippage of the accessory drive belt. If necessary, replace the accessory drive belt.
4. Condenser contamination
Check that there is no dirt on the surface of the condenser. Clean the condenser if necessary.
5. Not enough refrigerant in the system
Make sure there is enough refrigerant in the air conditioning system:
- check the level of refrigerant charge;
- make sure there are no refrigerant leaks.
If necessary, repair refrigerant leaks, restore refrigerant level.
6. Faulty expansion valve (TRV)
Make sure there is enough refrigerant in the air conditioning system:
- check the correct installation of the expansion valve;
- check if the expansion valve is dirty or jammed;
- check if the expansion valve grid is not clogged;
- make sure that there is no leakage in the thermal bulb of the expansion valve;
- make sure that the expansion valve opens and closes. If necessary, replace the TRV.
7. Evaporator icing
Make sure the heater fan is working:
- - check that fuses F36 and F39 are working properly;
- - check the serviceability of the additional resistor;
- - check the electrical wiring;
- - check the health of the heating, air conditioning and ventilation control unit.
If necessary, troubleshoot, replace faulty elements.
Make sure that there is no dirt on the surface of the evaporator.
If necessary, clean the evaporator.
Make sure the receiver-dryer is not clogged.
Replace dryer if necessary.
Make sure there is no moisture in the system.
Perform the following procedure if necessary:
- unload the refrigerant from the system;
- replace the receiver dryer;
- drain and prime the system.
8. Dirty receiver dryer
Make sure that the receiver-dryer is not contaminated. If necessary, replace the receiver dryer._
9. Presence of air and non-condensable gases in the system
Ensure that there is no air or non-condensable gases in the system. If necessary, bleed air and non-condensable gases from the system.
10. Faulty compressor valves
Check that the compressor valves are working. Replace the compressor if necessary.
After troubleshooting, check the air conditioning system.
APN 4 | Increased compressor noise |
Diagnostic instructions | Perform after a complete check of the air conditioning system using a diagnostic tool. |
1. Lack or excess of oil in the system
Check the oil level in the air conditioning system. Top up the oil level if necessary.
2. Too much refrigerant in the system
Check the refrigerant level in the air conditioning system.
If necessary, unload excess refrigerant from the system.
3. Malfunction or low voltage supply of the electromagnetic clutch of the compressor
Measure the supply voltage of the compressor electromagnetic clutch.
Check the reliability of the connections in the wiring.
If necessary, troubleshoot, replace the compressor.
4. Compressor mounting elements are loose
Make sure that the compressor mounting elements are securely fastened. Tighten compressor mounting bolts if necessary.
5. Worn or broken compressor parts
Check for wear and tear on compressor parts. Replace compressor if necessary.
After troubleshooting, check the air conditioning system.
APN 5 | High discharge pressure |
Diagnostic instructions | Perform after a complete check of the A/C system with a scan tool and when the parameter PR037 "Refrigerant pressure" is above the maximum value (> 6 bar). |
1. High ambient temperature
Make sure that the ambient temperature does not exceed +45°C.
If necessary, test the system in a room with air temperature up to 45°C.
2. Too much refrigerant in the system
Check the refrigerant level in the air conditioning system.
If necessary, unload excess refrigerant from the system.
3. Condenser contamination
Check that there is no dirt on the surface of the condenser. Clean the condenser if necessary.
4. The engine cooling fan does not work
Make sure the engine cooling fan is working:
- check the integrity of the fuses;
- check the serviceability of the additional resistor;
- check the correctness of the electrical wiring;
If necessary, troubleshoot, replace faulty elements.
5. The heater fan does not work
Make sure the heater fan is working:
- check the fuses F36 and F39;
- check the serviceability of the additional resistor;
- check the correctness of the electrical wiring;
- check the operation of the heating, air conditioning and ventilation control unit.
If necessary, troubleshoot, replace faulty elements.
6. Presence of air and non-condensable gases in the system
Ensure that there is no air or non-condensable gases in the system. If necessary, bleed air and non-condensable gases from the system.
After troubleshooting, check the air conditioning system.
APN 6 | Low discharge pressure |
Diagnostic instructions | Perform after a complete A/C system check with a scan tool and when the parameter PR037 "Refrigerant pressure" is below the minimum value (< 2 bar). |
1. Not enough refrigerant in the system
Make sure there is enough refrigerant in the air conditioning system:
- check the level of refrigerant charge;
- make sure there are no refrigerant leaks.
If necessary, repair refrigerant leaks, restore refrigerant level.
2. Low ambient temperature
Make sure that the ambient temperature is not lower than +10°C.
If necessary, test the system in a room with an air temperature above +10°C.
3. Accessory drive belt slip
Check for slippage of the accessory drive belt. If necessary, replace the accessory drive belt.
4. Faulty compressor valves
Check that the compressor valves are working. Replace the compressor if necessary.
After troubleshooting, check the air conditioning system.