



3.1. Checking the elements of the air conditioning system
Check the elements of the air conditioning system for mechanical damage, replace damaged components (visual inspection).
3.2. Checking the Condition of the Accessory Drive Belt
Check the condition of belt 2, Figure 3-1, accessory drive. The presence of cracks, fraying and delamination of the belt is not allowed. If necessary, replace the accessory drive belt:
- turn the automatic tensioner 3, figure 3-1, of the accessory drive belt clockwise (wrench 16);
- block roller 3 with a tension hex wrench (hex key 6 mm);
- remove the belt 2 of the auxiliary equipment drive;
- remove roller 3 tension and roller 4 bypass (interchangeable heads 10 and 13, crank, extension);
- install new tension and bypass rollers (interchangeable heads 10 and 13, crank, extension);
- turn the automatic tension roller 3 (wrench 16);
- block roller 3 with a tension hex wrench (hex key 6 mm);
- install a new belt 2 auxiliary equipment drives;
- unlock roller 3 tensioner.
Attention. The removed accessory drive belt must be replaced.
Attention. When replacing the accessory drive belt, be sure to change the idler and idler rollers.
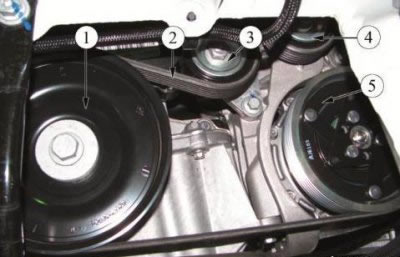
Figure 3-1 - Checking the accessory drive belt: - crankshaft pulley; 2 - auxiliary equipment drive belt; 3 - tension roller; 4 - bypass roller; 5 - compressor pulley
3.3. Checking the inclusion of the electromagnetic clutch of the compressor
Start the engine and warm it up to operating temperature, turn on the heater fan motor and the air conditioner switch.
Troubleshoot if necessary (see section "Diagnostics of the car air conditioning system").
3.4. Checking the quantity and condition of the refrigerant in the air conditioning system
Check the quantity and condition of the refrigerant in the air conditioning system:
- connect the service hoses to the fittings on the pipelines of the air conditioning system and open the valves on the tips of the hoses;
- start and warm up the engine to operating temperature;
- set the air recirculation mode to the outside air intake position;
- turn on the heater fan motor and set the maximum rotation speed;
- open the central and side ventilation nozzles on the panel and set to the neutral position;
- set the air conditioner switch to "included" and turn the temperature control to position "MIN";
- close all windows and doors of the car;
- ensure the constant operation of the engine cooling fan;
- set the engine crankshaft speed to 2000 rpm;
- measure the ambient temperature (TK), Figure 3-2, after stabilization of the values;
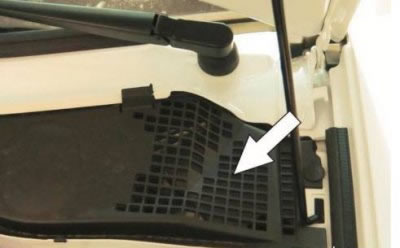
Figure 3-2 - Ambient temperature measurement
- wait 5 minutes and measure the air temperature from the left side ventilation nozzle (T1), Figure 3-3, and the right side vent (T2);
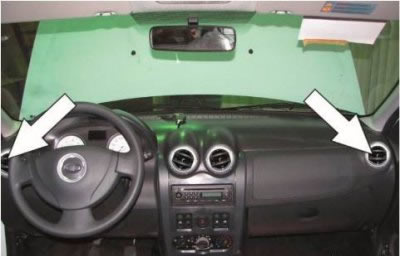
Figure 3-3 - Chilled air temperature measurement
- after stabilization of the values, determine the temperature difference between T3 and the largest of the T1 or T2 values;
- determine the difference in values between T1 and T2.
If the temperature difference between T1 and T2 is greater than 2°C or the temperature difference between T3 and the highest of T1 or T2 is less than 5°C, then the system is faulty and it is necessary to diagnose the air conditioning system according to section "Diagnostics of the air conditioning system of the car LADA LARGUS".