
Car repair AvtoVAZ Car repair Renault Car repair Hyundai Car repair Ford Car repair Volkswagen Car repair Audi Car repair Chevrolet
English Русский
Български
Беларускі
Український
Српски
Hrvatski
Română
Polski
Slovenský
Magyar
articles sitemap contacts bookmark
LadaMan.ru


Kalina Granta Priora Vesta Largus XRAY
Vesta 1 (2015-2023, VAZ-2180)

Maintenance of the air conditioning system (Vesta 2180)

  • Main
  • Vesta
  • Vesta 1
  • Body and interior
  • Heating and ventilation
  • Maintenance of the air conditioning system
0
During vehicle operation, contaminants accumulate in the evaporator and insects, fungal spores, mold and other dangerous microorganisms settle there, which can lead to respiratory diseases in humans. Therefore, it is recommended to clean the evaporator once a year.

The air conditioning condenser is located in front of the cooling system radiator, so it is susceptible to clogging with small debris, insects and other dirt. This reduces heat exchange and decreases the efficiency of the air conditioning system. For preventive purposes, it should be done once a season (after winter) clean the condenser from dirt.

To carry out the work, you will need an inspection pit or overpass; car air conditioner cleaning agent with extension hose (see "Operating and repair materials"), a source of compressed air (compressor or foot pump).

Sequence of execution


1. Place the vehicle on an inspection ditch or overpass and prepare it for work (see "Preparing the car for maintenance and repair").

Warning! To avoid damage to the condenser, do not apply pressure higher than 3 bar during the following operation.


(The original was published on the portal: LadaMan.ru)

2. Blow out the cooling system radiator and condenser from the engine compartment with compressed air from a compressor or foot pump.
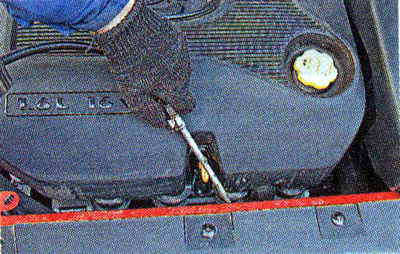
2. Blow out the cooling system radiator and condenser from the engine compartment with compressed…


Note: When using a foot pump, insert a blow-out nozzle into the hose. You can use the body of a ballpoint pen as an attachment.


3. Using a washing gun, wash the condenser from the outside with water through the radiator grilles and bumpers.

4. Then we blow out the condenser with compressed air.
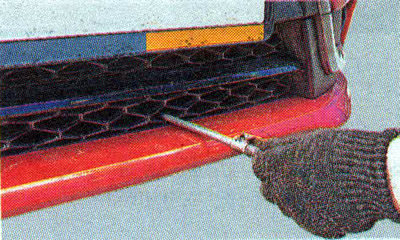
4. Then we blow out the condenser with compressed air.


Recommendation. The procedure shown is effective only if performed regularly. In some cases this is not enough, especially if the radiator has not been blown through for a long time. For easier cleaning of the condenser, you can also remove the front bumper (see "Front bumper - removal and installation of the trim"). If the condenser is very dirty (when it is, for example, clogged with hardened dirt) you can remove the radiator and blow out the condenser. It is permissible to wash off dirt with a soft paint brush.
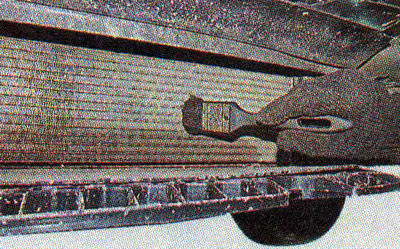

Recommendation. The procedure shown is effective only if performed regularly. In some cases this is…


Recommendation. When the air conditioner is running, moisture from the air condenses in the evaporator, and in dampness, fungus spores, mold and other dangerous microbes easily multiply. All this can cause respiratory diseases in humans. Especially many microorganisms accumulate on the damp surfaces of the evaporator if a cabin filter is not installed. To reduce the health risk, it is advisable to clean the evaporator every time the air conditioning filter element is replaced. To do this, you will need a product for cleaning the car air conditioner.
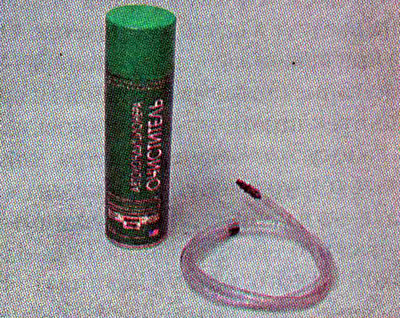


Recommendation. When the air conditioner is running, moisture from the air condenses in the…


5. Insert the aerosol can extension through the air conditioning system drain hose until it stops. Shake the can vigorously, connect it to the extension cord and, holding the can vertically, release the foam from it into the evaporator.
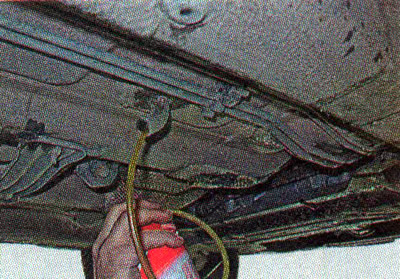
5. Insert the aerosol can extension through the air conditioning system drain hose until it stops.…


6. Wait 10-15 minutes.

Warning! There should be no people or pets in the vehicle while performing the following operation.


7. Start the engine.

8. Turn on the air conditioner in the maximum intensive mode for 10 minutes.

9. After leaving the car, close all doors and windows.

10. After cleaning the evaporator, ventilate the interior and install the filter in place (see below, "Air Conditioning Filter - Replacement").


This article is available at russian, bulgarian, belarusian, ukrainian, serbian, croatian, romanian, polish, slovak, hungarian
This article has been reviewed: Kirill Dementyev
Share with friends:
◀ Previous
Lada Vesta 1: Heating and ventilation
Next ▶

Checking the technical condition of the air conditioning system
Description of the air conditioning system design
Basic data for monitoring, maintenance and repair
Air Conditioning Filter — replacement
More articles with information from manuals for Lada:

• Preparing the car for maintenance and repair Lada Kalina Hatchback (2004-2013, VAZ-1119)
• Safety precautions for maintenance and repair of the engine… Lada Granta 1 (2011-2023, VAZ-2190)
• Features of the interior heating and ventilation system Lada Priora 1 (2007-2018, VAZ-2170)
• Air conditioning system maintenance Lada Largus 1 (2012-2023)
• Replacing the replacement element of the outdoor air filter of the… Lada X-Ray 1 (2015-2022)
Link to this article in various formats
Reviews and comments of visitors
No comments yet


Add up two numbers: 10 + 43


Vesta 1 (2015-2023) 
  • General information
  • Governing bodies
  • User manual
  • Maintenance
  • Troubleshooting
  • Power unit
  • Engine repair
  • Control system
  • Supply system
  • Cooling system
  • Exhaust system
  • Transmission
  • Clutch
  • Mechanical gearbox
  • Automatic gearbox
  • Drive shafts
  • Chassis (running gear)
  • Wheels, tires and hubs
  • Front suspension
  • Rear suspension
  • Steering
  • Brake system
  • Body and interior
  • Exterior (external elements)
  • Doors, locks and windows
  • Heating and ventilation
  • Electrical equipment
  • Equipment and devices
  • Power devices
  • Breakers and switches
  • Lighting and signaling
  • Electrical circuits
LadaMan.ru © 2018–2026 | Mobile version | About Lada | Sitemap: EN BG BY UA RS HR RO PL SK HU | Contacts with admin | | Add to bookmarks
Kalina Hatchback (2004-2013) | Kalina Sedan (2004-2013) | Granta 1 (2011-2023) | Priora 1 (2007-2018) | Vesta 1 (2015-2023) | Largus 1 (2012-2023) | X-Ray 1 (2015-2022) |
This site uses cookies to ensure everything runs smoothly.