
Car repair AvtoVAZ Car repair Renault Car repair Hyundai Car repair Ford Car repair Volkswagen Car repair Audi Car repair Chevrolet
English Русский
Български
Беларускі
Український
Српски
Hrvatski
Română
Polski
Slovenský
Magyar
articles sitemap contacts bookmark
LadaMan.ru


Kalina Granta Priora Vesta Largus XRAY
Largus 1 (2012-2023)

Heater radiator — removal and installation (Largus 1)

  • Main
  • Largus
  • Largus 1
  • Body and interior
  • Heating and ventilation
  • Heater radiator — removal and installation
0
Contents: Removal ⇣ Installation ⇣
For part numbers of the spare parts used, see here and here.

For part numbers of the spare parts used, see here and here.


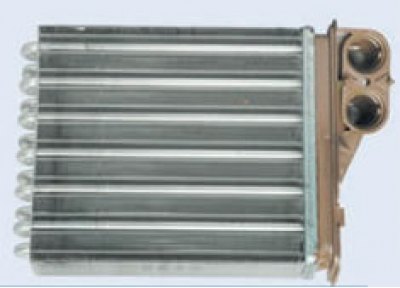
Coolant circulates through the radiator. The air passes either through the radiator or past it, depending on what air temperature is set on the regulator.

If coolant leaks from the heater radiator, it should be replaced.

Removal


Drain the coolant (see here).

Remove the visor, instrument cluster and floor tunnel center trim (see here).

Remove the pin and fold back the edge of the carpet.
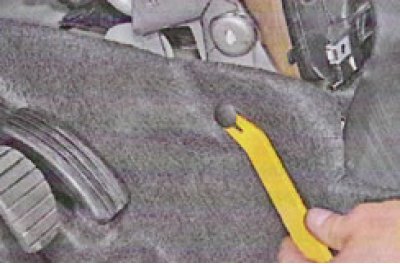
Remove the pin and fold back the edge of the carpet.


Unscrew the two bolts 1, Figure 14-1, securing the reinforcement 2 of the instrument panel cross member to the body base (replaceable head 13, ratchet).
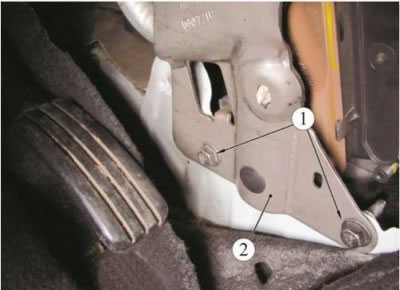
Figure 14-1 - Lower instrument panel cross member reinforcement mount: 1 - Instrument panel cross…

Figure 14-1 - Lower instrument panel cross member reinforcement mount: 1 - Instrument panel cross member reinforcement mounting bolt; 2 - Instrument panel cross member reinforcement


Unscrew the two nuts 1, Figure 14-2, of the upper mount of the amplifier 2 of the crossbar through the window in the instrument panel, disconnect the connector 3 of the wiring harness and remove the amplifier 2. (replaceable head 13, ratchet).
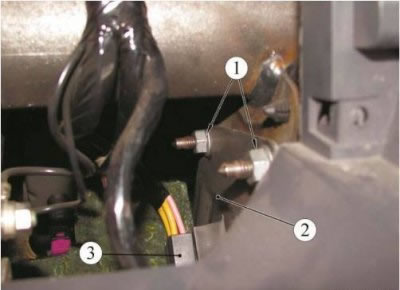
Figure 14-2 - Upper instrument panel cross member reinforcement mount: 1 - Instrument panel cross…

Figure 14-2 - Upper instrument panel cross member reinforcement mount: 1 - Instrument panel cross member reinforcement mounting nut; 2 - Instrument panel cross member reinforcement; 3 - wiring harness block


Loosen the screw securing the pressure plate of the pipes 3, Figure 14-3, (torx T20 replaceable head, extension, ratchet)...
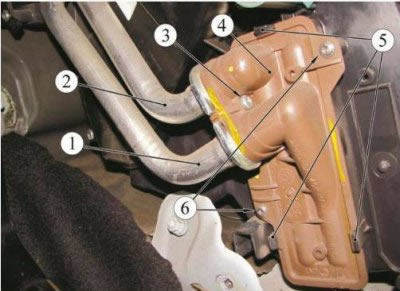
Figure 14-3 - Heating system radiator: 1 - heating system radiator outlet pipe; 2 - heating system…

Figure 14-3 - Heating system radiator: 1 - heating system radiator outlet pipe; 2 - heating system radiator supply pipe; 3 - screw for fastening the inlet and outlet pipes; 4 - heating system radiator; 5 - retainer; 6 - screw for fastening the heating system radiator


... and disconnect the supply 2 and outlet 1 pipes from the heater radiator.
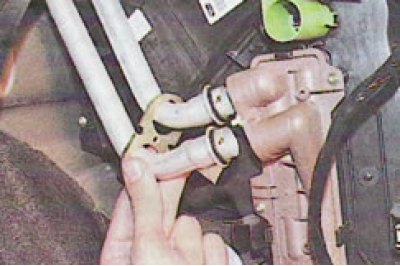
... and disconnect the supply 2 and outlet 1 pipes from the heater radiator.


Residual coolant may leak from the pipes and radiator. Take steps to prevent it from contaminating your floor mat.
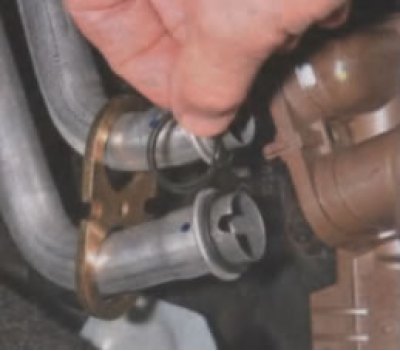
Residual coolant may leak from the pipes and radiator. Take steps to prevent it from contaminating…


The pipes are sealed with rubber rings. When installing the radiator, be sure to replace the rings.

Unscrew two screws 6, press three clamps 5 and remove the radiator from the heater housing (torx T20 replaceable head, extension, ratchet).
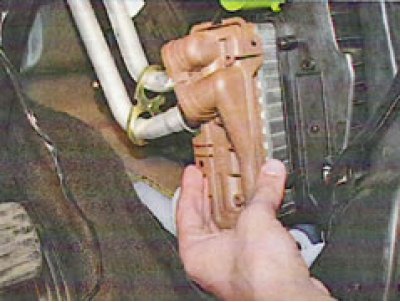
Unscrew two screws 6, press three clamps 5 and remove the radiator from the heater housing (torx…


Installation


Install the heating radiator in the reverse order of removal, while installing new sealing rings on the heating system pipes.


This article is available at russian, bulgarian, belarusian, ukrainian, serbian, croatian, romanian, polish, slovak, hungarian
This article has been reviewed: Daniil Markelov
Share with friends:
◀ Previous
Lada Largus 1: Heating and ventilation
Next ▶

Replacing the HVAC Cabin Filter
Removal the heating and air conditioning control unit
Heater (stove) — assembly removal and disassembly
Heating, ventilation and air conditioning system
Replacing the heater fan (fan motor)
Replacing the additional heater fan resistor
Air conditioning system — design description
Air conditioning system maintenance
Unloading and loading of air conditioner refrigerant
More articles with information from manuals for Lada:

• Heater radiator — removal and installation Lada Kalina Hatchback (2004-2013, VAZ-1119)
• Engine cooling system radiator — removal and installation Lada Granta 1 (2011-2023, VAZ-2190)
• Removal and installation the heater radiator Lada Priora 1 (2007-2018, VAZ-2170)
• Engine cooling system radiator — removal and installation Lada Vesta 1 (2015-2023, VAZ-2180)
• Engine cooling system radiator — removal and installation Lada X-Ray 1 (2015-2022)
Link to this article in various formats
Reviews and comments of visitors
No comments yet


Add up two numbers: 43 + 31


Largus 1 (2012-2023) 
  • General information
  • Vehicle device
  • User manual
  • Maintenance
  • Power unit
  • Engine repair
  • Cooling and lubrication system
  • Supply system
  • Ignition system
  • Exhaust system
  • Spare parts catalog
  • Transmission
  • Clutch
  • Car gearbox
  • Drive shafts
  • Spare parts catalog
  • Chassis (running gear)
  • Suspension and wheels
  • Steering
  • Brake system
  • Spare parts catalog
  • Body and interior
  • Exterior (external elements)
  • Interior (internal elements)
  • Doors, locks and windows
  • Heating and ventilation
  • Spare parts catalog
  • Electrical equipment
  • Equipment and devices
  • Power devices
  • Lighting and signaling
  • Spare parts catalog
  • Electrical circuits
LadaMan.ru © 2018–2026 | Mobile version | About Lada | Sitemap: EN BG BY UA RS HR RO PL SK HU | Contacts with admin | | Add to bookmarks
Kalina Hatchback (2004-2013) | Kalina Sedan (2004-2013) | Granta 1 (2011-2023) | Priora 1 (2007-2018) | Vesta 1 (2015-2023) | Largus 1 (2012-2023) | X-Ray 1 (2015-2022) |
This site uses cookies to ensure everything runs smoothly.