



Removal
Place the vehicle on a two-post lift, apply the parking brake, turn off the ignition and disconnect the battery ground terminal (electro-hydraulic lift type P-3.2G with lifting capacity of 3.2 t, spanner 10).
Remove the engine crankcase protection in accordance with the requirements of TI 3100.25100.20594.
Remove the front bumper in accordance with the requirements of TI 3100.25100.20599.
Drain the fluid from the engine cooling system (see above).
Flush the engine cooling system (see above).
Remove reservoir 1, Figure 10-4, of the power steering pump from the mounting bracket without disconnecting the pipes, and tie it to the engine.
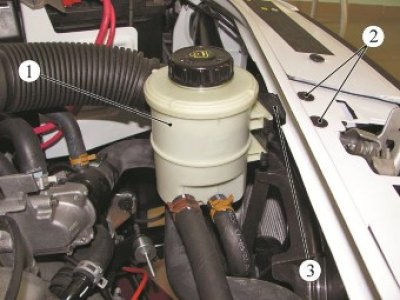
Figure 10-4 - Removing the power steering pump reservoir: 1 - Power steering pump reservoir; 2 - mounting screw; 3 - Power steering pump reservoir mounting bracket
Loosen two screws 2 and remove bracket 3 securing the power steering pump reservoir (torx T30 bit screwdriver).
Operations for all vehicle configurations
Remove the clamps on the inlet and outlet hoses of the engine cooling system radiator (tool for removing elastic clamps Mot. 1448).
Disconnect the inlet and outlet hoses of the cooling system radiator.
For cars with air conditioning
Remove the air deflector mounting screws (screwdriver, Torx T30 bit).
Remove air deflector 1, Figure 10-5.
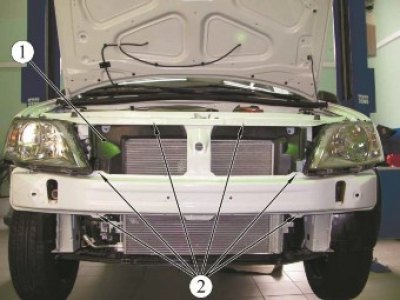
Figure 10-5 - Removing the air deflector: 1 - air deflector; 2 - air deflector mounting screw
Disconnect the wire harness from the holder on the electric fan.
Disconnect the air conditioner line from the holder on the electric fan.
Disconnect the condenser 2, Figure 10-6, of the air conditioner from the radiator of the engine cooling system (flat head screwdriver).
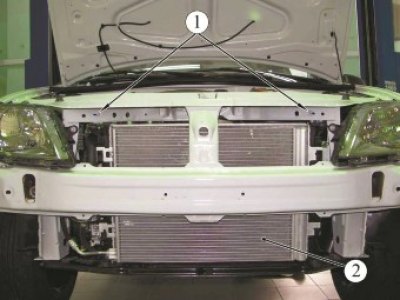
Figure 10-6 - Disconnecting the air conditioner condenser from the engine cooling system radiator: 1 - radiator bracket mounting bolt; 2 - air conditioner condenser
Secure the air conditioner condenser to the upper cross member.
Operations for all vehicle configurations
Remove the electric fan of the engine cooling system (see below).
Loosen bolts 1, Figure 10-7, securing the radiator bracket to the car body (replacement head 10, extension, ratchet handle).
Remove the 2 radiator mounting brackets from the engine cooling system radiator.
Remove radiator 1, Figure 10-8, of the engine cooling system from its mount on the front suspension subframe and remove the radiator.
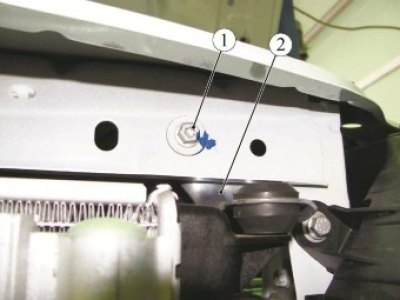
Figure 10-7 - Upper mount of the engine cooling system radiator: 1 - radiator bracket mounting bolt; 2 - radiator mounting bracket
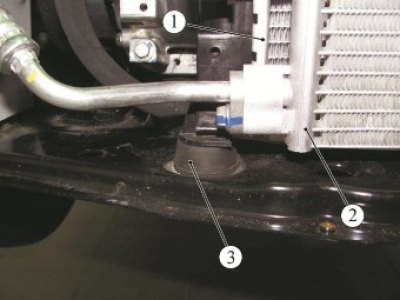
Figure 10-8 - Lower mount of the engine cooling system radiator: 1 - engine cooling system radiator; 2 - air conditioner condenser; 3 - lower radiator mount
Installation
Install the engine cooling system radiator into the lower mounts on the front suspension subframe.
Install brackets 2, Figure 10-7, for fastening the radiator onto the cooling system radiator.
Install and tighten bolts 1 securing the radiator bracket to the body. Tightening torque of radiator bracket mounting bolts 8 Nm (0.8 kgf·m) (replacement head 10, extension, ratchet handle, torque wrench).
Install the electric fan of the engine cooling system (see below).
Connect the inlet and outlet hoses to the cooling system radiator.
Install new clamps on the radiator inlet and outlet hoses (tool for removing elastic clamps Mot. 1448).
For cars with air conditioning
Install and secure the air conditioner condenser to the engine cooling system radiator.
Install air deflector 1, Figure 13-5, and secure with clamps to the vehicle body (torx T30 bit screwdriver).
Secure the power steering line to the holder on the power steering fan.
Connect the wire harness to the holder on the electric fan.
Connect the air conditioner pipe to the holder on the electric fan.
Install bracket 3, Figure 13-4, for fastening the power steering pump reservoir and secure with two screws 2 (torx T30 bit screwdriver).
Install reservoir 1 of the power steering pump onto the mounting bracket.
Operations for all vehicle configurations
Fill the engine cooling system (see above).
Install engine crankcase protection in accordance with the requirements of TI 3100.25100.20594.
Install the front bumper in accordance with the requirements of TI 3100.25100.20599.
Connect the ground wire terminal to the battery (spanner 10).
Bleed air from the engine cooling system (see above).
Present the vehicle to the Quality Control Department. The Quality Control Department will check the vehicle for compliance with the requirements of TU 017200-254-00232934, paragraphs 1.19.6, 1.19.9, 1.19.10, 1.19.14.