
Note. radiator part number (capacitor) air conditioner see here.
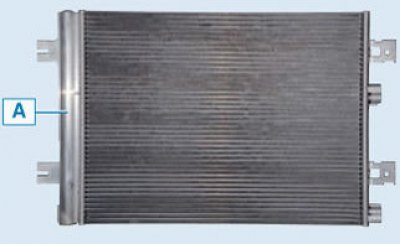
Capacitor: A - receiver-drier
A dryer receiver is built into the right side of the condenser, which has a filter for cleaning the refrigerant from impurities.
Condenser (air conditioning radiator) multi-flow type is located in front of the radiator of the engine cooling system. It is attached with brackets to the radiator tanks of the cooling system. The condenser cells are made of flat thin-walled aluminum tubes with internal longitudinal baffles for rigidity and external fins to improve heat transfer. Tanks are aluminum, with flanges for connection of pipelines. The tanks are divided into sections along the height, therefore, passing through the condenser, the refrigerant flow changes direction several times. In the condenser, the vapors of the refrigerant compressed by the compressor are condensed and the heat released in this case is removed into the surrounding air.
When the air conditioner is turned on, the engine control unit turns on the power supply circuit for the electric fan of the engine cooling radiator, which improves heat transfer in the condenser and reduces pressure in the air conditioner system.
Recommendations
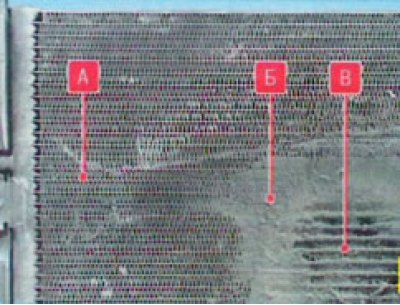
At least once a year, preferably before the start of summer operation, wash the fins A of the condenser honeycombs from adhering dirt, dust and anti-icing agents B. This will improve heat transfer, reduce pressure in the system and increase the service life of the system elements.
Do not use high pressure water jets to clean the condenser. This may cause damage to the B thin-walled fins. Even with regular washing, the need to replace the condenser occurs much more often than we would like. The thing is. that he is the first to take on the flow of de-icing reagents, dirt and pebbles from the road. And its tube walls are thin... In most cases, the condenser is damaged by corrosion in the third or fourth year of operation.
If the tightness of the condenser is broken as a result of corrosion, then it is more expensive to repair it. Even if the master of argon welding manages to patch the hole, a leak may soon appear elsewhere. By the way, the pressure in the system on hot days can reach up to 25-28 bar.
In addition, the complex structure of the condenser tube should be taken into account: along it is divided into channels by partitions, so it is highly likely that after welding, some of the channels will be blocked. Accordingly, the dissipated power will drop and the operation of the air conditioner will deteriorate, especially in traffic jams and in hot weather.
After each experiment with condenser patching, you will need to pay for removal-installation, welding of the condenser and charging the system with refrigerant. So it is better to immediately install a new condenser. Instead of an expensive original one, it is quite possible to buy a cheaper condenser from authorized spare parts manufacturers.
You can replace the air conditioner radiator yourself, but the subsequent refueling of the air conditioner, if you do not have special equipment, is best done at a service station.
Removing
Set the car to work (or two post lift), apply the parking brake and disconnect the wire terminal "masses" from battery (wrench "on 10").
Unload the refrigerant from the car's air conditioning system (see here).
Note: If the system is depressurized due to through corrosion of its parts, then there is no need to discharge it.
Raise the vehicle to a height that is comfortable for the job.
Remove front bumper (see here).
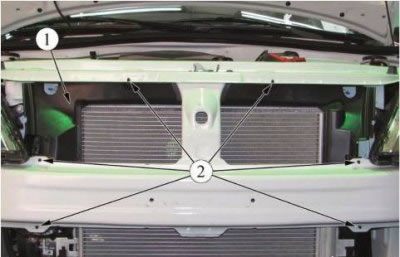
Figure 5-1 - Removing the air baffle: 1 - air deflector; 2 - air baffle attachment points
Disconnect the air baffle fasteners (deflector) 1, Figure 5-1, (screwdriver, nozzle Torx T30). Remove air deflector.
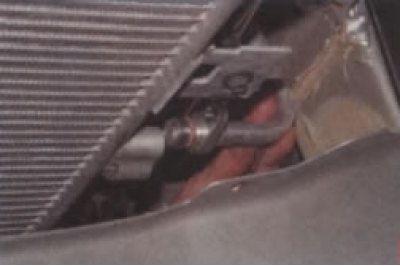
Unscrew bolt 2, figure 5-2, fastening pipeline 1 connecting the condenser to the compressor and bolt 4 fastening pipeline 3 connecting the condenser and evaporator (interchangeable head 13, knob and extension).
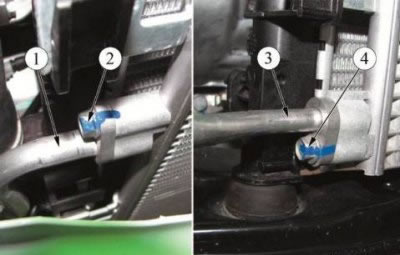
Figure 5-2 - Removing the heatsink (capacitor): 1 - pipeline connecting the condenser and compressor; 2 - pipeline fastening bolt; 3 - pipeline connecting the condenser and evaporator; 4 - a bolt of fastening of the pipeline
Disconnect lines from condenser.
Remove sealing rings from tubes.
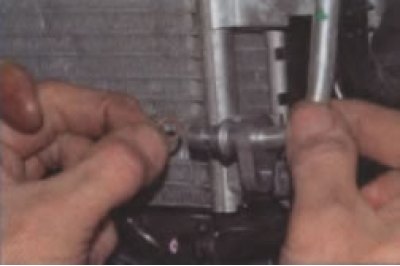
Install technological plugs on the pipelines and in the openings of the condenser.
Attention. Do not damage the air conditioning pipes.
Disconnect the capacitor at the four fixing points, Figure 5-3 (flat head screwdriver or head "on 7").
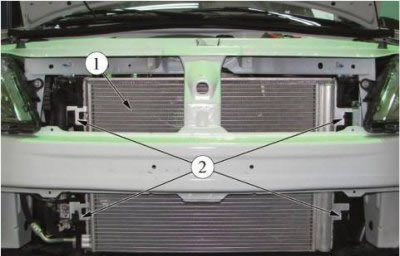
Figure 5-3 1 - capacitor (radiator) air conditioner; 2 - places for attaching the condenser to the cooling system
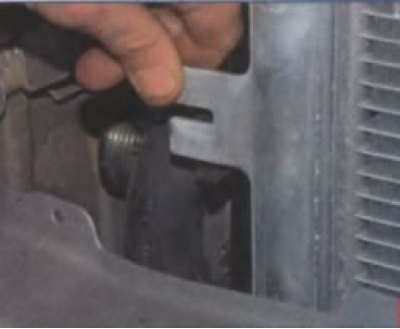
Having lifted the condenser on the right side, we remove the condenser bracket from the holder on the radiator of the cooling system. Similarly, we display the bracket on the left side of the capacitor...
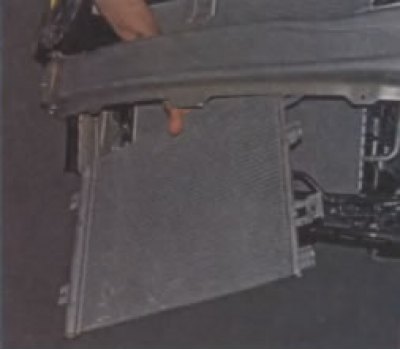
Remove the capacitor from the vehicle.
Installation
Before installation, add compressor oil to the condenser in the amount according to Table 5-1 (Compressor oil Sanden SP-10, graduated container).
Lead the condenser into the opening of the radiator frame and install its supports in the attachment points in the radiator housing, Figure 5-3 (flat screwdriver).
Remove the plugs from the pipelines and the condenser, install new sealing rings on the pipelines. Apply Sanden SP10 compressor oil to the O-rings.
Replace the tube seals with new ones.
Connect the piping to the condenser fittings and secure with bolts, Figure 5-2.
The moment of an inhaling of bolts of fastening of pipelines - 8 Nm (0.8 kgf·m) (interchangeable head 13, knob and extension, torque wrench).
Install the air baffle, Figure 5-1.
Install the front bumper.
Evacuate the air conditioning system and charge the system with refrigerant (refrigerant R134a, loading rate - 475±35 g).
Check the air conditioning system for refrigerant leaks (leak detector).
Check the operation of the air conditioning system.