
Car repair AvtoVAZ Car repair Renault Car repair Hyundai Car repair Ford Car repair Volkswagen Car repair Audi Car repair Chevrolet
English Русский
Български
Беларускі
Український
Српски
Hrvatski
Română
Polski
Slovenský
Magyar
articles sitemap contacts bookmark
LadaMan.ru


Kalina Granta Priora Vesta Largus XRAY
Kalina Sedan (2004-2013, VAZ-1118) Kalina Hatchback (2004-2013, VAZ-1119)

Shock absorber and spring rear suspension — removal and installation (Kalina 1119)

  • Main
  • Kalina
  • Kalina Hatchback
  • Chassis (running gear)
  • Rear suspension
  • Shock absorber and spring rear suspension — removal and installation
0
Contents: Removal ⇣ Installation ⇣
Note: It is convenient to perform the work on an inspection pit. But if necessary, you can remove and install the spring and shock absorber of the rear suspension by placing the car on a flat horizontal surface.


Recommendation. Replace shock absorbers and springs in pairs.


To complete the work you will need an assistant, as well as:
  • inspection ditch or overpass;
  • stand;
  • device for disassembling suspension struts.

Removal


1. Prepare the car for work and hang the rear part of the car on stands (see "Preparing the car for maintenance and repair").

Note: If there is no pit or overpass, remove the rear wheel of the car from the side of the shock absorber being replaced (see "Wheel - replacement").


2. Remove the luggage compartment shelf.

3. Fold the rear seat.

4. Using a slotted screwdriver, remove the plug.
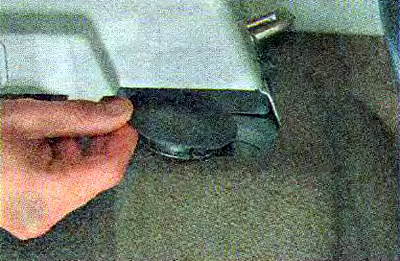
4. Using a slotted screwdriver, remove the plug.


5. Install the device for disassembling the struts onto the nut and the shock absorber rod. Using two wrenches to hold the shock absorber rod from turning, unscrew its nut.
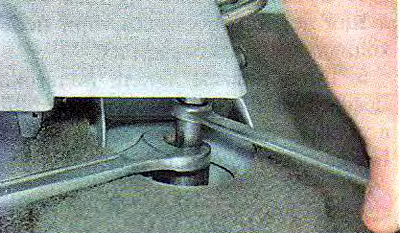
5. Install the device for disassembling the struts onto the nut and the shock absorber rod. Using…


6. Using a magnet, remove the spring washer from the shock absorber rod...
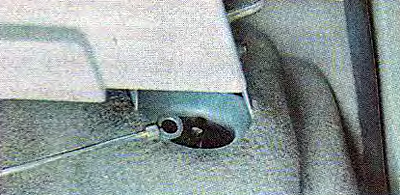


6. Using a magnet, remove the spring washer from the shock absorber rod...


... and the upper support washer.
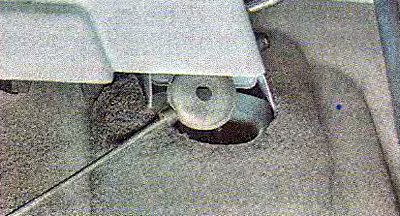
... and the upper support washer.


7. Remove the upper shock absorber rod mounting cushion from the shock absorber rod.
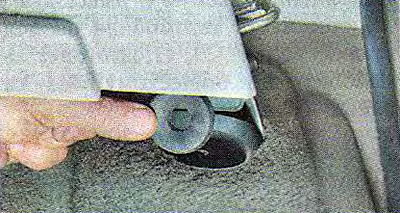
7. Remove the upper shock absorber rod mounting cushion from the shock absorber rod.


8. Using two 19 mm wrenches, unscrew the nut of the bolt securing the lower end of the shock absorber to the rear axle beam and remove the bolt.
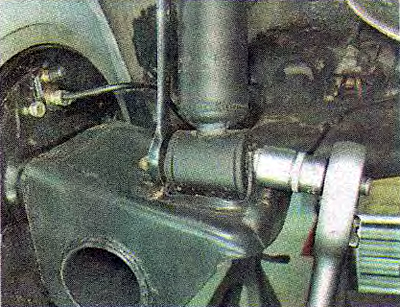
8. Using two 19 mm wrenches, unscrew the nut of the bolt securing the lower end of the shock…


9. Move the lower end of the shock absorber towards the rear of the car and remove the shock absorber.
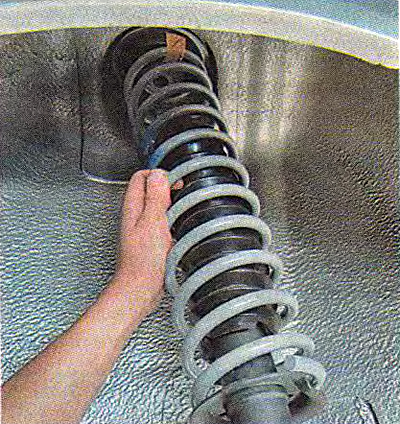


9. Move the lower end of the shock absorber towards the rear of the car and remove the shock…


10. Remove the spring and its gasket from the shock absorber, and, if necessary, remove the lower cushion and spacer sleeve from the shock absorber rod.

Installation


The rear suspension of the car should be equipped with springs of the same class (with the same color of the marks).

1. Before installing the shock absorber, secure the rubber gasket 4 to the spring 2 with insulating tape or scotch tape.

2. Install the spring on the shock absorber and fully extend the rod. We put the buffer 1, protective cover 3 with a cover, spacer sleeve 5 and lower cushion 6 on the shock absorber rod (if they are not on the stock).
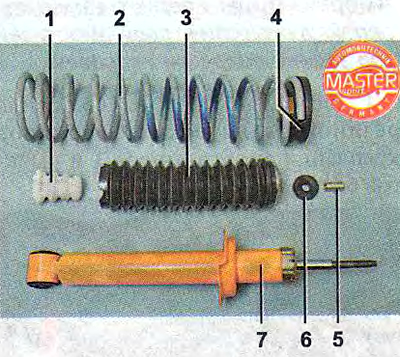
2. Install the spring on the shock absorber and fully extend the rod. We put the buffer 1,…


Warning! When installing, the shock absorber must be oriented so that the end of the lower coil of the spring faces the wheel.


3. Insert the shock absorber rod into the hole in the body cup, while the assistant puts the upper cushion and support washer on the rod and tightens the rod nut by several turns.
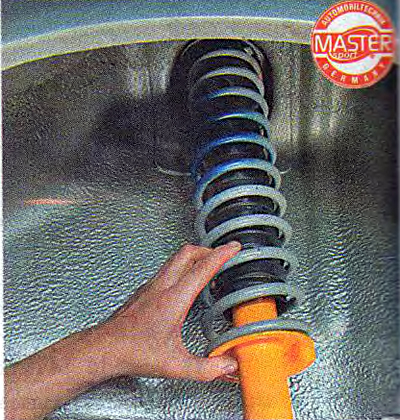
3. Insert the shock absorber rod into the hole in the body cup, while the assistant puts the upper…


Article copied from a web page: LADAMAN.RU

4. Raise the lever until the holes in the shock absorber and the beam bracket are aligned. We install the lower shock absorber mounting bolt and tighten its nut (without delay).

Note: If you don't have an assistant, you can first secure the shock absorber to the rear suspension beam. Then, placing a stop under the rear lever, smoothly lower the car using the jack, making sure that the shock absorber rod enters the hole in the body, and only after that put on the upper cushion with the support washer and tighten the nut.


5. Install the removed wheel (if the work was carried out without an inspection pit) and lower the car onto its wheels. Press the rear of the car several times to automatically adjust the suspension elements.

6. Tighten the shock absorber rod mounting nut to a torque of 50-61.7 Nm (5.1-6.3 kgf·m).

7. Tighten the nut of the lower shock absorber mounting bolt to a torque of 66.6-82.3 Nm (6.8-8.4 kgf·m).


This article is available at russian, bulgarian, belarusian, ukrainian, serbian, croatian, romanian, polish, slovak, hungarian
This article has been reviewed: Polina Kudryashova
Share with friends:
◀ Previous
Lada Kalina Hatchback: Rear suspension
Next ▶

Checking the technical condition of the rear suspension
Rear suspension: design description
Rear suspension: reference data
Rear suspension beam — silent block replacement
More articles with information from manuals for Lada:

• Shock absorber and spring rear suspension — removal and installation Lada Granta 1 (2011-2023, VAZ-2190)
• Replacing the shock absorber and rear suspension spring Lada Priora 1 (2007-2018, VAZ-2170)
• Description of the rear suspension design Lada Vesta 1 (2015-2023, VAZ-2180)
• Rear shock absorber — removal and installation Lada Largus 1 (2012-2023)
• Rear shock absorber — removal and installation Lada X-Ray 1 (2015-2022)
Link to this article in various formats
Reviews and comments of visitors
No comments yet


Add up two numbers: 36 + 23


Kalina Sedan (2004-2013) 
  • General information
  • Vehicle device
  • Operation and maintenance
  • Faults en route
  • Power unit
  • Engine repair
  • Cooling and lubrication system
  • Exhaust system
  • Supply system
  • Ignition and control
  • Transmission
  • Clutch and drive shafts
  • Car gearbox
  • Chassis (running gear)
  • Front suspension
  • Rear suspension
  • Steering
  • Brake system
  • Body and interior
  • Exterior (external elements)
  • Interior (internal elements)
  • Doors, locks and windows
  • Electrical equipment
  • Equipment and devices
  • Power devices
  • Lighting and signaling
  • Heating and ventilation
Kalina Hatchback (2004-2013) 
  • General information
  • Vehicle Details
  • Maintenance
  • Troubleshooting
  • Power unit
  • Engine repair
  • Cooling system
  • Supply system
  • Control system
  • Exhaust system
  • Transmission
  • Clutch
  • Car gearbox
  • Drive shafts
  • Chassis (running gear)
  • Wheels and tires
  • Front suspension
  • Rear suspension
  • Steering
  • Brake system
  • Body and interior
  • Exterior (external elements)
  • Interior (internal elements)
  • Doors, locks and windows
  • Electrical equipment
  • Equipment and devices
  • Power devices
  • Lighting and signaling
  • Electrical circuits
LadaMan.ru © 2018–2026 | Mobile version | About Lada | Sitemap: EN BG BY UA RS HR RO PL SK HU | Contacts with admin | | Add to bookmarks
Kalina Hatchback (2004-2013) | Kalina Sedan (2004-2013) | Granta 1 (2011-2023) | Priora 1 (2007-2018) | Vesta 1 (2015-2023) | Largus 1 (2012-2023) | X-Ray 1 (2015-2022) |
This site uses cookies to ensure everything runs smoothly.