
Car repair AvtoVAZ Car repair Renault Car repair Hyundai Car repair Ford Car repair Volkswagen Car repair Audi Car repair Chevrolet
English Русский
Български
Беларускі
Український
Српски
Hrvatski
Română
Polski
Slovenský
Magyar
articles sitemap contacts bookmark
LadaMan.ru


Kalina Granta Priora Vesta Largus XRAY
Priora 1 (2007-2018, VAZ-2170)

Replacing the rear suspension beam (Priora 2170)

  • Main
  • Priora
  • Priora 1
  • Chassis (running gear)
  • Car suspension
  • Replacing the rear suspension beam
0
It is more convenient to remove the rear axle on a lift. If it is not possible to place the vehicle on a lift, carefully raise the rear of the vehicle by placing a jack under the beam. Then place supports under the jack mounting sockets on the car body.

Note: When removing the rear axle, you must have assistants who will hold and lower the rear suspension beam.


Note: If you intend to disassemble the beam after removing it, first loosen the wheel mounting bolts and hub nuts.
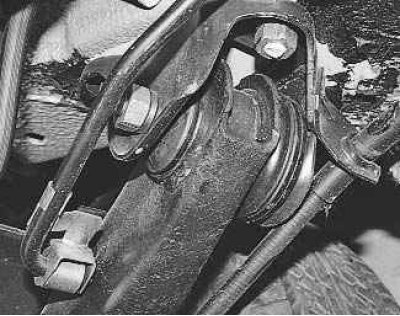

Replacing worn rubber-metal hinges of the rear suspension beam arms requires special tools and…


Replacing worn rubber-metal hinges of the rear suspension beam arms requires special tools and skills, so it is recommended to replace the hinges in a specialized workshop.

Caution! Loosen and tighten the wheel mounting bolts only with the vehicle on the ground. Tightening torque of bolts 65–95 N·m (6.5–9.5 kgf·m).


You will need: a 15 mm wrench, two 19 mm wrenches, and a special 10 mm wrench for loosening the brake pipe nuts.

1. Remove the rear suspension shock absorbers on both sides of the vehicle (see "Replacing the shock absorber and rear suspension spring").

2. Disconnect the parking brake cables from the equalizer, remove the sheaths of both cables from the bracket on the body, bend back the two brackets securing each cable to the body and remove both cables from the rear suspension beam mounting brackets for easy access to the beam mounting bolt (see Fig. "Replacing the parking brake cable").


3. Disconnect the pressure regulator drive elastic lever earring from the bracket on the rear suspension beam (see "Removing and installing the pressure regulator").
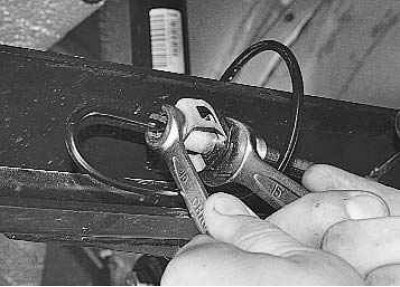
4. Disconnect one brake hose on each side from the tubes on the rear suspension beam. Plug the hose…


4. Disconnect one brake hose on each side from the tubes on the rear suspension beam. Plug the hose openings.
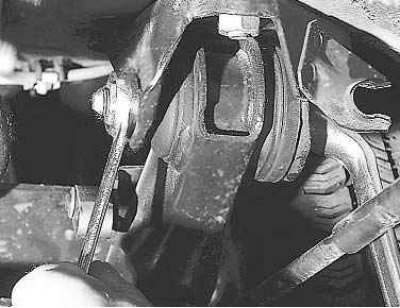
5. Unscrew one nut on each side of the bolts securing the beam to the brackets, knock out the bolts…


5. Unscrew one nut on each side of the bolts securing the beam to the brackets, knock out the bolts and remove the beam, rolling it out on its wheels from under the car.
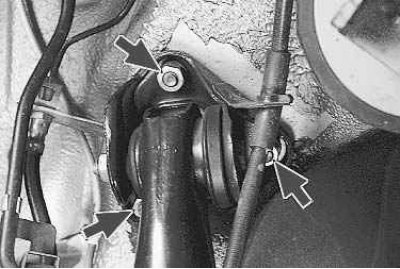
Note: The manufacturer recommends removing the beam together with the brackets by unscrewing the…


Note: The manufacturer recommends removing the beam together with the brackets by unscrewing the three nuts that secure them. However, after prolonged use, rusty studs may break. Therefore, it is better to remove the beam by disconnecting it from the brackets, which will remain on the body.


6. Install the rear suspension beam in the reverse order of removal.

Finally tighten the beam mounting bolts with the vehicle on the ground. After installation, bleed the brake system and adjust the parking brake.


This article is available at russian, bulgarian, belarusian, ukrainian, serbian, croatian, romanian, polish, slovak, hungarian
This article has been reviewed: Vladislav Voloshin
Share with friends:
◀ Previous
Lada Priora 1: Car suspension
 

Replacing the rear suspension hub bearing
Replacing the shock absorber and rear suspension spring
Possible faults of the rear suspension
Features of the rear suspension design
Replacing the front suspension hub bearing
 
More articles with information from manuals for Lada:

• Replacing the rear suspension beam Lada Kalina Sedan (2004-2013, VAZ-1118)
• Rear suspension beam — silent block replacement Lada Granta 1 (2011-2023, VAZ-2190)
• Rear suspension beam — removal and installation Lada Vesta 1 (2015-2023, VAZ-2180)
• Rear suspension — design description Lada Largus 1 (2012-2023)
• Rear suspension — design features Lada X-Ray 1 (2015-2022)
Link to this article in various formats
Reviews and comments of visitors
No comments yet


Add up two numbers: 32 + 33


Priora 1 (2007-2018) 
  • General information
  • Vehicle device
  • User manual
  • Faults en route
  • Maintenance
  • Power unit
  • Engine repair
  • Cooling and lubrication system
  • Supply system
  • Exhaust system
  • Transmission
  • Clutch
  • Car gearbox
  • Drive shafts
  • Chassis (running gear)
  • Car suspension
  • Steering
  • Brake system
  • Body and interior
  • Exterior (external elements)
  • Interior (internal elements)
  • Doors, locks and windows
  • Electrical equipment
  • Equipment and devices
  • Power devices
  • Lighting and signaling
  • Cooling and heating
  • Electrical circuits
LadaMan.ru © 2018–2026 | Mobile version | About Lada | Sitemap: EN BG BY UA RS HR RO PL SK HU | Contacts with admin | | Add to bookmarks
Kalina Hatchback (2004-2013) | Kalina Sedan (2004-2013) | Granta 1 (2011-2023) | Priora 1 (2007-2018) | Vesta 1 (2015-2023) | Largus 1 (2012-2023) | X-Ray 1 (2015-2022) |
This site uses cookies to ensure everything runs smoothly.