



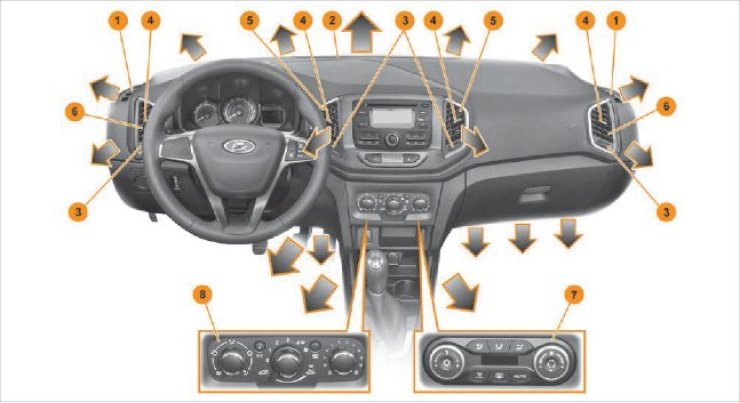
Figure 6.1. Climate system: 1 – Blowing nozzles (unregulated) side windows. 2 – Blowing nozzles (unregulated) windshield. 3 – Nozzle flap control regulator. 4 – Air flow direction adjustment handle. 5 – Central ventilation nozzles (adjustable). 6 – Side ventilation nozzles (adjustable). 7 – Automatic climate control panel (in a variant design). 8 – Manual climate control panel.
The car's climate control system is designed to clear the glass from fogging, icing and to create a comfortable air temperature in the cabin.
Direction of air supply through the central 5 and side 6 ventilation flaps (Figure 6.1) the ventilation nozzles on the instrument panel can be adjusted using the nozzle flap control knob 1 (Figure 6.2) and air flow direction adjustment handles 2.
To close the ventilation openings, switch control 1 to position O.
The air flow direction can be adjusted by moving the adjustment handle 2 in the directions shown by the arrows.
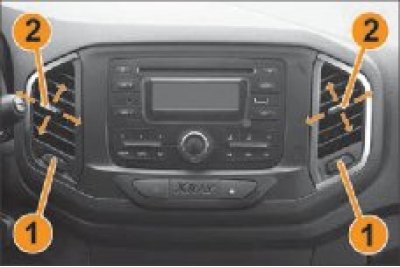
Figure 6.2. Adjusting air flows through ventilation nozzles: 1 – Nozzle flap control regulator. 2 – Air flow direction adjustment handle.
Manual climate control system
Figure 6.3 shows the control panel for the manual climate control system and air conditioning (in a variant design).
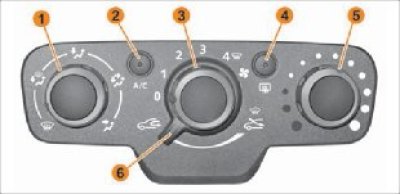
Figure 6.3. Control panel of the manual climate control system: 1 – Rotary regulator for air flow distribution. 2 – Air conditioning mode on/off button with indicator light (in a variant design). 3 – Rotary air flow speed regulator. 4 – Button for turning on the heated rear window and rear-view mirrors (in a variant design) with indicator light. 5 – Rotary regulator of air flow temperature. 6 – Rotary lever for turning on the air recirculation mode (mode of isolating the interior from the outside air).
To control the air flow distribution, it is necessary to install a rotary regulator 1 (Figure 6.3) into any of the five main positions, indicated by the corresponding symbols around the perimeter of the handle.
In addition, four "mixed" distribution modes are provided, corresponding to intermediate positions of rotary regulator 1.
To regulate the air temperature, set the desired air temperature with regulator 5. The more the regulator is shifted towards the red zone, the higher the temperature of the air entering the cabin.
To adjust the fan speed, select the position of the regulator 3 from "1" to "4". The higher the selected value, the more air is supplied to the passenger compartment. To turn off the climate control fan, set the regulator 3 to the "0" position. When the car is moving at high speed, with the fan turned off, you may feel a weak air flow from the ventilation nozzles and glass blower.
Warning! Driving for a long time with the climate control system turned off may cause the windows to fog up, as well as unpleasant odors, since air exchange in the car interior is stopped.
Air recirculation (interior insulation)
In recirculation mode, air is taken from the passenger compartment and re-entered into the passenger compartment without mixing with outside air. This allows you to block the access of outside air (when driving in areas with polluted air, in a tunnel, when driving in traffic jams) and speed up the achievement of the required air temperature in the car interior.
The recirculation mode is activated by turning lever 6 to the extreme left position.
You can turn off the recirculation mode by turning lever 6 to the extreme right position.
It is recommended to turn off the air recirculation mode as soon as it is no longer needed.
Warning! The air recirculation mode should not be left on for long periods of time (more than 20 minutes), since "stale" air increases driver and passenger fatigue and reduces the ability to concentrate, and under certain conditions causes fogging of the windows. The risk of an accident increases. turn off the recirculation mode immediately if the windows begin to fog up.
Electric heated rear window and outside mirrors (in a variant design)
To turn on the heated rear window and rear view mirrors (in a variant design) with the engine running, press button 4, the indicator light will come on. This function eliminates and prevents icing, freezing and fogging of the rear window and outside rear-view mirrors (in a variant design).
The termination of work occurs:
- automatically, after the time set in the system (the indicator light on button 4 will go out);
- when you press button 4 again (the indicator light on button 4 will go out);
- automatically when the on-board network voltage drops or the battery charge level falls below the permissible level.
Air conditioning (interior cooling) (in a variant design)
To turn on the air conditioner with the engine running and the climate control fan on (controller 3 is in position from "1" to "4"), press button 2, the indicator light will light up.
Use regulator 5 to set the required temperature of the air supplied to the passenger compartment and adjust the direction of the air flow using regulator 1.
To turn off the air conditioner, press button 2 again, the indicator light will go out.
Automatic climate control system (in a variant design)
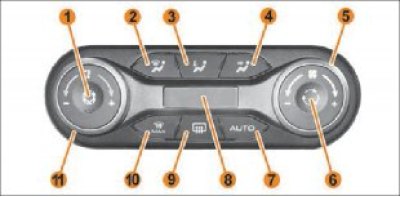
Figure 6.4. Control panel of the climate control system with automatic control:
1 – Air conditioning mode switch button with indicator light.
2 – Push-button switch for air flow distribution mode to the windshield and front side windows ("to the front windows") with a light indicator.
3 – Push-button switch for distributing air flow to the driver's and passenger's footwells ("to the feet") with a light indicator.
4 – Push-button switch for air flow distribution mode to adjustable deflectors on the instrument panel ("in the face") with a light indicator.
5 – Rotary switch for controlling the speed of air flow from the nozzles.
6 – Button for turning on the "air recirculation in the cabin" mode with a light indicator.
7 – AUTO pushbutton switch (automatic climate control mode).
8 – Climate control panel information board (information about the set temperature and air flow rate).
9 – Push-button switch for heating the rear door glass and outside rear-view mirrors.
10 – MAX pushbutton switch (mode "max defrost").
11 – Rotary switch for controlling the supply air temperature.
Article copied from this portal [LadaMan.ru]
Left zone of information board 8 (Figure 6.4) informs about the set temperature of the supplied air, the right zone – about the set air flow speed.
The temperature level of the air supplied to the passenger compartment is set by turning the handle 11 from the minimum LO to the maximum HI. When the LO level is selected, the air mixing flap will be closed and all the air will go bypassing the heater radiator. When the HI level is selected, the air mixing flap will be fully open and all air will flow through the heater core. Between the two extreme levels on the left side of the display, numbers will be displayed indicating the set air temperature in the cabin.
The amount of air supplied to the cabin (fan speed) is set by turning handle 5.
Information about the amount of air supplied is presented on the right side of the information board in the form of vertical bars: the more bars are illuminated, the more air is supplied to the cabin.
Handles 11 and 5 have no rotation angle limitation. Turning the knobs clockwise increases the parameters, and counterclockwise decreases them.
Manual climate control
Press one of the buttons 2, 3 or 4 to distribute the air flow in the required direction (the built-in indicator on the button will light up).
If you need to select intermediate air flow distribution modes "to the windows - to the feet", "to the face - to the feet" in manual control mode, press two buttons with the corresponding symbols simultaneously or sequentially.
When selecting one of the intermediate modes, the light indicators of the two push-button switches are activated in one or another combination.
Air recirculation (interior insulation)
In recirculation mode, air is taken from the passenger compartment and re-entered into the passenger compartment without mixing with outside air. This allows you to block the access of outside air (when driving in areas with polluted air, in a tunnel, when driving in traffic jams) and speed up the achievement of the required air temperature in the car interior.
The recirculation mode is switched on/off using button 6 (the built-in indicator on the button will light up/go out). It is recommended to turn off the air recirculation mode as soon as it is no longer needed.
Warning! The air recirculation mode should not be left on for long periods of time (more than 20 minutes), since "stale" air increases driver and passenger fatigue and reduces the ability to concentrate, and under certain conditions causes fogging of the windows. The risk of an accident increases. turn off the recirculation mode immediately if the windows begin to fog up.
Electric heated rear window and outside rear view mirrors
To turn on the rear window and rear view mirror heating with the engine running, press button 9, the indicator light will come on. This function eliminates and prevents icing, freezing and fogging of the rear window and outside rear-view mirrors.
The termination of work occurs:
- automatically, after the time set in the system (the indicator light on button 9 will go out);
- when you press button 9 again (the indicator light on button 9 will go out);
- automatically when the on-board network voltage drops or the battery charge level falls below the permissible level.
Air conditioning (interior cooling)
To turn on the air conditioner with the engine running and the air conditioning fan on (regulator 5 is in a position other than the extreme left) press button 1, the indicator light will light up.
Use regulator 11 to set the required temperature of the air supplied to the passenger compartment and press one of the buttons 2, 3 or 4 to distribute the air flow in the required direction (the built-in indicator on the button will light up).
To turn off the air conditioner, press button 1 again, the indicator light will go out.
Automatic climate control mode
The automatic operation mode of the climate control system is switched on/off using button 7 (AUTO).
After turning on the automatic mode, use regulator 11 to set a comfortable temperature.
The climate control system in automatic mode provides (except in extreme weather conditions) good visibility and comfortable conditions in the car interior with optimal fuel consumption.
The system automatically regulates the temperature, speed and distribution of air flows from the nozzles, switching on the recirculation and air conditioning modes depending on external conditions.
Mode "max defrost" and heated windshield (in a variant design)
Mode "max defrost" it is switched on/off by button 10 (MAX) and is designed to provide better visibility through the windows and rear-view mirrors. If the function is switched on, air is automatically supplied only to the windshield and front side windows with the optimum speed and humidity, ensuring maximum speed of cleaning the windows from frost or condensation. When you press the MAX button, the air conditioner turns on automatically (the indicator light will come on), electric heated rear door glass, heated outside mirrors and windshield (in a variant design), the air recirculation mode in the cabin is automatically switched off (if it is on). The temperature of the air supplied to the passenger compartment must be set independently: in winter, to heat the glass, it is necessary to set the maximum temperature; in warmer weather, to dry the glass, it is permissible to set a lower temperature.
Warning! When selecting the "window" mode, all air is used to defrost/demist the windows, while no air is supplied to the footwell area for heating. This may cause mild discomfort. After defrosting or removing condensation from the glass, switch the system to any mode that is comfortable for you (direction of air flow "to the face", "to the feet" or any of the two intermediate modes).
Elimination of frost and fogging of glass
Before driving, use a soft brush to remove snow and ice from the windshield, rear window, outside rearview mirrors and all side windows. Remove snow and ice from the hood and air intake grille to improve the efficiency of the interior heater and defroster, and to reduce fogging of the inside of the windshield. It is not recommended to use hard scrapers to remove ice from glass to avoid scratches on the glass.
Do not allow the air humidity in the car to increase due to the evaporation of water and snow from carpets and rubber mats; clean them promptly.
To reduce fogging of the inner surface of the glass in rainy or humid weather, you need to reduce the humidity in the cabin by turning on the air conditioner (in a variant design). If the air distribution mode "on the glass" or "on the glass - to the feet" is turned on on the climate control panel, and the air conditioner is operating in the cooling mode, then at a high level of humidity in the outside air, due to the difference in temperature between the outside air and the windshield, fogging of the outer surface of the windshield may occur, which will lead to loss of visibility. In this case, you need to turn off the air conditioner and switch the fan speed to minimum.
To prevent the glass from fogging up, the fan must be kept on at all times.
At positive ambient temperatures, to remove condensation from the inside surface of the windshield and side windows, and at negative ambient temperatures, to remove frost as effectively as possible, follow the recommendations below.
For manual climate control system:
- turn the temperature control all the way to the right;
- set the fan speed control to maximum speed;
- move the air flow distribution regulator to the "on the glass" position;
- recirculation mode must be turned off;
- open the side nozzles and direct the air flow towards the side windows.
In the automatic climate control system, to quickly remove frost from the inside of the windshield and side windows, press the MAX button and set the maximum air temperature. You can also use the same recommendations as for a manual climate control system.
Attention! Keep your car windows clean, as dirty windows retain more moisture and take longer to defrost.