
Car repair AvtoVAZ Car repair Renault Car repair Hyundai Car repair Ford Car repair Volkswagen Car repair Audi Car repair Chevrolet
English Русский
Български
Беларускі
Український
Српски
Hrvatski
Română
Polski
Slovenský
Magyar
articles sitemap contacts bookmark
LadaMan.ru


Kalina Granta Priora Vesta Largus XRAY
Kalina Sedan (2004-2013, VAZ-1118) Kalina Hatchback (2004-2013, VAZ-1119)

Thermostat — Removal, Replacement and Installation (Kalina 1119)

  • Main
  • Kalina
  • Kalina Hatchback
  • Power unit
  • Cooling system
  • Thermostat — Removal, Replacement and Installation
0
Contents: Replacement ⇣ Removal ⇣ Installation ⇣
The thermostat is detachable - the parts of the thermostat housing are connected with bolts, so if necessary, only the thermostat actuator can be replaced (thermoelement assembled with valves).

Replacement


1. Drain the coolant (see "Coolant - Replacement").

2. Remove the air filter (see "Air filter - removal and installation").

3. Using a Phillips screwdriver, loosen the clamps securing the two hoses to the thermostat pipes.
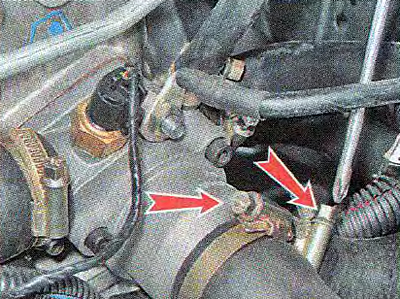
3. Using a Phillips screwdriver, loosen the clamps securing the two hoses to the thermostat pipes.


4. Disconnect the hoses from the thermostat pipes.

5. Using a 5 mm Allen key, unscrew the three thermostat housing tie bolts.
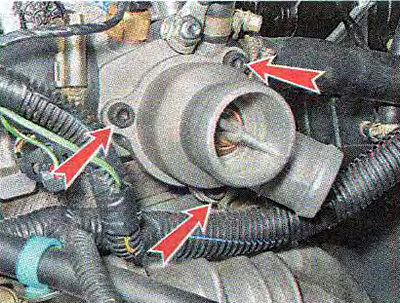
5. Using a 5 mm Allen key, unscrew the three thermostat housing tie bolts.


6. Disconnect the thermostat housing and remove the rubber sealing ring. We replace the damaged sealing ring.
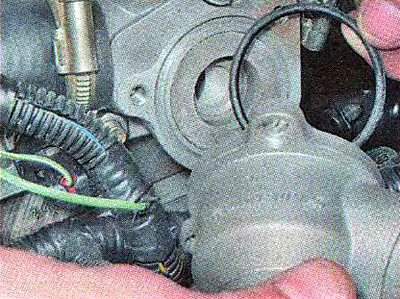
6. Disconnect the thermostat housing and remove the rubber sealing ring. We replace the damaged…


7. Press and turn the thermostat spring stop plate...
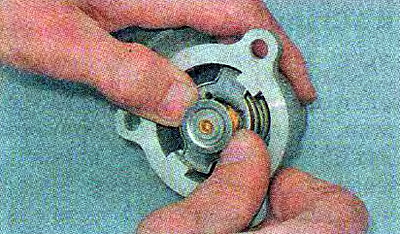


7. Press and turn the thermostat spring stop plate...


... and we remove the thermostat actuator from the removed part of the housing.
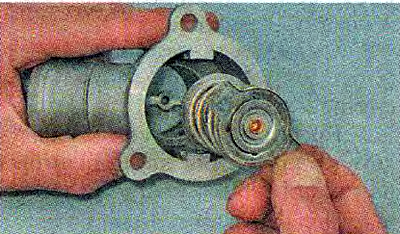
... and we remove the thermostat actuator from the removed part of the housing.


Note: You can check the functionality of the thermostat by placing it in a container with water heated to a temperature close to the boiling point. The valve should open.


8. Assemble and install the thermostat in reverse order.

Removal


1. To remove the thermostat assembly, disconnect the two hoses from the thermostat cover pipes (see above 1-4).

2. Similarly, disconnect three more hoses from the thermostat pipes.
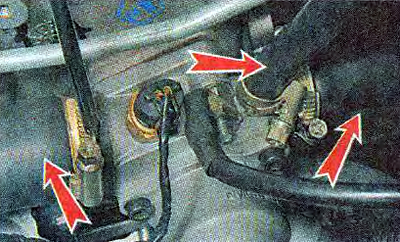
2. Similarly, disconnect three more hoses from the thermostat pipes.


3. Disconnect the wiring harness from the coolant temperature sensor.
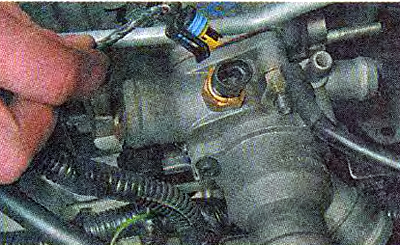


3. Disconnect the wiring harness from the coolant temperature sensor.


4. Using a 13 mm deep-head socket wrench, unscrew the nut securing the ground wire.
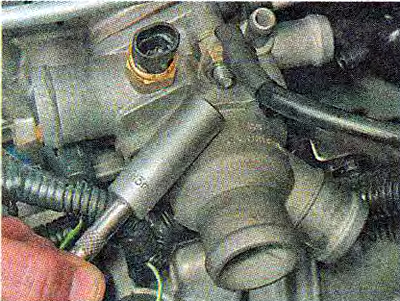
4. Using a 13 mm deep-head socket wrench, unscrew the nut securing the ground wire.


5. Using the same wrench, unscrew the two nuts securing the thermostat to the cylinder head.
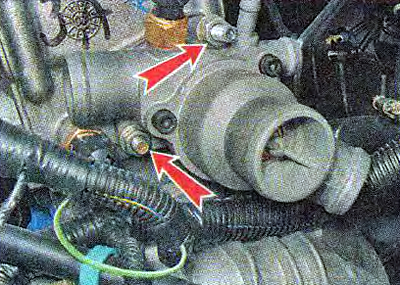
5. Using the same wrench, unscrew the two nuts securing the thermostat to the cylinder head.


6. Remove the thermostat from the studs and remove the sealing gasket.
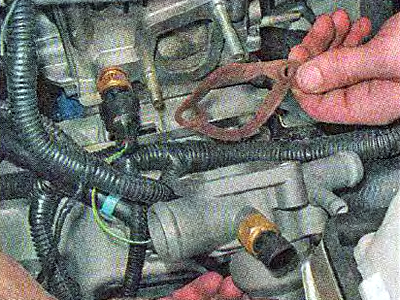
6. Remove the thermostat from the studs and remove the sealing gasket.


7. If necessary, unscrew the coolant temperature sensor (see "Coolant Temperature Sensor - Checking and Replacing").


Installation


1. Install the thermostat in the reverse order, replacing the sealing gasket with a new one.

2. Fill the system with coolant (see "Coolant - Replacement").

3. Make sure there is no fluid leakage at the points where the hoses are connected to the thermostat. If necessary, tighten the hose clamps.


This article is available at russian, bulgarian, belarusian, ukrainian, serbian, croatian, romanian, polish, slovak, hungarian
This article has been reviewed: Polina Kudryashova
Share with friends:
◀ Previous
Lada Kalina Hatchback: Cooling system
Next ▶

Expansion tank — removal and installation
Coolant — Replacement
Checking the technical condition of the cooling system
Description of the design of the cooling system
Cooling system reference data
Coolant Pump — Replacement
Additional electric fan resistor — checking and replacing
Electric fan — removal, disassembly and installation
Engine cooling system radiator — removal and installation
More articles with information from manuals for Lada:

• Thermostat — Removal, Replacement and Installation Lada Granta 1 (2011-2023, VAZ-2190)
• Replacing the cooling system thermostat Lada Priora 1 (2007-2018, VAZ-2170)
• Thermostat — replacement Lada Vesta 1 (2015-2023, VAZ-2180)
• Thermostat — removal and installation Lada Largus 1 (2012-2023)
Link to this article in various formats
Reviews and comments of visitors
No comments yet


Add up two numbers: 21 + 42


Kalina Sedan (2004-2013) 
  • General information
  • Vehicle device
  • Operation and maintenance
  • Faults en route
  • Power unit
  • Engine repair
  • Cooling and lubrication system
  • Exhaust system
  • Supply system
  • Ignition and control
  • Transmission
  • Clutch and drive shafts
  • Car gearbox
  • Chassis (running gear)
  • Front suspension
  • Rear suspension
  • Steering
  • Brake system
  • Body and interior
  • Exterior (external elements)
  • Interior (internal elements)
  • Doors, locks and windows
  • Electrical equipment
  • Equipment and devices
  • Power devices
  • Lighting and signaling
  • Heating and ventilation
Kalina Hatchback (2004-2013) 
  • General information
  • Vehicle Details
  • Maintenance
  • Troubleshooting
  • Power unit
  • Engine repair
  • Cooling system
  • Supply system
  • Control system
  • Exhaust system
  • Transmission
  • Clutch
  • Car gearbox
  • Drive shafts
  • Chassis (running gear)
  • Wheels and tires
  • Front suspension
  • Rear suspension
  • Steering
  • Brake system
  • Body and interior
  • Exterior (external elements)
  • Interior (internal elements)
  • Doors, locks and windows
  • Electrical equipment
  • Equipment and devices
  • Power devices
  • Lighting and signaling
  • Electrical circuits
LadaMan.ru © 2018–2026 | Mobile version | About Lada | Sitemap: EN BG BY UA RS HR RO PL SK HU | Contacts with admin | | Add to bookmarks
Kalina Hatchback (2004-2013) | Kalina Sedan (2004-2013) | Granta 1 (2011-2023) | Priora 1 (2007-2018) | Vesta 1 (2015-2023) | Largus 1 (2012-2023) | X-Ray 1 (2015-2022) |
This site uses cookies to ensure everything runs smoothly.