
Car repair AvtoVAZ Car repair Renault Car repair Hyundai Car repair Ford Car repair Volkswagen Car repair Audi Car repair Chevrolet
English Русский
Български
Беларускі
Український
Српски
Hrvatski
Română
Polski
Slovenský
Magyar
articles sitemap contacts bookmark
LadaMan.ru


Kalina Granta Priora Vesta Largus XRAY
Kalina Sedan (2004-2013, VAZ-1118) Kalina Hatchback (2004-2013, VAZ-1119)

Interior rear view mirror — removal and installation (Kalina 1119)

  • Main
  • Kalina
  • Kalina Hatchback
  • Body and interior
  • Interior (internal elements)
  • Interior rear view mirror — removal and installation
0
Contents: Removal ⇣ Installation ⇣
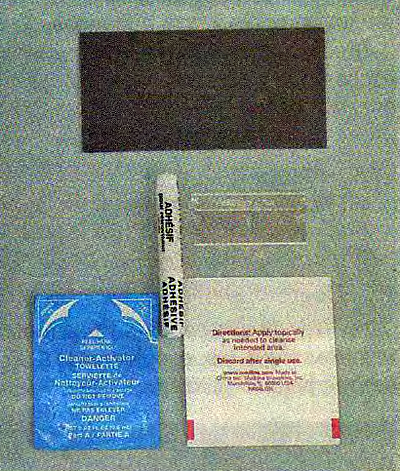
The interior rearview mirror is glued to the windshield. When replacing the windshield, it is necessary to reinstall the mirror. To perform such work, you need a special glass glue. There are special repair kits available for gluing mirrors. In addition to glue, the kit usually comes with sandpaper, a scraper and napkins soaked in special compounds.

The interior rearview mirror is glued to the windshield. When replacing the windshield, it is…


Warning. The work must be carried out at an ambient temperature of 10-25°C. Since the properties of the preparations included in the kit may differ among different manufacturers, when performing the work, it is necessary to follow the instructions attached to the kit. Below are general recommendations for installing a mirror.


Removal


1. Prepare the car for work and disconnect the terminal from the negative terminal of the battery (see "Preparing a car for technical inspection and repair").

2. Using a slotted screwdriver with a thin blade, unscrew the mirror mounting screw.
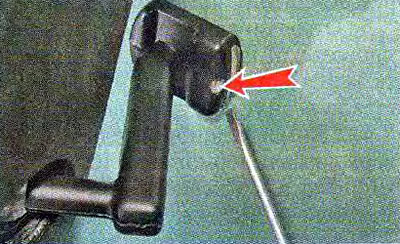
2. Using a slotted screwdriver with a thin blade, unscrew the mirror mounting screw.


3. Slide it up and remove the mirror from the bracket.
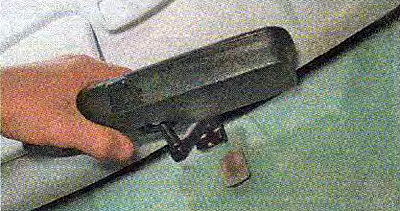


3. Slide it up and remove the mirror from the bracket.


Recommendation. When the bracket is knocked down, the glass breaks. Therefore, the bracket should be removed from the glass that has already been removed.


Installation


1. Remove any remaining glass from the bracket and sand the surface of the bracket intended for applying glue.

Warning: Wipes should be used within two minutes of opening the package.


2. Clean the glass with a cloth with a cleaning solution (at the place where the mirror is installed) and bracket.
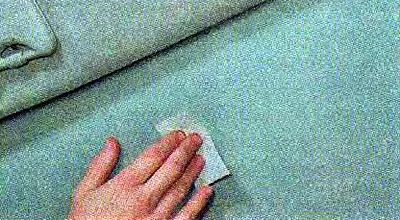
2. Clean the glass with a cloth with a cleaning solution (at the place where the mirror is…


3. In the middle of the glass, stepping back about 50 mm from the ceiling trim, we mark the place for installing the mirror with a marker (if necessary, use a tape measure or ruler).

4. Using the second napkin with activator, degrease the surfaces to be glued.


5. Apply glue to the bracket.
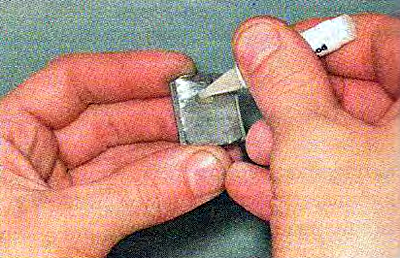
5. Apply glue to the bracket.


6. Press the bracket against the glass in accordance with the markings and hold it in this position for a minute.
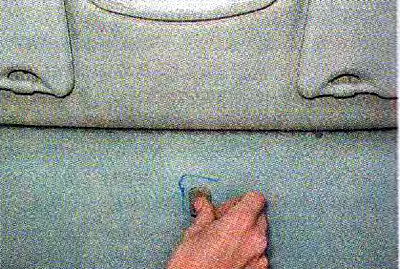
6. Press the bracket against the glass in accordance with the markings and hold it in this position…


Warning: Wait at least 30 minutes before installing the mirror on the bracket.


7. Place the mirror on the bracket and tighten the mounting screw.


This article is available at russian, bulgarian, belarusian, ukrainian, serbian, croatian, romanian, polish, slovak, hungarian
This article has been reviewed: Polina Kudryashova
Share with friends:
 
Lada Kalina Hatchback: Interior (internal elements)
Next ▶

 
Floor Tunnel Lining — Removal and Installation
Instrument panel console trim — removal and installation
Instrument panel — removal and installation
Interior ventilation and heating system: reference data
Interior ventilation and heating system: design description
More articles with information from manuals for Lada:

• Interior rear view mirror — removal and installation Lada Granta 1 (2011-2023, VAZ-2190)
• Removal and installation the interior rearview mirror Lada Priora 1 (2007-2018, VAZ-2170)
• Outside rear view mirror — removal and installation Lada Vesta 1 (2015-2023, VAZ-2180)
• Interior rear view mirror Lada Largus 1 (2012-2023)
• Interior mirror Lada X-Ray 1 (2015-2022)
Link to this article in various formats
Reviews and comments of visitors
No comments yet


Add up two numbers: 44 + 48


Kalina Sedan (2004-2013) 
  • General information
  • Vehicle device
  • Operation and maintenance
  • Faults en route
  • Power unit
  • Engine repair
  • Cooling and lubrication system
  • Exhaust system
  • Supply system
  • Ignition and control
  • Transmission
  • Clutch and drive shafts
  • Car gearbox
  • Chassis (running gear)
  • Front suspension
  • Rear suspension
  • Steering
  • Brake system
  • Body and interior
  • Exterior (external elements)
  • Interior (internal elements)
  • Doors, locks and windows
  • Electrical equipment
  • Equipment and devices
  • Power devices
  • Lighting and signaling
  • Heating and ventilation
Kalina Hatchback (2004-2013) 
  • General information
  • Vehicle Details
  • Maintenance
  • Troubleshooting
  • Power unit
  • Engine repair
  • Cooling system
  • Supply system
  • Control system
  • Exhaust system
  • Transmission
  • Clutch
  • Car gearbox
  • Drive shafts
  • Chassis (running gear)
  • Wheels and tires
  • Front suspension
  • Rear suspension
  • Steering
  • Brake system
  • Body and interior
  • Exterior (external elements)
  • Interior (internal elements)
  • Doors, locks and windows
  • Electrical equipment
  • Equipment and devices
  • Power devices
  • Lighting and signaling
  • Electrical circuits
LadaMan.ru © 2018–2026 | Mobile version | About Lada | Sitemap: EN BG BY UA RS HR RO PL SK HU | Contacts with admin | | Add to bookmarks
Kalina Hatchback (2004-2013) | Kalina Sedan (2004-2013) | Granta 1 (2011-2023) | Priora 1 (2007-2018) | Vesta 1 (2015-2023) | Largus 1 (2012-2023) | X-Ray 1 (2015-2022) |
This site uses cookies to ensure everything runs smoothly.