
Car repair AvtoVAZ Car repair Renault Car repair Hyundai Car repair Ford Car repair Volkswagen Car repair Audi Car repair Chevrolet
English Русский
Български
Беларускі
Український
Српски
Hrvatski
Română
Polski
Slovenský
Magyar
articles sitemap contacts bookmark
LadaMan.ru


Kalina Granta Priora Vesta Largus XRAY
Priora 1 (2007-2018, VAZ-2170)

Checking the operation of the brake booster (Priora 2170)

  • Main
  • Priora
  • Priora 1
  • General information
  • Maintenance
  • Checking the operation of the brake booster
0
When the vacuum booster fails, the force on the brake pedal increases significantly, which negatively affects vehicle control.

If the pedal effort is noticeably greater than normal when braking, check the brake booster with the vehicle stationary.

You will need: pliers, rubber bulb.

1. With the engine not running, press the brake pedal five to six times. Keeping the pedal depressed, start the engine. The brake pedal should move forward.
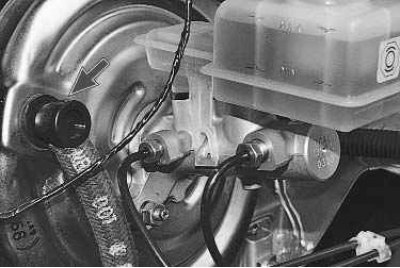
2. If this does not happen, check the tightness…


2. If this does not happen, check the tightness of the connections of the vacuum booster hose with the check valve..
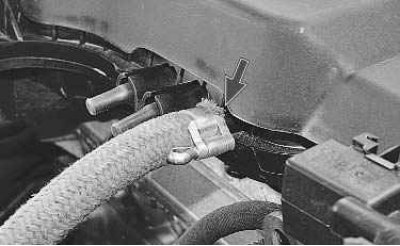
3. …and the intake pipe, if necessary, eliminate…


3. …and the intake pipe, if necessary, eliminate air leaks. If this does not give a positive result, then the amplifier is faulty and must be replaced.


Article based on information from the website [ladaman.ru]

4. To check the vacuum booster for leaks, open the hood and start the engine for 1 minute. Approximately 30 seconds after the engine is turned off, press the brake pedal twice; you should hear the characteristic hiss of air entering the booster.

5. Additionally, check the booster check valve; if it is faulty, the vacuum in the booster vacuum cavity is not maintained when the engine load changes or when it is stopped. To check, hold the valve and disconnect the vacuum hose from it.
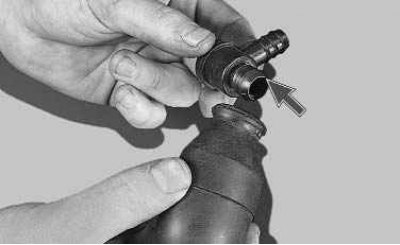
6. Remove the valve from the rubber seal of the…


6. Remove the valve from the rubber seal of the booster flange and place it on the valve nipple (short, larger diameter) rubber bulb (for example, from a hydrometer)...
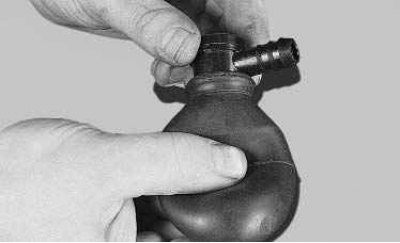
7. ...and squeeze it.
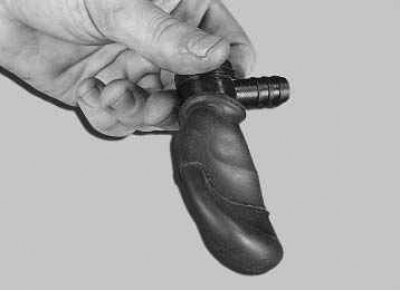

7. ...and squeeze it.


8. If the valve is working properly, the bulb…


8. If the valve is working properly, the bulb will remain compressed. If the bulb straightens out, replace the valve and retest the booster.

9. Reinstall the removed parts in the reverse order of removal.

Note: If a fault is found in the amplifier, replace it with a new one, since amplifier repair work is very labor-intensive, requires appropriate skills and the use of special installation and adjustment equipment.


This article is available at russian, bulgarian, belarusian, ukrainian, serbian, croatian, romanian, polish, slovak, hungarian
This article has been reviewed: Vladislav Voloshin
Share with friends:
◀ Previous
Lada Priora 1: Maintenance
Next ▶

Diagnostics of the electronic engine management system
Lubrication of body fittings
Checking the level and adding oil to the gearbox
Checking the level and adding fluid to the washer reservoir
Checking the level and adding brake fluid to the master cylinder reservoir
Checking the parking brake
Checking the efficiency of the braking system
Checking the free play (play) of the steering wheel
Checking and adjusting the front wheel alignment angles
Checking and adjusting headlights
More articles with information from manuals for Lada:

• Checking the operation of the brake booster Lada Kalina Sedan (2004-2013, VAZ-1118)
• Brake fluid level in the master cylinder reservoir — checking Lada Granta 1 (2011-2023, VAZ-2190)
• Checking the relay for proper operation Lada Vesta 1 (2015-2023, VAZ-2180)
• Brake booster hose Lada Largus 1 (2012-2023)
• Checking the tightness of the service brake system Lada X-Ray 1 (2015-2022)
Link to this article in various formats
Reviews and comments of visitors
No comments yet


Add up two numbers: 36 + 24


Priora 1 (2007-2018) 
  • General information
  • Vehicle device
  • User manual
  • Faults en route
  • Maintenance
  • Power unit
  • Engine repair
  • Cooling and lubrication system
  • Supply system
  • Exhaust system
  • Transmission
  • Clutch
  • Car gearbox
  • Drive shafts
  • Chassis (running gear)
  • Car suspension
  • Steering
  • Brake system
  • Body and interior
  • Exterior (external elements)
  • Interior (internal elements)
  • Doors, locks and windows
  • Electrical equipment
  • Equipment and devices
  • Power devices
  • Lighting and signaling
  • Cooling and heating
  • Electrical circuits
LadaMan.ru © 2018–2026 | Mobile version | About Lada | Sitemap: EN BG BY UA RS HR RO PL SK HU | Contacts with admin | | Add to bookmarks
Kalina Hatchback (2004-2013) | Kalina Sedan (2004-2013) | Granta 1 (2011-2023) | Priora 1 (2007-2018) | Vesta 1 (2015-2023) | Largus 1 (2012-2023) | X-Ray 1 (2015-2022) |
This site uses cookies to ensure everything runs smoothly.