Car repair AvtoVAZ Car repair Renault Car repair Hyundai Car repair Ford Car repair Volkswagen Car repair Audi Car repair Chevrolet
English Русский
Български
Беларускі
Український
Српски
Hrvatski
Română
Polski
Slovenský
Magyar
articles sitemap contacts bookmark
LadaMan.ru


Kalina Granta Priora Vesta Largus XRAY
Granta 1 (2011-2023, VAZ-2190)

Camshaft — Removal and Installation (Granta 2190)

  • Main
  • Granta
  • Granta 1
  • Power unit
  • Engine repair
  • Camshaft — Removal and Installation
0
Contents: Removal ⇣ Installation ⇣

Removal


1. Remove the timing belt ("Timing Belt - Replacement").

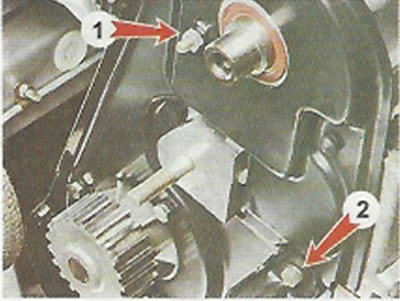
2. Unscrew nut 1 and bolt 2 of the upper fastening of the rear timing belt cover.

2. Unscrew nut 1 and bolt 2 of the upper…


3. Disconnect the throttle cable from the sector and unscrew the cable bracket mounting bolts ("Throttle assembly - removal, inspection, cleaning and installation").

4. Using a 10 mm socket wrench, unscrew the bolt and two nuts securing the plug.
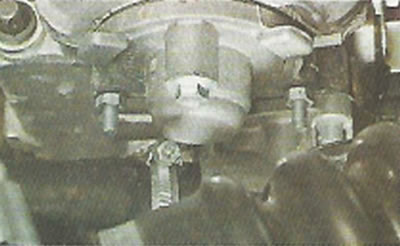
4. Using a 10 mm socket wrench, unscrew the bolt…


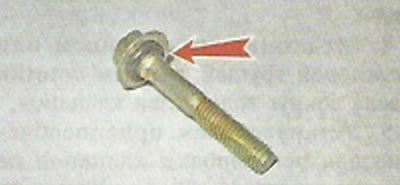
5. A rubber sealing ring is installed on the plug mounting bolt. We replace the damaged sealing ring.

5. A rubber sealing ring is installed on the plug…


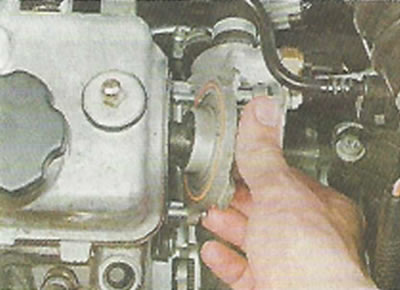
6. Remove the plug.


6. Remove the plug.


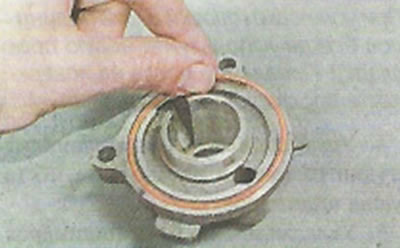
We remove the sealing ring from the plug. We replace the damaged sealing ring.

7. Using a 13 mm socket wrench, tighten (half a turn) we unscrew the ten nuts securing the two bearing housings.
7. Using a 13 mm socket wrench, tighten (half a…


8. Remove the front bearing housing.

8. Remove the front bearing housing.
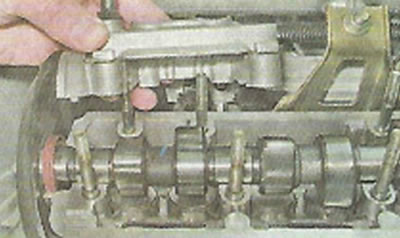

9. Remove the rear bearing housing.
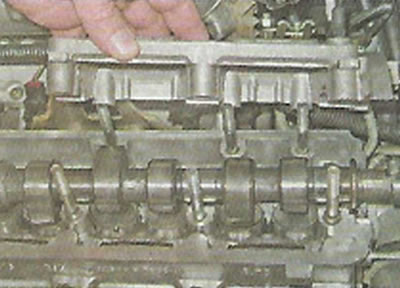
9. Remove the rear bearing housing.


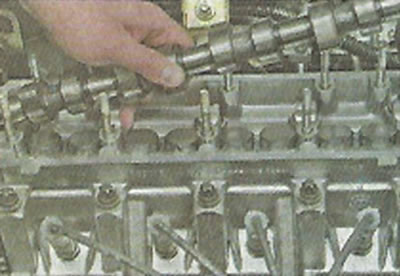
10. Remove the camshaft from the cylinder head by slightly pulling back the rear timing belt cover.


10. Remove the camshaft from the cylinder head by…


11. Remove the oil seal from the camshaft.

Installation


1. Lubricate the camshaft journals with clean engine oil.

2. Place the camshaft into the cylinder head so that the cams of the first cylinder are facing upwards.

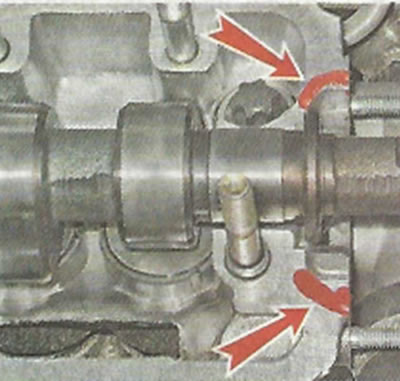
3. Before installing the bearing housings on the mating surface of the cylinder head in the areas of the front oil seal...
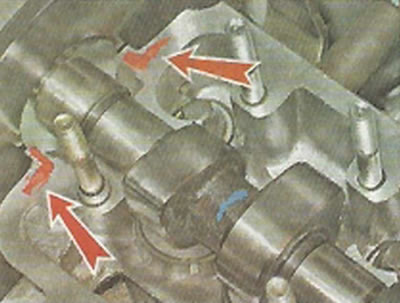
3. Before installing the bearing housings on the…


...and apply a thin layer of Lactate-574 sealant or similar to the plugs.

...and apply a thin layer of Lactate-574 sealant…


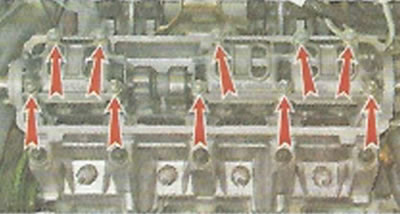
4. Evenly, in several steps, tighten the bearing housing nuts until the housings touch the cylinder head (following the sequence shown in the photo). After this, tighten the nuts to a torque of 18.38-22.64 N·m (1.87-2.31 kgf·m).
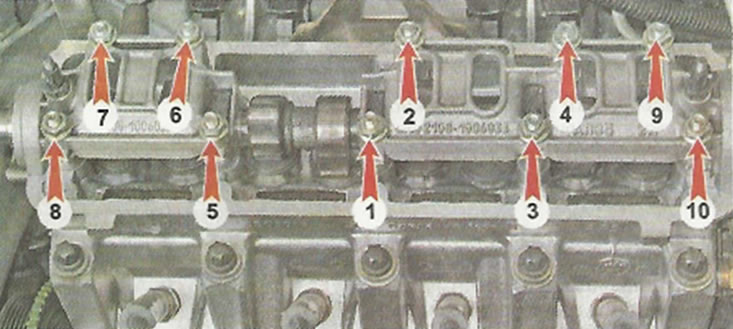


Sequence of tightening bearing housing nuts

Sequence of tightening bearing housing nuts


5. Press in the new camshaft oil seal ("Distribution wat seal - replacement").

6. Before installing the plug, put the sealing ring on it.

6. Before installing the plug, put the sealing…


7. Further assembly is carried out in the reverse order of removal.


This article is available at russian, bulgarian, belarusian, ukrainian, serbian, croatian, romanian, polish, slovak, hungarian
This article has been reviewed: Polina Kudryashova
Share with friends:
◀ Previous
Lada Granta 1: Engine repair
Next ▶

Valve timing drive clearances — adjustment
Camshaft Seal — Replacement
Cylinder Head Cover Gasket — Replacement
Timing Belt Roller — Removal and Installation
Timing belt drive with automatic tensioner — replacement
Valve stem seals — replacement
Cylinder head — removal and installation
Cylinder head — checking, valve grinding
Front Crankshaft Oil Seal — Replacement
Flywheel — removal and installation
More articles with information from manuals for Lada:

• Camshaft Position Sensor — Removal, Checking and Installation Lada Kalina Hatchback (2004-2013, VAZ-1119)
• Removal and installation the decorative engine cover Lada Priora 1 (2007-2018, VAZ-2170)
• Engine trim panel — removal and installation Lada Vesta 1 (2015-2023, VAZ-2180)
• Engine assembly — removal and installation Lada Largus 1 (2012-2023)
• Engine — removal and installation of main systems, units and parts Lada X-Ray 1 (2015-2022)
Link to this article in various formats
Reviews and comments of visitors
No comments yet


Add up two numbers: 28 + 37


Granta 1 (2011-2023) 
  • User manual
  • Governing bodies
  • Vehicle operation
  • Maintenance
  • Radio receiver
  • Radio receiver (option)
  • Power unit
  • Engine repair
  • Control system
  • Supply system
  • Cooling system
  • Exhaust system
  • Transmission
  • Clutch
  • Car gearbox
  • Drive shafts
  • Chassis (running gear)
  • Wheels, tires and hubs
  • Front suspension
  • Rear suspension
  • Steering
  • Brake system
  • Body and interior
  • Exterior (external elements)
  • Interior (internal elements)
  • Doors, locks and windows
  • Heating and ventilation
  • Electrical equipment
  • Equipment and devices
  • Power devices
  • Breakers and switches
  • Lighting and signaling
  • Electrical circuits
LadaMan.ru © 2018–2026 | Mobile version | About Lada | Sitemap: EN BG BY UA RS HR RO PL SK HU | Contacts with admin | | Add to bookmarks
Kalina Hatchback (2004-2013) | Kalina Sedan (2004-2013) | Granta 1 (2011-2023) | Priora 1 (2007-2018) | Vesta 1 (2015-2023) | Largus 1 (2012-2023) | X-Ray 1 (2015-2022) |
This site uses cookies to ensure everything runs smoothly.