Car repair AvtoVAZ Car repair Renault Car repair Hyundai Car repair Ford Car repair Volkswagen Car repair Audi Car repair Chevrolet
English Русский
Български
Беларускі
Український
Српски
Hrvatski
Română
Polski
Slovenský
Magyar
articles sitemap contacts bookmark
LadaMan.ru


Kalina Granta Priora Vesta Largus XRAY
Granta 1 (2011-2023, VAZ-2190)

Cylinder head — removal and installation (Granta 2190)

  • Main
  • Granta
  • Granta 1
  • Power unit
  • Engine repair
  • Cylinder head — removal and installation
0
Contents: Removal ⇣ Installation ⇣

Removal


1. Drain the coolant from the engine ("Coolant - Replacement").

2. Remove the high-voltage wire tips from the spark plugs.

3. Remove the cylinder head cover ("Cylinder Head Cover Gasket - Replacement").

4. Remove the camshaft pulley ("Camshaft Seal - Replacement").

Note: The cylinder head mounting bolts are accessible with the camshaft installed, but require a socket wrench with a special head. The cylinder head can be removed as a complete assembly with the receiver and exhaust manifold. But if the head is removed for repair, it is better to disassemble it first ("Intake manifold receiver - removal, replacement of seals and installation" and "Fuel rail - removal, disassembly, assembly and installation").


5. Remove the thermostat housing from the cylinder head studs ("Thermostat - Removal, Replacement and Installation").

6. Unscrew the nut and bolt of the upper fastening of the rear timing belt cover ("Camshaft - Removal and Installation").

7. Using a Torx E14 key, evenly and in several steps, unscrew the 10 cylinder head mounting bolts.
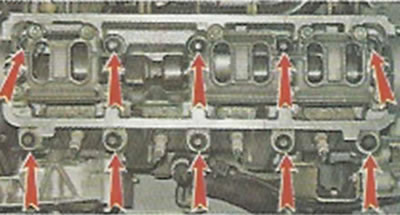
7. Using a Torx E14 key, evenly and in several steps, unscrew the 10 cylinder head mounting bolts.


8. Pulling the rear timing belt cover slightly to the side, remove the cylinder head.


9. Remove the cylinder head gasket and take out the two guide bushings from their seats.
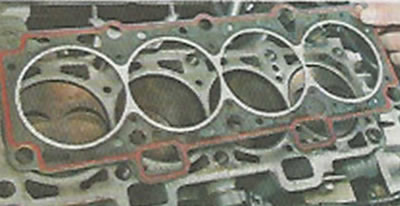
9. Remove the cylinder head gasket and take out the two guide bushings from their seats.


Installation


1. We flush the cylinder head from dirt and deposits with kerosene or diesel fuel.

2. Using a medical syringe or bulb, remove from the threaded holes of the cylinder block (under the cylinder head mounting bolts) oil and coolant residues.

3. Clean the mating surfaces of the head and cylinder block from the remains of the old gasket, degrease the surfaces with a solvent.

Warning: Always use a new gasket when installing the cylinder head. Do not allow oil to come into contact with the gasket surface.


4. Install the head guide bushings into the cylinder block mounting locations.

5. Place the gasket on the cylinder block, while the guide bushings should enter the corresponding holes of the gasket.

6. Install the head on the cylinder block. By slightly moving the head from side to side, we ensure that the guide bushings enter the corresponding holes in the head.

Warning! Reuse of cylinder head bolts is permitted only if their length does not exceed 135.5 mm.


7. Using a caliper or a mechanic's ruler, measure the length of the bolts. Bolts longer than 135.5 mm are replaced.
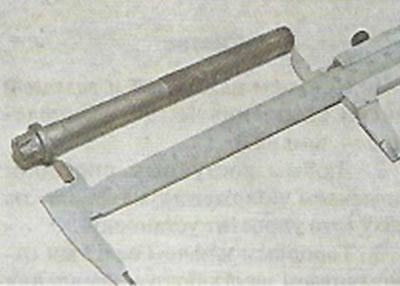


7. Using a caliper or a mechanic's ruler, measure the length of the bolts. Bolts longer than 135.5…


8. Before tightening, dip the threaded part of the bolts in engine oil, then let the oil drain, waiting about half an hour.

9. Install bolts with washers into the head holes.

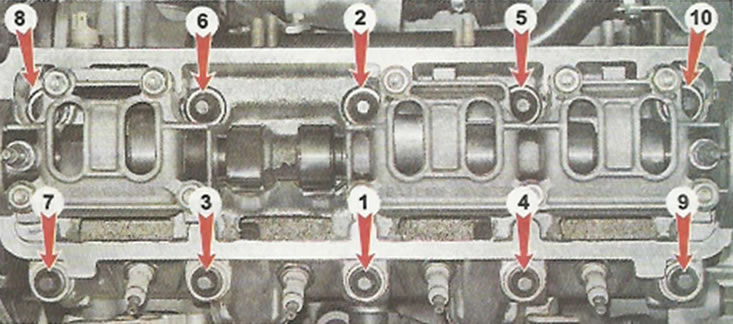
10. Using a torque wrench, tighten the head mounting bolts (in the sequence shown in the photo) in four steps:
  • tighten the bolts with a torque of 20 Nm (2 kgf·m);
  • tighten the bolts to a torque of 69.4-85.7 N·m (7.1-8.7 kgf·m);
  • we turn the bolts by 90°;
  • we turn the bolts 90° again.

Bolt tightening sequence

Bolt tightening sequence


11. Further assembly is carried out in the reverse order of removal.


This article is available at russian, bulgarian, belarusian, ukrainian, serbian, croatian, romanian, polish, slovak, hungarian
This article has been reviewed: Polina Kudryashova
Share with friends:
◀ Previous
Lada Granta 1: Engine repair
Next ▶

Valve stem seals — replacement
Camshaft — Removal and Installation
Valve timing drive clearances — adjustment
Camshaft Seal — Replacement
Cylinder Head Cover Gasket — Replacement
Cylinder head — checking, valve grinding
Front Crankshaft Oil Seal — Replacement
Flywheel — removal and installation
Rear Crankshaft Oil Seal — Replacement
Engine Oil Pan — Removal, Gasket Replacement and Installation
More articles with information from manuals for Lada:

• Cylinder Head Cover — Removal, Cleaning Oil Deflector and Installation Lada Kalina Hatchback (2004-2013, VAZ-1119)
• Replacing the cylinder head cover gasket Lada Priora 1 (2007-2018, VAZ-2170)
• Cylinder Head Cover — Removal, Cleaning Oil Deflector and Installation Lada Vesta 1 (2015-2023, VAZ-2180)
• Replacing the cylinder head cover gasket Lada Largus 1 (2012-2023)
• Disassembling the engine cylinder head Lada X-Ray 1 (2015-2022)
Link to this article in various formats
Reviews and comments of visitors
No comments yet


Add up two numbers: 38 + 29


Granta 1 (2011-2023) 
  • User manual
  • Governing bodies
  • Vehicle operation
  • Maintenance
  • Radio receiver
  • Radio receiver (option)
  • Power unit
  • Engine repair
  • Control system
  • Supply system
  • Cooling system
  • Exhaust system
  • Transmission
  • Clutch
  • Car gearbox
  • Drive shafts
  • Chassis (running gear)
  • Wheels, tires and hubs
  • Front suspension
  • Rear suspension
  • Steering
  • Brake system
  • Body and interior
  • Exterior (external elements)
  • Interior (internal elements)
  • Doors, locks and windows
  • Heating and ventilation
  • Electrical equipment
  • Equipment and devices
  • Power devices
  • Breakers and switches
  • Lighting and signaling
  • Electrical circuits
LadaMan.ru © 2018–2026 | Mobile version | About Lada | Sitemap: EN BG BY UA RS HR RO PL SK HU | Contacts with admin | | Add to bookmarks
Kalina Hatchback (2004-2013) | Kalina Sedan (2004-2013) | Granta 1 (2011-2023) | Priora 1 (2007-2018) | Vesta 1 (2015-2023) | Largus 1 (2012-2023) | X-Ray 1 (2015-2022) |
This site uses cookies to ensure everything runs smoothly.