
Car repair AvtoVAZ Car repair Renault Car repair Hyundai Car repair Ford Car repair Volkswagen Car repair Audi Car repair Chevrolet
English Русский
Български
Беларускі
Український
Српски
Hrvatski
Română
Polski
Slovenský
Magyar
articles sitemap contacts bookmark
LadaMan.ru


Kalina Granta Priora Vesta Largus XRAY
Priora 1 (2007-2018, VAZ-2170)

Removal and installation the oil pump (Priora 2170)

  • Main
  • Priora
  • Priora 1
  • Power unit
  • Cooling and lubrication system
  • Removal and installation the oil pump
0
The oil pump is removed for repair when its supply decreases, causing a constant drop in oil pressure in the engine lubrication system, and when oil leaks through the sealing gasket.

You will need: all the tools necessary to remove the timing belt and engine oil pan, as well as a 10 mm wrench.

1. Disconnect the wire from the negative terminal of the battery.

2. Drain the oil from the engine oil pan (see "Changing engine oil and oil filter").

3. Remove the timing belt (see "Replacing the timing belt and tension roller").

Caution! After removing the timing belt, do not turn the camshaft or crankshaft, as the pistons may damage the valves.
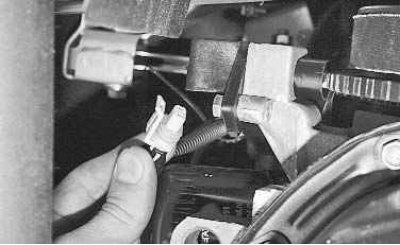

4. Disconnect the wiring harness connector from the crankshaft position sensor.
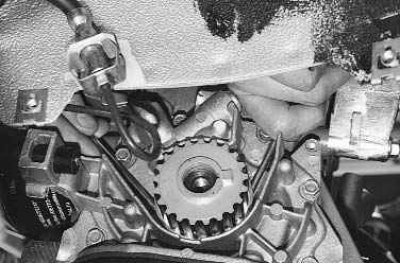

4. Disconnect the wiring harness connector from the crankshaft position sensor.

5. Using two screwdrivers, remove the pulley from the crankshaft.
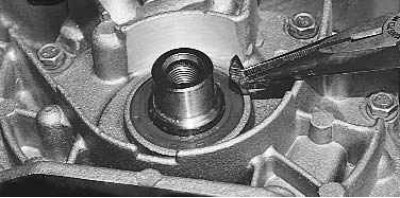

5. Using two screwdrivers, remove the pulley from the crankshaft.


6. Remove the key from the crankshaft groove.


6. Remove the key from the crankshaft groove.

7. Remove the engine oil pan (see "Replacing the oil pan gasket").
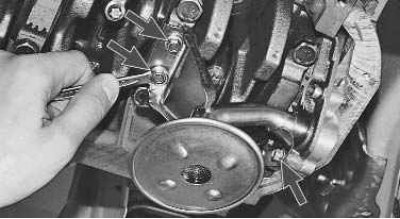
8. Using an 8 mm spanner, unscrew the three bolts securing the oil receiver…
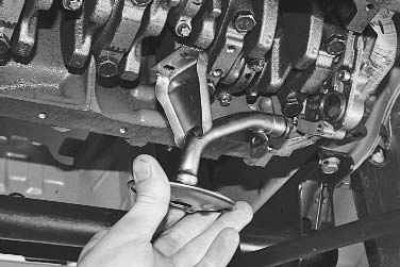

8. Using an 8 mm spanner, unscrew the three bolts securing the oil receiver…

9. …and remove the oil receiver.
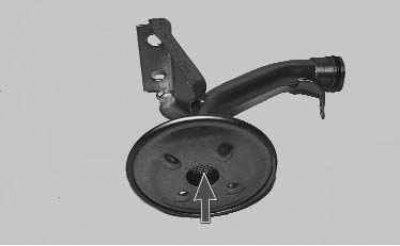

9. …and remove the oil receiver.

10. Clean the oil receiver mesh from dirt and wash it with white spirit. If the screen cannot be…


(Data obtained from the website: «LADAMAN.ru»)


10. Clean the oil receiver mesh from dirt and wash it with white spirit. If the screen cannot be cleaned or is damaged, replace the oil pan.
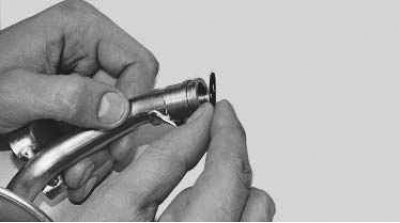
11. Replace the torn or loose oil receiver sealing ring.

11. Replace the torn or loose oil receiver sealing ring.

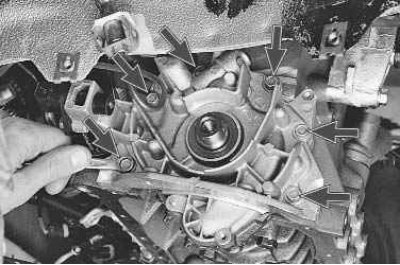
12. Unscrew the six bolts securing the oil pump to the cylinder block, move the oil pump with a…


12. Unscrew the six bolts securing the oil pump to the cylinder block, move the oil pump with a screwdriver, inserting it between the pump and the main bearing cap…
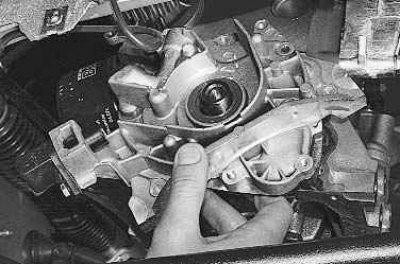
13. …and remove the pump with the gasket.


13. …and remove the pump with the gasket.


Note: Replace the gasket with a new one each time the oil pump is removed. Install only the original factory-made gasket, a gasket of a different thickness will cause disruption of the normal operation of the pump.


14. Clean the mating surfaces of the cylinder block and pump housing from any remaining old gasket.

15. Before installation, fill the oil pump cavity with grease to ensure oil is sucked in from the oil pan when the engine is first started.
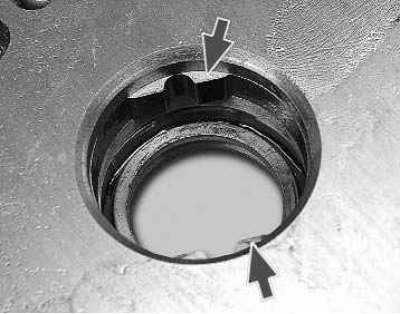
16. Rotate the oil pump drive gear to install it correctly on the crankshaft: the projections on…


16. Rotate the oil pump drive gear to install it correctly on the crankshaft: the projections on the drive gear must match...
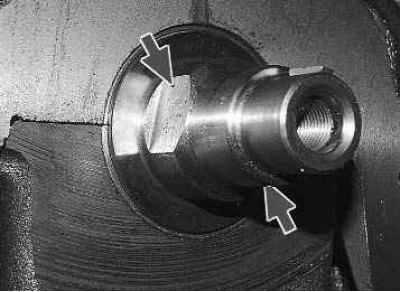
17. ...with chamfers on the crankshaft.
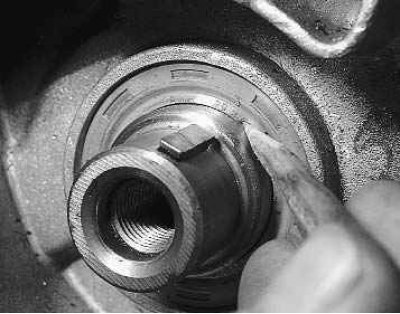

17. ...with chamfers on the crankshaft.

18. Lubricate the working lip of the oil seal with engine oil. When installing the pump, carefully…


18. Lubricate the working lip of the oil seal with engine oil. When installing the pump, carefully tuck the working edge of the oil seal onto the crankshaft journal using a wooden stick. After this, tighten the pump mounting bolts.


19. Install all removed parts in reverse order.

20. Adjust the timing belt tension (see "Replacing the timing belt and tension roller").

21. Adjust the tension of the generator drive belt (see "Replacing the alternator drive belt").

22. Fill the engine with oil (see "Changing engine oil and oil filter").

Note: When installing a new or reconditioned oil pump, we recommend replacing the oil filter.


This article is available at russian, bulgarian, belarusian, ukrainian, serbian, croatian, romanian, polish, slovak, hungarian
This article has been reviewed: Vladislav Voloshin
Share with friends:
◀ Previous
Lada Priora 1: Cooling and lubrication system
Next ▶

Design features of the engine lubrication system
Oil pump repair
Features of the design of the engine cooling system
Possible malfunctions of the cooling system
Replacing the expansion tank
Removal and installation the radiator electric fan with casing
More articles with information from manuals for Lada:

• Oil pump — removal, inspection and installation Lada Kalina Hatchback (2004-2013, VAZ-1119)
• Oil pump — removal, inspection and installation Lada Granta 1 (2011-2023, VAZ-2190)
• Oil pump — removal, inspection and installation Lada Vesta 1 (2015-2023, VAZ-2180)
• Oil pump — removal and installation Lada Largus 1 (2012-2023)
• Checking the condition and replacing the power steering pump drive… Lada X-Ray 1 (2015-2022)
Link to this article in various formats
Reviews and comments of visitors
No comments yet


Add up two numbers: 40 + 33


Priora 1 (2007-2018) 
  • General information
  • Vehicle device
  • User manual
  • Faults en route
  • Maintenance
  • Power unit
  • Engine repair
  • Cooling and lubrication system
  • Supply system
  • Exhaust system
  • Transmission
  • Clutch
  • Car gearbox
  • Drive shafts
  • Chassis (running gear)
  • Car suspension
  • Steering
  • Brake system
  • Body and interior
  • Exterior (external elements)
  • Interior (internal elements)
  • Doors, locks and windows
  • Electrical equipment
  • Equipment and devices
  • Power devices
  • Lighting and signaling
  • Cooling and heating
  • Electrical circuits
LadaMan.ru © 2018–2026 | Mobile version | About Lada | Sitemap: EN BG BY UA RS HR RO PL SK HU | Contacts with admin | | Add to bookmarks
Kalina Hatchback (2004-2013) | Kalina Sedan (2004-2013) | Granta 1 (2011-2023) | Priora 1 (2007-2018) | Vesta 1 (2015-2023) | Largus 1 (2012-2023) | X-Ray 1 (2015-2022) |
This site uses cookies to ensure everything runs smoothly.