
Car repair AvtoVAZ Car repair Renault Car repair Hyundai Car repair Ford Car repair Volkswagen Car repair Audi Car repair Chevrolet
English Русский
Български
Беларускі
Український
Српски
Hrvatski
Română
Polski
Slovenský
Magyar
articles sitemap contacts bookmark
LadaMan.ru


Kalina Granta Priora Vesta Largus XRAY
Granta 1 (2011-2023, VAZ-2190)

Steering wheel — removal and installation (Granta 2190)

  • Main
  • Granta
  • Granta 1
  • Chassis (running gear)
  • Steering
  • Steering wheel — removal and installation
0
Contents: Removal ⇣ Installation ⇣
Note: Operation shown on a vehicle equipped with an airbag. On a car without an airbag, the work is easier to perform; you only need to remove the steering wheel cover.


To complete the job, you will need a special airbag remover and a new steering wheel mounting nut. If you don't have a puller, you can make one from an old slotted screwdriver with a blade width of 5-6 mm. To do this, you need to cut a small groove in the middle of the blade.

Removal


1. Prepare the car for work ("Preparing the car for maintenance and repair"), remove the terminal from the negative terminal of the battery.

Warning: On vehicles equipped with an airbag, to prevent the airbag from deploying, wait at least five minutes after disconnecting the battery before continuing work. Place the removed airbag module with the actuator facing down and away from the work area.


2. Set the front wheels of the car to the straight-ahead position.

3. Through the holes in the steering wheel upholstery using a homemade puller...
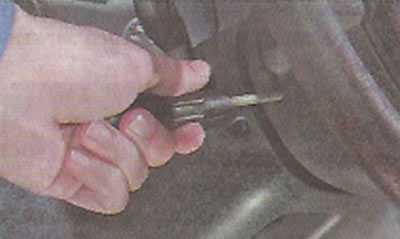
3. Through the holes in the steering wheel upholstery using a homemade puller...


...first on one side, then on the other, pressing the outer antennae of the spring clamps (for clarity, the airbag has been removed)...
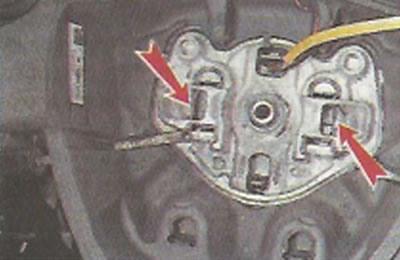


...first on one side, then on the other, pressing the outer antennae of the spring clamps (for…


...we release the two airbag module holders.
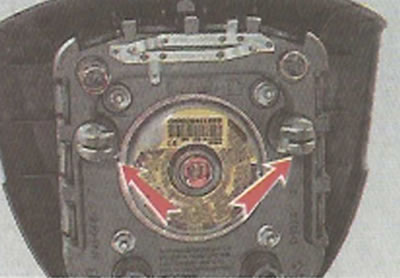
...we release the two airbag module holders.


4. After moving the airbag module away from the steering wheel, disconnect the ends of the two wires.
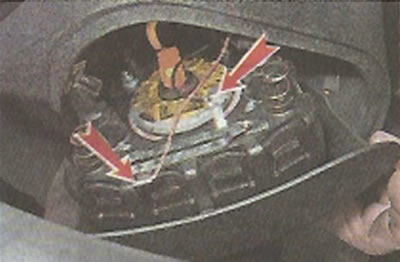
4. After moving the airbag module away from the steering wheel, disconnect the ends of the two…


5. Using a slotted screwdriver with a thin blade, release the wire connector retainer.
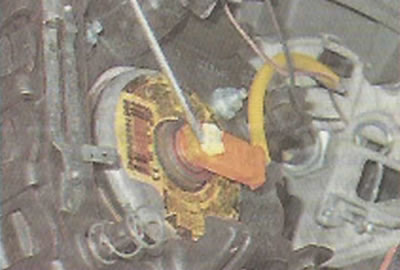
5. Using a slotted screwdriver with a thin blade, release the wire connector retainer.


6. Disconnect the wire connector from the airbag module.
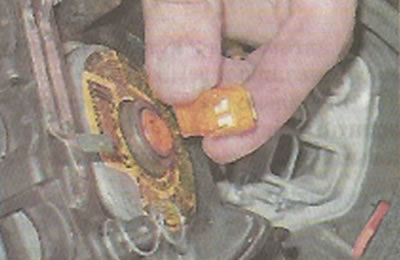


6. Disconnect the wire connector from the airbag module.


7. To avoid injury in the event of an accidental deployment of the airbag, place the removed module away from the work area with the decorative cover facing up.

8. If necessary, install the steering wheel in its previous position. by any available means (marker, felt-tip pen, thin chisel) we make installation marks on the shaft and steering wheel.

Note: When removing the steering wheel, the movable part of the contact ring is not automatically fixed from rotation. As a result, the central position of the movable part of the ring may be disturbed during assembly. In this case, there is a high probability of damage to the contact ring when turning the steering wheel to one of the extreme positions. To secure the ring, the steering wheel is equipped with a special stopper.
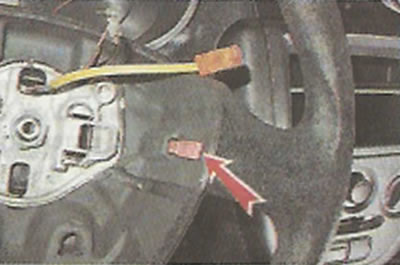

Note: When removing the steering wheel, the movable part of the contact ring is not automatically…


And there is a special hole on the contact ring. By inserting a stopper into this hole, the movable part of the contact ring can be fixed in a certain position.
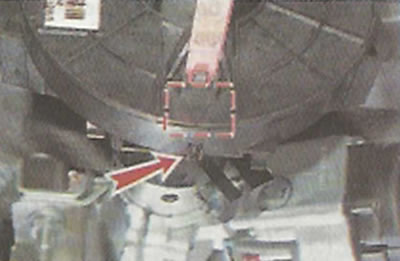


And there is a special hole on the contact ring. By inserting a stopper into this hole, the movable…


When disassembling, it is necessary to lock the contact ring and not remove the lock until the steering wheel is installed on the steering shaft.


9. Insert the stopper into the special hole to secure the contact ring.
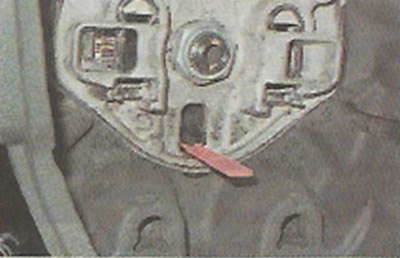
9. Insert the stopper into the special hole to secure the contact ring.


10. Using a 24 mm socket wrench with an extension, unscrew the steering wheel mounting nut and leave the nut on several turns of the shaft thread.
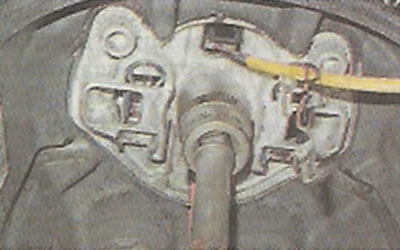
10. Using a 24 mm socket wrench with an extension, unscrew the steering wheel mounting nut and…


11. By successively hitting the steering wheel rim with your palms on the right and left sides, we knock it off the shaft splines.


12. After unscrewing the nut, remove the steering wheel from the shaft, while pulling the contact ring wires together with the pads out of the steering wheel hub hole.
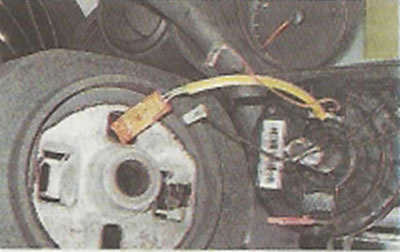
12. After unscrewing the nut, remove the steering wheel from the shaft, while pulling the contact…


Installation


We install the steering wheel in the reverse order, aligning the previously made marks and installing a new self-locking nut. Steering wheel fastening nut with a torque of 32-51 N·m (3.2-5.2 kgf·m).

Recommendation. If it is necessary to install the steering wheel in a new position (for example, if the spokes are at an angle when the car is moving in a straight line), place the wheel on the shaft and secure it with the nut without tightening it completely. After driving straight ahead for a few meters, make sure it is in the correct position. If necessary, move the steering wheel to the required number of splines and tighten the nut.


This article is available at russian, bulgarian, belarusian, ukrainian, serbian, croatian, romanian, polish, slovak, hungarian
This article has been reviewed: Polina Kudryashova
Share with friends:
◀ Previous
Lada Granta 1: Steering
Next ▶

Checking the technical condition of the steering
Description of the steering design
Steering Reference Data
Decorative steering column trims — removal and installation
Tie Rod End — Replacement
Steering rod — removal and installation
Steering Gear Cover — Replacement
Steering column — removal and installation
More articles with information from manuals for Lada:

• Adjusting the position of the steering wheel Lada Kalina Sedan (2004-2013, VAZ-1118)
• Adjusting the position of the steering wheel Lada Priora 1 (2007-2018, VAZ-2170)
• Adjusting the seat and steering wheel position Lada Vesta 1 (2015-2023, VAZ-2180)
• Steering wheel — removal and installation Lada Largus 1 (2012-2023)
• Steering wheel Lada X-Ray 1 (2015-2022)
Link to this article in various formats
Reviews and comments of visitors
No comments yet


Add up two numbers: 14 + 25


Granta 1 (2011-2023) 
  • User manual
  • Governing bodies
  • Vehicle operation
  • Maintenance
  • Radio receiver
  • Radio receiver (option)
  • Power unit
  • Engine repair
  • Control system
  • Supply system
  • Cooling system
  • Exhaust system
  • Transmission
  • Clutch
  • Car gearbox
  • Drive shafts
  • Chassis (running gear)
  • Wheels, tires and hubs
  • Front suspension
  • Rear suspension
  • Steering
  • Brake system
  • Body and interior
  • Exterior (external elements)
  • Interior (internal elements)
  • Doors, locks and windows
  • Heating and ventilation
  • Electrical equipment
  • Equipment and devices
  • Power devices
  • Breakers and switches
  • Lighting and signaling
  • Electrical circuits
LadaMan.ru © 2018–2026 | Mobile version | About Lada | Sitemap: EN BG BY UA RS HR RO PL SK HU | Contacts with admin | | Add to bookmarks
Kalina Hatchback (2004-2013) | Kalina Sedan (2004-2013) | Granta 1 (2011-2023) | Priora 1 (2007-2018) | Vesta 1 (2015-2023) | Largus 1 (2012-2023) | X-Ray 1 (2015-2022) |
This site uses cookies to ensure everything runs smoothly.