



Removal
Place the vehicle in a work area, apply the parking brake, turn off the ignition and disconnect the ground wire terminal from the battery.
For cars with K4M engine
Remove the intake noise muffler (see here), air filter housing and throttle body (see here).
Disconnect cable 1, Figure 11-8, of the throttle valve drive from the intake manifold 5.
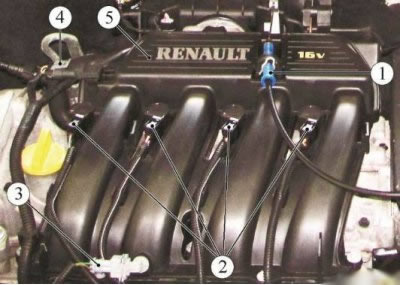
Figure 11-8 - Removing the intake manifold of the K4M engine: 1 - throttle cable; 2 - Wiring harness connector to ignition coils; 3 - Wiring harness connector to the air temperature sensor; 4 - Wiring harness connector to the incoming air pressure sensor; 5 - intake manifold
Disconnect pads 2 from the ignition coils.
Disconnect connector 3 from the air temperature sensor.
Disconnect connector 4 from the incoming air pressure sensor.
Loosen bolts 1...7, Figure 11-9, and remove the intake manifold assembly with the air temperature sensor and the incoming air pressure sensor (replaceable head 8, extension, ratchet).
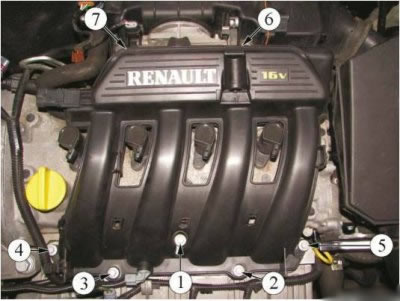
Figure 11-9 - Removing the intake manifold of the K4M engine: 1... 7 - intake manifold mounting bolts
For cars with K7M engine
Remove the air filter housing (see here).
Disconnect:
- ball joints 1, Fig. 11-10 throttle actuator (flat head screwdriver);
- block 2 wiring harness from the temperature sensor;
- block 3 wiring harness from the pressure sensor;
- brake booster vacuum hose from intake manifold;
- tube 4 crankcase ventilation from the intake manifold;
- crankcase ventilation hose from the intake manifold.
Remove the throttle body 5 (see here).
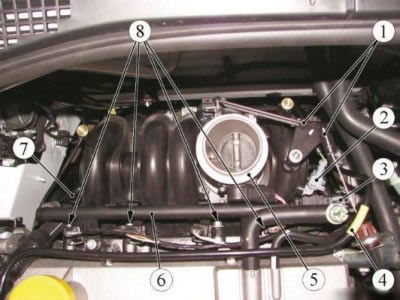
Figure 11-10 - Removing the intake manifold of the K7M engine: 1 - throttle actuator ball joints; 2 - Wiring harness connector to the air temperature sensor; 3 - wiring harness block to the pressure sensor; 4 - crankcase ventilation tube; 5 - throttle pipe; 6 - fuel rail; 7 - fuel rail supply line; 8 - intake manifold mounting bolt
Press the spring lock of the connector and disconnect the supply line 7 from the fuel rail 6.
Unscrew nut 1, figure 11-11, studs securing intake manifold 2 to bracket 3 (replacement head 13, extension, ratchet).
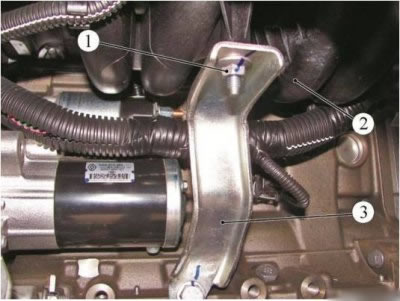
Figure 11-11 - Disconnecting the intake manifold of the K7M engine from the bracket: 1 - intake manifold mounting stud nut; 2 - intake manifold; 3 - bracket
Disconnect the intake manifold wiring harness.
Unscrew the four upper bolts 8, Figure 11-10, securing the intake manifold (replacement head 10, extension, ratchet wrench).
Unscrew the three nuts of the lower intake manifold mount (replacement head 10, extension, ratchet wrench).
Remove the intake manifold.
Installation
Warning: A rather simple-looking, but extremely important element of the fuel system is the intake manifold gasket. It would seem that the requirements for it are not particularly complex, and the materials used are ordinary - simple elastic cardboard, but if the integrity of the gasket is compromised, the fuel system of a modern car will go into emergency mode. On older and simpler injection systems, damage to it leads to loss of power and unstable engine operation.
For cars with K4M engine
Attention: All gaskets must be replaced.
Before installing the intake manifold, install a new gasket on the intake manifold.
Install the intake manifold on the vehicle.
Install and tighten the mounting bolts in the order shown in Fig. 11-9. The tightening torque of the bolts is 9 N·m (0.9 kgf·m) (replaceable head 8, extension, ratchet, torque wrench).
Connect connector 4, Figure 11-8, to the incoming air pressure sensor.
Connect block 3 to the air temperature sensor.
Connect pads 2 to the ignition coils.
Connect throttle cable 1 to intake manifold 5.
Install the throttle body, air filter housing and intake silencer (see above).
For cars with K7M engine
Attention: All gaskets must be replaced.
Install the intake manifold and tighten the lower center mounting nut (replacement head 10, extension, ratchet wrench).
Install the intake manifold mounting bolts and nuts (replaceable head 10, 13, extension, ratchet wrench).
Tightening torques:
- intake manifold mounting bolts 25 Nm (2.5 kgf·m);
- intake manifold mounting nuts 25 Nm (2.5 kgf·m).
Further installation is carried out in the reverse order of removal.
Operations for all vehicle configurations
Connect the ground wire terminal to the battery.