



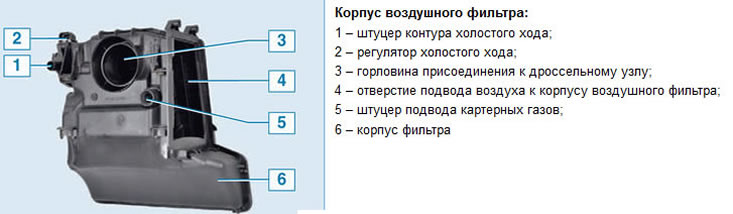
Engine Air Filter Housing K4M
K7M Engine Air Filter Housing (Bottom View)
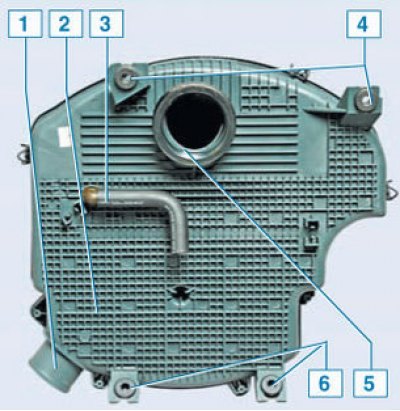
1 - supply pipe; 2 - filter housing; 3 - nipple of the main crankcase ventilation hose; 4 - fastening the housing to the intake manifold; 5 - neck for connection with the throttle assembly branch pipe; 6 - fastening the housing to the cylinder head cover
Removal
Place the vehicle in a work area, apply the parking brake, turn off the ignition and disconnect the ground wire terminal from the battery.
For cars with K4M engine
Remove the intake noise muffler (see here).
Press the spring clips and disconnect hose 1, Figure 11-2, from intake manifold 2.
If it is necessary to replace the filter element, unscrew the two screws 4 and remove the cover 3 of the air filter housing.
Remove the filter element from the air filter housing cover.
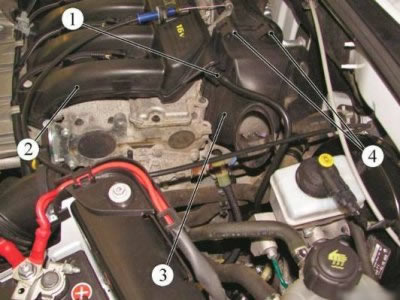
Figure 11-2 - Removing the air filter housing cover of the K4M engine: 1 - vacuum hose for brake booster vacuum; 2 - intake manifold; 3 - air filter housing cover; 4 - screw for fastening the air filter housing cover
Disconnect connector 1, Figure 11-3, from the idle speed control valve.
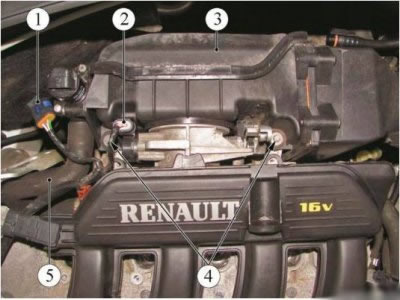
Figure 11-3 - Removing the air filter housing of the K4M engine: 1 - Wiring harness connector to the idle speed control stepper motor; 2 - Wiring harness connector to the throttle position sensor; 3 - air filter housing; 4 - air filter housing mounting bolts; 5 - gasoline vapor recovery system pipeline
Disconnect connector 2 from the throttle position sensor.
Disconnect pipe 5 from air filter housing 3.
Unscrew two bolts 4 and remove the air filter housing 3 from the vehicle (torx E8 replaceable head, extension, ratchet).
For cars with K7M engine
Disconnect the four fasteners 1, Figure 11-4, of the air filter cover.
Loosen the five screws 2 securing the air filter cover (phillips screwdriver).
Remove air filter cover 3.
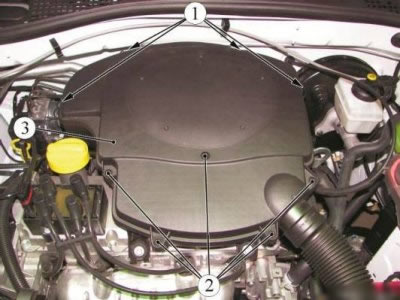
Figure 11-4 - Removing the air filter cover of the K7M engine: 1 - Air filter cover retainer; 2 - air filter cover mounting screw; 3 - air filter housing cover
Remove filter element 1, Figure 11-5, of the air filter.
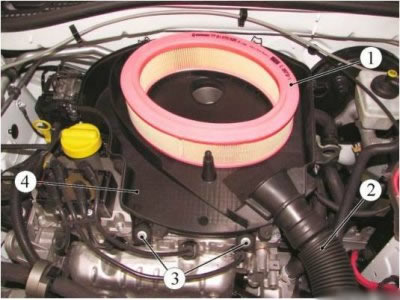
Figure 11-5 - Removing the air filter of the K7M engine: 1 - air filter element; 2 - air intake hose; 3 - air filter mounting bolt; 4 - air filter housing
Disconnect air intake hose 2 from air filter housing 4.
Unscrew the four bolts 3 securing the air filter (replacement head 10, extension, ratchet).
Disconnect the crankcase ventilation hose from the air filter housing.
Remove the air filter housing.
Installation
For cars with K4M engine
Before installing the air filter housing, install a new gasket on the throttle pipe, having previously lubricated it with engine oil.
Install housing 3, Figure 11-3, of the air filter on the vehicle.
Install and tighten two bolts 4. Tightening torque of bolts 9 N·m (0.9 kgf·m) (torx E8 socket, extension, ratchet, torque wrench).
Connect pipeline 5 to air filter housing 3.
Connect connector 2 to the throttle position sensor.
Connect block 1 to the idle speed control valve.
Install the new air filter element into the air filter housing cover.
Install cover 3, Figure 11-2, onto the air filter housing and secure with two screws 4.
Connect hose 1 to intake manifold 2.
Install the intake noise muffler.
For cars with K7M engine
Connect the crankcase ventilation hose to the housing 4, Figure 11-5, of the air filter.
Article based on data from the website ladaman.ru
Install the air filter housing.
Install four bolts 3 securing the air filter. Tightening torque of air filter mounting bolts 10 Nm (1.0 kgf·m) (replaceable head 10, extension, ratchet, torque wrench).
Connect air intake hose 2 to the air filter housing.
Install a new air filter element 1.
Install cover 3, Figure 11-4, of the air filter.
Install the five screws 2 securing the air filter cover (phillips screwdriver).
Secure the four clips 1 of the air filter cover.
Operations for all vehicle configurations
Connect the ground wire terminal to the battery.