
Car repair AvtoVAZ Car repair Renault Car repair Hyundai Car repair Ford Car repair Volkswagen Car repair Audi Car repair Chevrolet
English Русский
Български
Беларускі
Український
Српски
Hrvatski
Română
Polski
Slovenský
Magyar
articles sitemap contacts bookmark
LadaMan.ru


Kalina Granta Priora Vesta Largus XRAY
Granta 1 (2011-2023, VAZ-2190)

Gearbox — removal and installation (Granta 2190)

  • Main
  • Granta
  • Granta 1
  • Transmission
  • Car gearbox
  • Gearbox — removal and installation
0
Contents: Removal ⇣ Installation ⇣
Recommendation. The gearbox weighs over 30 kg, so work should be done with an assistant or using an adjustable stand or lifting device.


Warning: Do not remove both drives at the same time or unless necessary. install a special mandrel instead of one of them, which prevents the axle gears from falling out of the differential box.


Removal


1. Remove the engine splash guard or crankcase protection (if installed).

2. Drain the oil from the gearbox ("Gearbox - Checking the level and changing the oil").

3. Remove the battery shelf ("Battery Shelf - Removal and Installation").

4. Remove the air filter ("Air filter - removal and installation").

5. Remove the starter ("Starter - removal and installation").

6. Disconnect the clutch release cable from the gearbox ("Clutch cable - replacement").

7. Disconnect the wiring harness connectors from the reversing light switch and the vehicle speed sensor ("Reversing light switch - removal and installation", "Vehicle Speed Sensor - Checking and Replacing").

8. Disconnect the gear shift mechanism drive rod from the hinge ("Gearshift Drive - Removal, Repair and Installation").

9. Disconnect the jet thrust from the gearbox housing ("Jet thrust - removal and installation").

10. Loosen the nut securing the longitudinal strut to the transverse arm and disconnect the strut bracket from the body ("Longitudinal suspension strut - removal and installation"). To prevent the stretch from getting in the way*, we move it to the side and secure it with a tourniquet or wire.


11. Remove the front wheel drives ("Front Wheel Drive - Removal and Installation").

12. Using a 10 mm wrench, unscrew the three bolts securing the lower cover of the clutch housing.
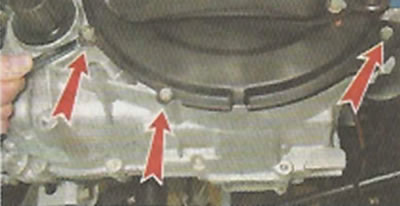
12. Using a 10 mm wrench, unscrew the three bolts securing the lower cover of the clutch housing.


13. Remove the lower crankcase cover.

14. Install an adjustable support under the engine and remove the left and rear supports of the power unit ("Powertrain Mounts - Replacement").

Note: We perform further work with an assistant or install an adjustable stand under the gearbox.


15. Using a 19 mm socket wrench, unscrew the three bolts and one nut securing the gearbox to the engine.
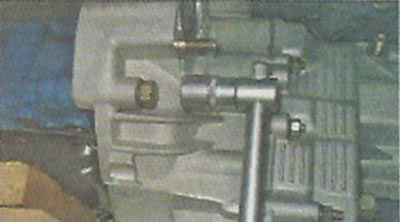
15. Using a 19 mm socket wrench, unscrew the three bolts and one nut securing the gearbox to the…


Note: Upper gearbox mounting bolt on the right side of the engine (when looking at it from the gearbox side) shorter than the rest.


Warning! When removing the gearbox, do not rest its input shaft on the clutch diaphragm spring, this may damage the latter.


16. Rocking the gearbox from side to side, remove it from the guide bushings and carefully remove the primary shaft from the hole in the driven disk and clutch basket.
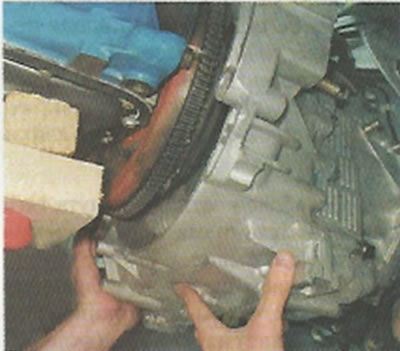
16. Rocking the gearbox from side to side, remove it from the guide bushings and carefully remove…


17. Move the gearbox away from the engine as far as possible, tilt it down with the clutch housing and, passing it between the engine and the front suspension brace, carefully lower the gearbox to the floor.

Installation


We install the gearbox in the reverse order, having first applied plastic grease to the splines of the gearbox input shaft.


This article is available at russian, bulgarian, belarusian, ukrainian, serbian, croatian, romanian, polish, slovak, hungarian
This article has been reviewed: Polina Kudryashova
Share with friends:
◀ Previous
Lada Granta 1: Car gearbox
 

Primary shaft seal — replacement
Front Wheel Drive Seals — Replacement
Gearshift Drive — Removal, Repair and Installation
Jet thrust — removal and installation
Gearbox — Checking the level and changing the oil
 
More articles with information from manuals for Lada:

• Reference data on gearbox components Lada Kalina Hatchback (2004-2013, VAZ-1119)
• Gearbox control Lada Priora 1 (2007-2018, VAZ-2170)
• Manual gearbox — technical condition check Lada Vesta 1 (2015-2023, VAZ-2180)
• Gearbox JH3, JR5, 21809 — design description Lada Largus 1 (2012-2023)
• Troubleshooting the gearbox Lada X-Ray 1 (2015-2022)
Link to this article in various formats
Reviews and comments of visitors
No comments yet


Add up two numbers: 44 + 40


Granta 1 (2011-2023) 
  • User manual
  • Governing bodies
  • Vehicle operation
  • Maintenance
  • Radio receiver
  • Radio receiver (option)
  • Power unit
  • Engine repair
  • Control system
  • Supply system
  • Cooling system
  • Exhaust system
  • Transmission
  • Clutch
  • Car gearbox
  • Drive shafts
  • Chassis (running gear)
  • Wheels, tires and hubs
  • Front suspension
  • Rear suspension
  • Steering
  • Brake system
  • Body and interior
  • Exterior (external elements)
  • Interior (internal elements)
  • Doors, locks and windows
  • Heating and ventilation
  • Electrical equipment
  • Equipment and devices
  • Power devices
  • Breakers and switches
  • Lighting and signaling
  • Electrical circuits
LadaMan.ru © 2018–2026 | Mobile version | About Lada | Sitemap: EN BG BY UA RS HR RO PL SK HU | Contacts with admin | | Add to bookmarks
Kalina Hatchback (2004-2013) | Kalina Sedan (2004-2013) | Granta 1 (2011-2023) | Priora 1 (2007-2018) | Vesta 1 (2015-2023) | Largus 1 (2012-2023) | X-Ray 1 (2015-2022) |
This site uses cookies to ensure everything runs smoothly.