
Car repair AvtoVAZ Car repair Renault Car repair Hyundai Car repair Ford Car repair Volkswagen Car repair Audi Car repair Chevrolet
English Русский
Български
Беларускі
Український
Српски
Hrvatski
Română
Polski
Slovenský
Magyar
articles sitemap contacts bookmark
LadaMan.ru


Kalina Granta Priora Vesta Largus XRAY
Granta 1 (2011-2023, VAZ-2190)

Timing drive with tension roller — checking the condition (Granta 2190)

  • Main
  • Granta
  • Granta 1
  • Power unit
  • Engine repair
  • Timing drive with tension roller — checking the condition
0
The timing belt should be checked during vehicle maintenance - every 15,000 km.

To perform the work you will need a timing belt tensioner key.

Sequence of execution


1. Prepare the car for work ("Preparing the car for maintenance and repair").

2. Using a 10 mm wrench, unscrew the three bolts securing the front timing belt cover.
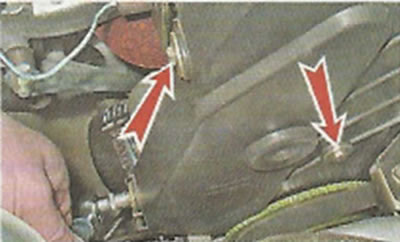
2. Using a 10 mm wrench, unscrew the three bolts securing the front timing belt cover.


3. Lift the cover vertically upwards, then remove it from the engine.

4. Rotate the crankshaft and visually check the condition of the belt.

Note: The crankshaft can be rotated using a 17 mm open-end wrench on the crankshaft pulley mounting bolt or a large slotted screwdriver on the flywheel teeth. To do this, remove the rubber plug from the hole in the clutch housing.


The belt must be clean, without dirt or oil on its surface. A belt with tears, cracks, delamination, cut or worn teeth, or abrasions down to the cord must be replaced (see below).

5. Using two fingers, try to turn the belt 90° in the area between the crankshaft and camshaft pulleys, applying a force of 15-20 N·m (1.5-2.0 kgf·m) to it.
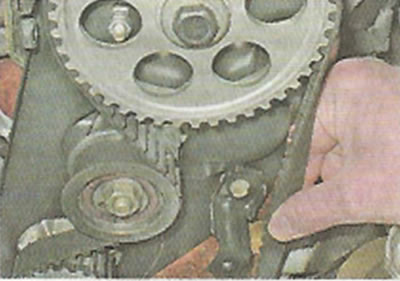
5. Using two fingers, try to turn the belt 90° in the area between the crankshaft and camshaft…


If the applied force is not enough to turn the belt to the required angle, the belt is too tight; if the circle can be rotated to a larger angle. this means the belt is not tensioned enough.


Warning! Excessive belt tension, oil and dirt on the belt will shorten the belt life and accelerate wear of the tension roller and coolant pump bearing.


The belt tension should be adjusted on a cold engine.

6. Using a 17 mm wrench, loosen the tension roller mounting nut.
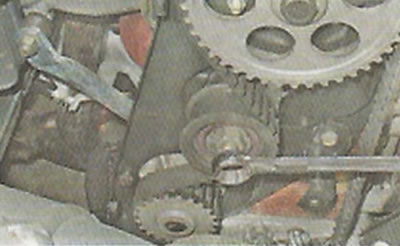
6. Using a 17 mm wrench, loosen the tension roller mounting nut.


7. Turning the roller with a special key, we achieve the required belt tension and, holding the roller in this position, tighten the nut that secures it.
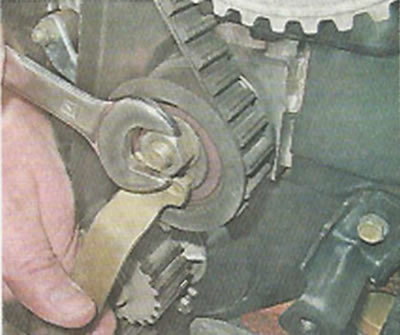
7. Turning the roller with a special key, we achieve the required belt tension and, holding the…


8. Check the belt tension (see above) and repeat the adjustment if necessary.

9. Finally tighten the roller mounting nut to a torque of 33.23-41.16 N·m (3.4-4.2 kgf·m).

10. Install the front belt cover in place and tighten the bolts that secure it.


This article is available at russian, bulgarian, belarusian, ukrainian, serbian, croatian, romanian, polish, slovak, hungarian
This article has been reviewed: Polina Kudryashova
Share with friends:
◀ Previous
Lada Granta 1: Engine repair
Next ▶

Timing Belt — Checking Condition
Compression in engine cylinders — check
Oil pressure — check
Engine Oil and Oil Filter — Replacement
Oil level — check
Timing belt drive with automatic tensioner — condition check
Timing drive with tension roller — replacement
Timing belt drive with automatic tensioner — replacement
Timing Belt Roller — Removal and Installation
Cylinder Head Cover Gasket — Replacement
More articles with information from manuals for Lada:

• Timing belt drive engine 1.6i — checking the condition and adjusting… Lada Kalina Hatchback (2004-2013, VAZ-1119)
• Checking the alternator drive belt tension Lada Priora 1 (2007-2018, VAZ-2170)
• Timing Belt — Checking Condition Lada Vesta 1 (2015-2023, VAZ-2180)
• Timing belt tensioner and roller defects Lada Largus 1 (2012-2023)
• Checking the condition of the auxiliary drive belt Lada X-Ray 1 (2015-2022)
Link to this article in various formats
Reviews and comments of visitors
No comments yet


Add up two numbers: 25 + 44


Granta 1 (2011-2023) 
  • User manual
  • Governing bodies
  • Vehicle operation
  • Maintenance
  • Radio receiver
  • Radio receiver (option)
  • Power unit
  • Engine repair
  • Control system
  • Supply system
  • Cooling system
  • Exhaust system
  • Transmission
  • Clutch
  • Car gearbox
  • Drive shafts
  • Chassis (running gear)
  • Wheels, tires and hubs
  • Front suspension
  • Rear suspension
  • Steering
  • Brake system
  • Body and interior
  • Exterior (external elements)
  • Interior (internal elements)
  • Doors, locks and windows
  • Heating and ventilation
  • Electrical equipment
  • Equipment and devices
  • Power devices
  • Breakers and switches
  • Lighting and signaling
  • Electrical circuits
LadaMan.ru © 2018–2026 | Mobile version | About Lada | Sitemap: EN BG BY UA RS HR RO PL SK HU | Contacts with admin | | Add to bookmarks
Kalina Hatchback (2004-2013) | Kalina Sedan (2004-2013) | Granta 1 (2011-2023) | Priora 1 (2007-2018) | Vesta 1 (2015-2023) | Largus 1 (2012-2023) | X-Ray 1 (2015-2022) |
This site uses cookies to ensure everything runs smoothly.