
Car repair AvtoVAZ Car repair Renault Car repair Hyundai Car repair Ford Car repair Volkswagen Car repair Audi Car repair Chevrolet
English Русский
Български
Беларускі
Український
Српски
Hrvatski
Română
Polski
Slovenský
Magyar
articles sitemap contacts bookmark
LadaMan.ru


Kalina Granta Priora Vesta Largus XRAY
Granta 1 (2011-2023, VAZ-2190)

Steering column switches — removal, inspection and installation (Granta 2190)

  • Main
  • Granta
  • Granta 1
  • Electrical equipment
  • Breakers and switches
  • Steering column switches — removal, inspection and installation
0
Contents: Removal the steering column switches ⇣ Examination ⇣ Installing steering column switches ⇣
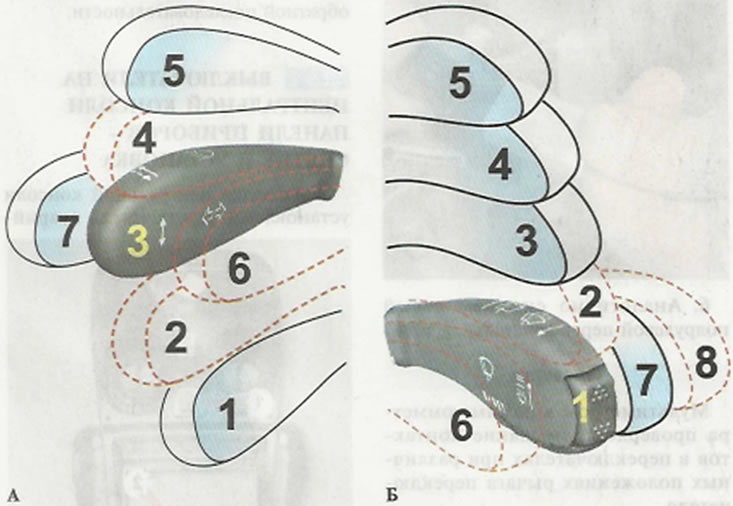
Position of the steering column shift levers: A - left steering column switch (headlight and turn…

Position of the steering column shift levers: A - left steering column switch (headlight and turn signal switch); B - right steering column switch (windshield wiper and washer switch)

Note: The dotted lines indicate positions in which the switch levers are not locked. The right switch lever has two buttons for controlling the trip computer.


The steering column switches must be removed individually when checking and replacing them. Before disassembling the steering column and other similar work, it is advisable to remove the steering column switches together with the connector ("Steering column - removal and installation").

To complete the work you will need a multimeter.

Removal the steering column switches


1. Prepare the car for work and disconnect the wire terminal from the negative terminal of the battery ("Preparing the car for maintenance and repair").

2. Remove the decorative steering column trims ("Decorative steering column trims - removal and installation").

3. By squeezing the spring clips of the right switch, we remove it from the connector together with the connected wiring harness block.
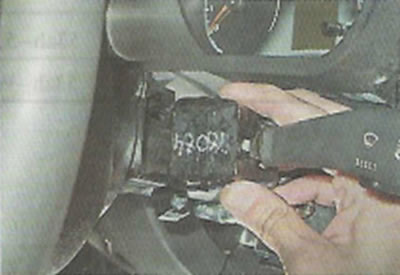


3. By squeezing the spring clips of the right switch, we remove it from the connector together with…


4. Disconnect the wiring harness connector from the switch.
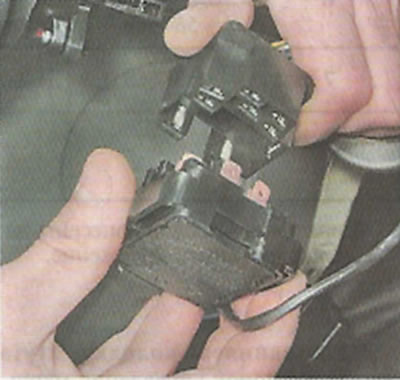
4. Disconnect the wiring harness connector from the switch.


5. Disconnect the wiring harness block of the trip computer control buttons.
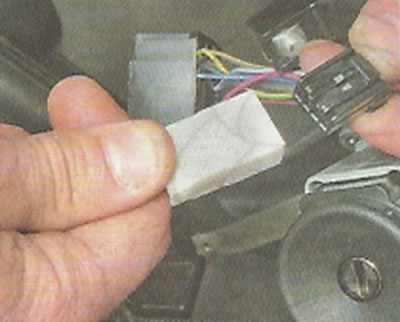
5. Disconnect the wiring harness block of the trip computer control buttons.


6. Remove the left steering column switch in the same way.

Examination


Using a multimeter in ohmmeter mode, we check the closure of contacts in the switches at different positions of the switch lever.


Note: The order of contact closing for different positions of the switch levers is presented in Table 13.9.1.


Installing steering column switches


We install the switches in reverse order.

Table 13.9.1. Contact closure with frame positions of steering column switch levers


(Original publication on the website: «LADAman»)

Position of the shift leverLeft switchRight switch
Closed contact terminals*Electrical equipment includedClosed contact terminals*Electrical equipment included
149a—49aLLeft turn signal53e—53Windscreen wiper is off
2**49a—49aLLeft turn signal53e—53
53a-j
Windshield wiper operation for a short time
3—Direction indicators are off53c—53
53a-j
Windshield wiper intermittent operation
56—56bLow beam headlights
4**49a—49aRRight turn signal53a-531st speed windshield wiper
549a—49aRRight turn signal53a-53b2nd speed windshield wiper
6**30-56aHigh beam headlights alarm53ah—WWindshield washer
56—56bLow beam headlights
756-56aHigh beam headlights53ah—53HReserve
8**——53ah—53HReserve
53ah—WHReserve

* Terminal designations are printed on the switch body.
** Non-fixed position.


This article is available at russian, bulgarian, belarusian, ukrainian, serbian, croatian, romanian, polish, slovak, hungarian
This article has been reviewed: Polina Kudryashova
Share with friends:
◀ Previous
Lada Granta 1: Breakers and switches
Next ▶

Switches and Toggle Switches — General Description
Switches on the central console of the instrument panel — removal and…
Reverse Light Switch — Checking and Replacing
Brake Light Switch — Checking and Replacing
Interior Light Switch — Checking and Replacing
Electric window switches — removal and installation
More articles with information from manuals for Lada:

• Steering column switches — removal, inspection and installation Lada Kalina Hatchback (2004-2013, VAZ-1119)
• Checking and replacing steering column switches Lada Priora 1 (2007-2018, VAZ-2170)
• Steering column switches Lada Vesta 1 (2015-2023, VAZ-2180)
• Steering column switches — removal and installation Lada Largus 1 (2012-2023)
• Steering column switches — removal and installation Lada X-Ray 1 (2015-2022)
Link to this article in various formats
Reviews and comments of visitors
No comments yet


Add up two numbers: 46 + 47


Granta 1 (2011-2023) 
  • User manual
  • Governing bodies
  • Vehicle operation
  • Maintenance
  • Radio receiver
  • Radio receiver (option)
  • Power unit
  • Engine repair
  • Control system
  • Supply system
  • Cooling system
  • Exhaust system
  • Transmission
  • Clutch
  • Car gearbox
  • Drive shafts
  • Chassis (running gear)
  • Wheels, tires and hubs
  • Front suspension
  • Rear suspension
  • Steering
  • Brake system
  • Body and interior
  • Exterior (external elements)
  • Interior (internal elements)
  • Doors, locks and windows
  • Heating and ventilation
  • Electrical equipment
  • Equipment and devices
  • Power devices
  • Breakers and switches
  • Lighting and signaling
  • Electrical circuits
LadaMan.ru © 2018–2026 | Mobile version | About Lada | Sitemap: EN BG BY UA RS HR RO PL SK HU | Contacts with admin | | Add to bookmarks
Kalina Hatchback (2004-2013) | Kalina Sedan (2004-2013) | Granta 1 (2011-2023) | Priora 1 (2007-2018) | Vesta 1 (2015-2023) | Largus 1 (2012-2023) | X-Ray 1 (2015-2022) |
This site uses cookies to ensure everything runs smoothly.