
Car repair AvtoVAZ Car repair Renault Car repair Hyundai Car repair Ford Car repair Volkswagen Car repair Audi Car repair Chevrolet
English Русский
Български
Беларускі
Український
Српски
Hrvatski
Română
Polski
Slovenský
Magyar
articles sitemap contacts bookmark
LadaMan.ru


Kalina Granta Priora Vesta Largus XRAY
X-Ray 1 (2015-2022)

Battery — removal and installation (XRAY 1)

  • Main
  • XRAY
  • X-Ray 1
  • Electrical equipment
  • Equipment and devices
  • Battery — removal and installation
0
Contents: Removal ⇣ Installation ⇣

Removal


Place the vehicle in the work area, apply the parking brake, turn off the ignition, and raise the hood.

Attention! Before disconnecting the terminals from the battery terminals, it is necessary to:
  • wait until the electric fan of the engine cooling system stops;
  • wait until the procedure for saving data in the ECU is complete (1 min).


Caution! Do not remove the terminals from the battery terminals when the ignition is on, as this may cause errors in the operation of the ECM or lead to failure of electrical components.


Caution: The reliability of the visual battery condition indicator is not guaranteed in after-sales service, so the visual battery condition indicator cannot be used as a means of monitoring the battery condition.


Loosen nut 2, Figure 2-1, of the battery ground wire terminal mounting bolt (spanner 10).

Disconnect terminal 3 of the ground wire from the battery 8.

Remove the positive terminal cover.

Loosen the nut 5 of the positive battery cable terminal mounting bolt (spanner 10).
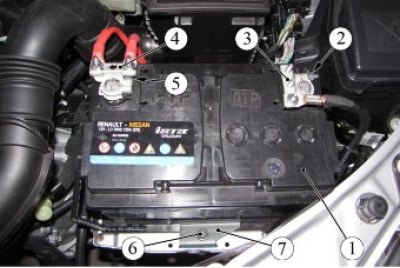
Figure 2-1 - Installing the battery on the vehicle: 1 - battery; 2, 5 - nut; 3 - «ground» wire…

Figure 2-1 - Installing the battery on the vehicle: 1 - battery; 2, 5 - nut; 3 - "ground" wire terminal; 4 - terminal of the "+" wire; 6 - bolt; 7 - pressure bar


Remove terminal 4 of the positive wire.

Loosen the mounting bolt 6 and remove the clamping plate 7 (replacement head 13, extension, ratchet).

Remove the battery 1.

Installation


Clean the battery terminals and wire terminals and apply a thin layer of grease to them; if there is a white coating on the terminals, remove it with sandpaper (vaseline technical VTV-1 in an aerosol can, sandpaper with a grain size of no more than 10-P or felt with abrasive paste PMA-2).

Install the battery 1 in the reverse order of removal. Tightening torque of the battery clamp mounting bolt Tightening torque of the bolt 11...13 N·m (1.1...1.3 kgf·m) (replaceable head 13, torque wrench).

Make sure that the battery is securely fastened to the platform.

Attention! Poor contact causes failures when starting the engine or charging the battery from the on-board network.


Tightening torque of nut 5 of the bolt securing the positive cable terminal to the battery 4...6 N·m (0.4...0.6 kgf·m) (replaceable head 10, torque wrench).

Tightening torque of nut 2 of the bolt securing the terminal of the ground wire to the battery 4...6 N·m (0.4...0.6 kgf·m) (replaceable head 10, torque wrench).

Install the cover on the positive terminal.

Present the vehicle to the Quality Control Department. The Quality Control Department will check the vehicle for compliance with the requirements of this technological instruction and TU 017200-254-00232934, paragraphs 1.19.21.1, 1.19.21.2, 1.19.21.3.


This article is available at russian, bulgarian, belarusian, ukrainian, serbian, croatian, romanian, polish, slovak, hungarian
This article has been reviewed: Daniil Markelov
Share with friends:
◀ Previous
Lada X-Ray 1: Equipment and devices
Next ▶

Electrical equipment — design and operation features
EMM system failures
Low Speed Switch CSW EMM System
High Speed Switch CSW EMM System
Functions performed by the EMM system
Starter — removal and installation
Generator — removal and installation
Instrument cluster — removal and installation
Headlight corrector switch, electric mirror adjustment knob
Safe Parking System Elements — removal and installation
More articles with information from manuals for Lada:

• The battery is not charging Lada Kalina Hatchback (2004-2013, VAZ-1119)
• Rechargeable battery Lada Granta 1 (2011-2023, VAZ-2190)
• The battery is not recharging Lada Priora 1 (2007-2018, VAZ-2170)
• Replacing the battery in the remote control Lada Vesta 1 (2015-2023, VAZ-2180)
• Starting the engine from another battery Lada Largus 1 (2012-2023)
Link to this article in various formats
Reviews and comments of visitors
No comments yet


Add up two numbers: 41 + 37


X-Ray 1 (2015-2022) 
  • General information
  • User manual
  • Maintenance
  • Daily care
  • Troubleshooting
  • Power unit
  • Engine repair
  • Fuel system
  • Cooling system
  • Repair H4M engine
  • Transmission
  • Clutch and drive shafts
  • Transmission
  • Chassis (running gear)
  • Front suspension
  • Rear suspension
  • Brake system
  • Steering
  • Body and interior
  • Exterior (external elements)
  • Interior (internal elements)
  • Electrical equipment
  • Equipment and devices
  • Lighting and signaling
LadaMan.ru © 2018–2026 | Mobile version | About Lada | Sitemap: EN BG BY UA RS HR RO PL SK HU | Contacts with admin | | Add to bookmarks
Kalina Hatchback (2004-2013) | Kalina Sedan (2004-2013) | Granta 1 (2011-2023) | Priora 1 (2007-2018) | Vesta 1 (2015-2023) | Largus 1 (2012-2023) | X-Ray 1 (2015-2022) |
This site uses cookies to ensure everything runs smoothly.