
Car repair AvtoVAZ Car repair Renault Car repair Hyundai Car repair Ford Car repair Volkswagen Car repair Audi Car repair Chevrolet
English Русский
Български
Беларускі
Український
Српски
Hrvatski
Română
Polski
Slovenský
Magyar
articles sitemap contacts bookmark
LadaMan.ru


Kalina Granta Priora Vesta Largus XRAY
Priora 1 (2007-2018, VAZ-2170)

Removal and installation the brake booster (Priora 2170)

  • Main
  • Priora
  • Priora 1
  • Chassis (running gear)
  • Brake system
  • Removal and installation the brake booster
0
You will need: 10 and 13 mm wrenches, flat-head and Phillips-head screwdrivers.

1. Remove the windshield frame trims (see "Removing and installing windshield frame trims").

2. Remove the soundproofing trim from the engine compartment (see "Removal and installation of soundproofing trim of the engine compartment").
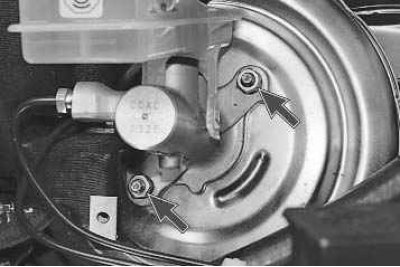
3. Using a 13 mm spanner, unscrew the two nuts securing the master brake cylinder to the vacuum…


3. Using a 13 mm spanner, unscrew the two nuts securing the master brake cylinder to the vacuum booster.

4. Without bending or twisting the brake pipes, carefully move the master brake cylinder to the side.
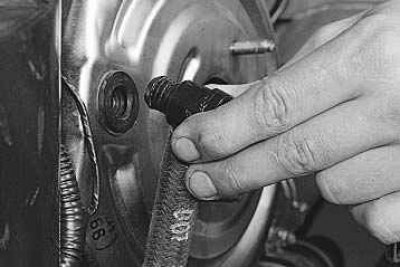
5. Disconnect the vacuum hose together with the valve from the vacuum booster.

5. Disconnect the vacuum hose together with the valve from the vacuum booster.

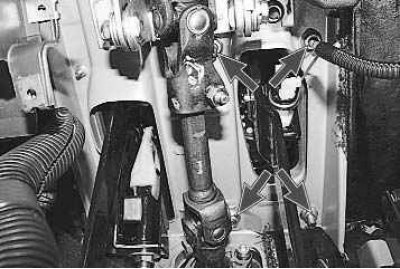
6. Under the instrument panel, use a 13 mm wrench to unscrew the four nuts securing the brake pedal…


(The material was taken from a website www.Ladaman.ru)


6. Under the instrument panel, use a 13 mm wrench to unscrew the four nuts securing the brake pedal bracket.

7. Remove the bracket with the pedal and vacuum booster (in the engine compartment).
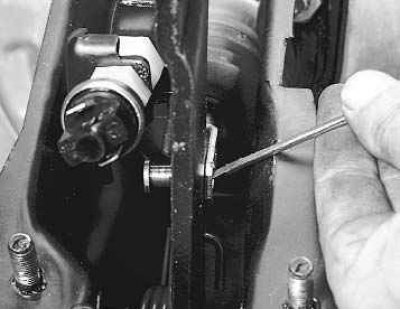
8. Using a screwdriver, pry off the pin retaining plate and, pushing out the pin, disconnect the…


8. Using a screwdriver, pry off the pin retaining plate and, pushing out the pin, disconnect the vacuum booster pusher from the pedal.
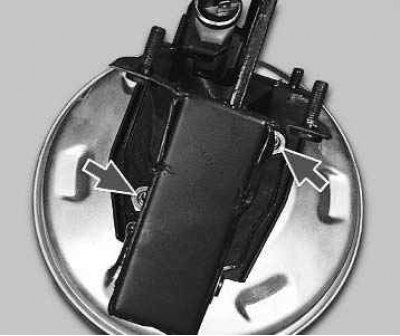
9. Using a 13 mm spanner, unscrew the two nuts securing the booster to the pedal bracket and, using…


9. Using a 13 mm spanner, unscrew the two nuts securing the booster to the pedal bracket and, using a screwdriver, remove the booster from the bracket.
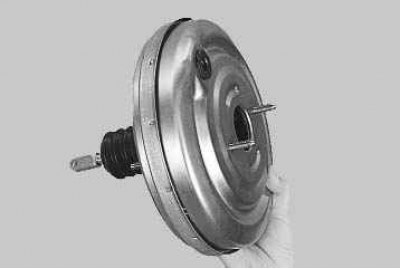
Note: This is what the brake booster looks like after it is removed from the vehicle. To replace…


Note: This is what the brake booster looks like after it is removed from the vehicle. To replace it, purchase a part with the same marking.
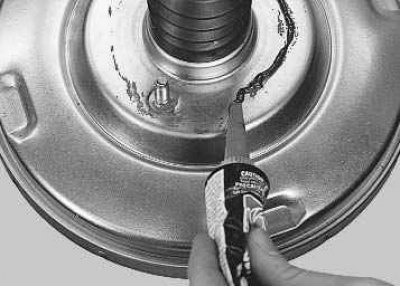


10. Install the vacuum booster in the reverse order, apply sealant to the contact surface of the…


10. Install the vacuum booster in the reverse order, apply sealant to the contact surface of the vacuum booster with the pedal bracket.


This article is available at russian, bulgarian, belarusian, ukrainian, serbian, croatian, romanian, polish, slovak, hungarian
This article has been reviewed: Vladislav Voloshin
Share with friends:
◀ Previous
Lada Priora 1: Brake system
Next ▶

Bleeding the hydraulic brake system
Possible malfunctions of the brake system
Design features of the brake system
Replacing the brake pedal axle bushings
Removal and installation the brake master cylinder reservoir
Removal and installation the master brake cylinder
Replacing the brake pads of the front wheel brake mechanism
Removal and installation the front wheel brake disc
More articles with information from manuals for Lada:

• Vacuum brake booster — check Lada Kalina Hatchback (2004-2013, VAZ-1119)
• Vacuum brake booster — check Lada Granta 1 (2011-2023, VAZ-2190)
• Parking brake Lada Vesta 1 (2015-2023, VAZ-2180)
• Brake booster hose Lada Largus 1 (2012-2023)
• Vacuum brake booster with master cylinder and reservoir assembly Lada X-Ray 1 (2015-2022)
Link to this article in various formats
Reviews and comments of visitors
No comments yet


Add up two numbers: 14 + 46


Priora 1 (2007-2018) 
  • General information
  • Vehicle device
  • User manual
  • Faults en route
  • Maintenance
  • Power unit
  • Engine repair
  • Cooling and lubrication system
  • Supply system
  • Exhaust system
  • Transmission
  • Clutch
  • Car gearbox
  • Drive shafts
  • Chassis (running gear)
  • Car suspension
  • Steering
  • Brake system
  • Body and interior
  • Exterior (external elements)
  • Interior (internal elements)
  • Doors, locks and windows
  • Electrical equipment
  • Equipment and devices
  • Power devices
  • Lighting and signaling
  • Cooling and heating
  • Electrical circuits
LadaMan.ru © 2018–2026 | Mobile version | About Lada | Sitemap: EN BG BY UA RS HR RO PL SK HU | Contacts with admin | | Add to bookmarks
Kalina Hatchback (2004-2013) | Kalina Sedan (2004-2013) | Granta 1 (2011-2023) | Priora 1 (2007-2018) | Vesta 1 (2015-2023) | Largus 1 (2012-2023) | X-Ray 1 (2015-2022) |
This site uses cookies to ensure everything runs smoothly.