
Car repair AvtoVAZ Car repair Renault Car repair Hyundai Car repair Ford Car repair Volkswagen Car repair Audi Car repair Chevrolet
English Русский
Български
Беларускі
Український
Српски
Hrvatski
Română
Polski
Slovenský
Magyar
articles sitemap contacts bookmark
LadaMan.ru


Kalina Granta Priora Vesta Largus XRAY
Priora 1 (2007-2018, VAZ-2170)

Replacing the hood lock drive rod (Priora 2170)

  • Main
  • Priora
  • Priora 1
  • Body and interior
  • Exterior (external elements)
  • Replacing the hood lock drive rod
0
You will need: a 10 mm wrench and a flat-blade screwdriver.

1. Disconnect the wire from the negative terminal of the battery.

2. Remove the front bumper (see "Removing and installing the front bumper").
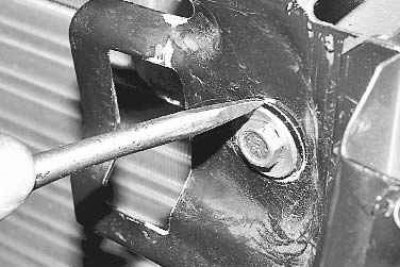
3. Mark the position of the washers relative to the body. This will make it easier to further…


3. Mark the position of the washers relative to the body. This will make it easier to further adjust the position of the lock.
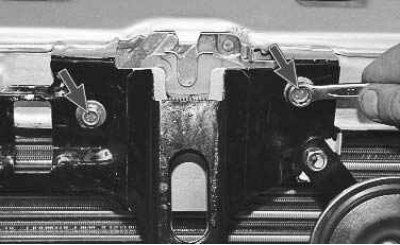
4. Remove the two bolts securing the lock.

4. Remove the two bolts securing the lock.

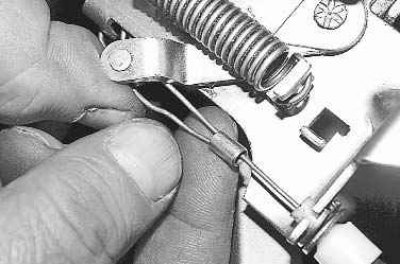
5. After removing the lock from under the bracket, straighten the end of the lock drive rod. Remove…


5. After removing the lock from under the bracket, straighten the end of the lock drive rod. Remove the end of the rod from the metal bushing and disconnect the rod from the lock lever. Remove the metal sleeve from the rod.
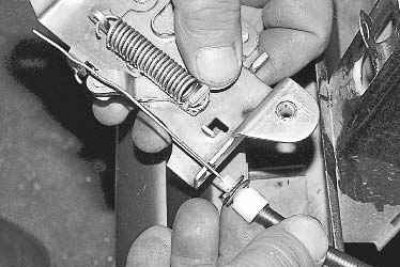


6. Slide the end of the traction sheath and remove the cable from the slot in the lock housing.
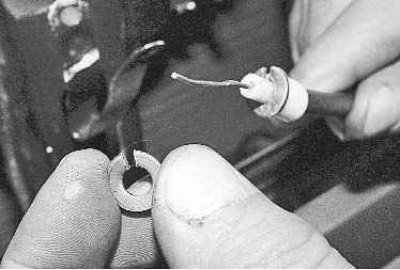

6. Slide the end of the traction sheath and remove the cable from the slot in the lock housing.

7. Please note that adjusting washers may be installed on the end of the tie rod housing.
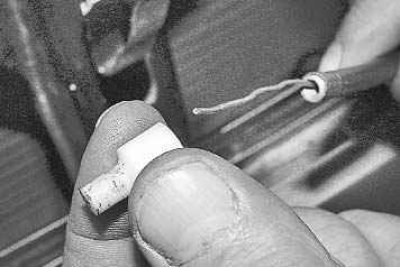

7. Please note that adjusting washers may be installed on the end of the tie rod housing.

8. Remove the tie rod end cap.
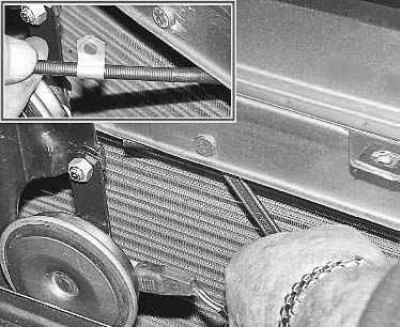

8. Remove the tie rod end cap.

9. Unscrew the nut securing the metal cable sheath holder and remove the holder from the stud and…


9. Unscrew the nut securing the metal cable sheath holder and remove the holder from the stud and then from the traction sheath.


10. Carefully press the plastic rod housing retainer inward and remove it from the rod housing.

11. Tie a soft wire or rope to the end of the rod, the length of which is not less than the length of the rod. This will make the job easier when installing the new rod.
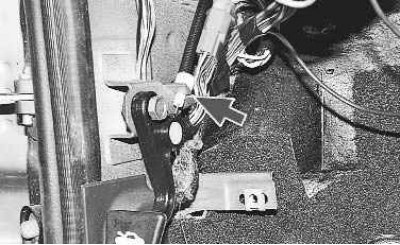
12. From inside the passenger compartment, remove the mounting block, press the hood opening handle…


12. From inside the passenger compartment, remove the mounting block, press the hood opening handle all the way down and, lifting the end of the sheath upwards, remove the cable from the bracket slot (for clarity, the instrument panel has been removed from the photo).

Material was taken from the website [LadaMan.ru]
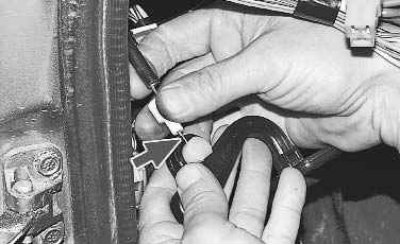
13. Disconnect the cable end from the handle. To do this, slide the cable in the L-shaped slot of…


13. Disconnect the cable end from the handle. To do this, slide the cable in the L-shaped slot of the handle until it stops and pull it out (for clarity, the instrument panel and hood release handle have been removed from the photo).


14. Pull the cable inside the passenger compartment so that the rope remains in place of the cable. Untie the rope from the cable.

15. Install the hood lock cable in the reverse order of removal, except that the cable housing holders must be secured last, after the lock has been installed. Please note that the cable end on the lever must be bent when the cable sheath end is installed in the lock body.


This article is available at russian, bulgarian, belarusian, ukrainian, serbian, croatian, romanian, polish, slovak, hungarian
This article has been reviewed: Vladislav Voloshin
Share with friends:
◀ Previous
Lada Priora 1: Exterior (external elements)
Next ▶

Adjusting the position of the hood lock
Removal and installation the hood lock and safety hook
Removal and installation the hood
Removal and installation decorative door sill trims
Removal and installation the front wing
Removal and installation the outside rearview mirror
Installation of a towing hitch
Polishing of paintwork
Anti-corrosion protection of the body
Preparation and anti-corrosion treatment of hidden cavities
More articles with information from manuals for Lada:

• Hood Lock Drive Rod — Replacement Lada Kalina Hatchback (2004-2013, VAZ-1119)
• Hood lock — removal, installation and adjustment Lada Granta 1 (2011-2023, VAZ-2190)
• Hood lock — removal, installation and adjustment Lada Vesta 1 (2015-2023, VAZ-2180)
• Replacing the outer joint boot of the front wheel drive Lada Largus 1 (2012-2023)
• Bleeding the clutch hydraulic drive, replacing the fluid Lada X-Ray 1 (2015-2022)
Link to this article in various formats
Reviews and comments of visitors
No comments yet


Add up two numbers: 24 + 39


Priora 1 (2007-2018) 
  • General information
  • Vehicle device
  • User manual
  • Faults en route
  • Maintenance
  • Power unit
  • Engine repair
  • Cooling and lubrication system
  • Supply system
  • Exhaust system
  • Transmission
  • Clutch
  • Car gearbox
  • Drive shafts
  • Chassis (running gear)
  • Car suspension
  • Steering
  • Brake system
  • Body and interior
  • Exterior (external elements)
  • Interior (internal elements)
  • Doors, locks and windows
  • Electrical equipment
  • Equipment and devices
  • Power devices
  • Lighting and signaling
  • Cooling and heating
  • Electrical circuits
LadaMan.ru © 2018–2026 | Mobile version | About Lada | Sitemap: EN BG BY UA RS HR RO PL SK HU | Contacts with admin | | Add to bookmarks
Kalina Hatchback (2004-2013) | Kalina Sedan (2004-2013) | Granta 1 (2011-2023) | Priora 1 (2007-2018) | Vesta 1 (2015-2023) | Largus 1 (2012-2023) | X-Ray 1 (2015-2022) |
This site uses cookies to ensure everything runs smoothly.