
Car repair AvtoVAZ Car repair Renault Car repair Hyundai Car repair Ford Car repair Volkswagen Car repair Audi Car repair Chevrolet
English Русский
Български
Беларускі
Український
Српски
Hrvatski
Română
Polski
Slovenský
Magyar
articles sitemap contacts bookmark
LadaMan.ru


Kalina Granta Priora Vesta Largus XRAY
Vesta 1 (2015-2023, VAZ-2180)

Hood lock — removal, installation and adjustment (Vesta 2180)

  • Main
  • Vesta
  • Vesta 1
  • Body and interior
  • Exterior (external elements)
  • Hood lock — removal, installation and adjustment
0
Access to the lock is obstructed by the radiator grille.

Sequence of execution


1. Use a marker to mark the position of the lock.

2. Using a 13 mm socket or open-end wrench, unscrew the two nuts securing the lock.
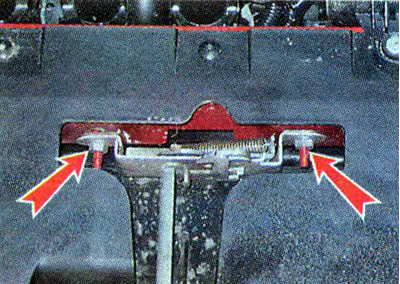
2. Using a 13 mm socket or open-end wrench, unscrew the two nuts securing the lock.


3. Remove the lock from the studs and disconnect the rod from the lock.
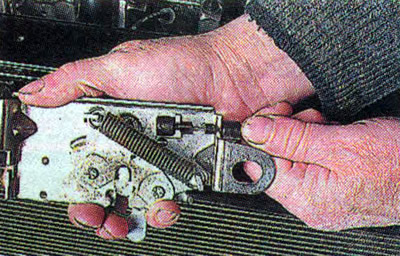
3. Remove the lock from the studs and disconnect the rod from the lock.


4. Install the lock in the reverse order in accordance with the mark made. Before installing the front bumper, check the operation of the lock. To do this:

5. Cover the hood (the hood latch must fit into the slot in the center of the lock).

[For more details, see the page: LADAMAN]

6. If necessary, loosen the fastening nuts and, by moving the lock to the right or left, adjust its position. Having adjusted the position of the lock, we slam the hood (it should close tightly). We adjust the tightness of the hood closing by moving the lock up and down.


7. If necessary, adjust the height of the hood stops.
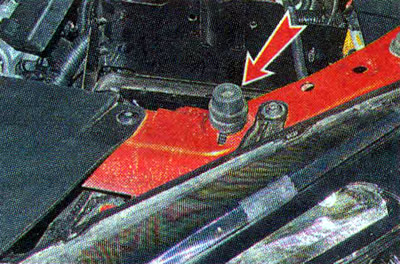
7. If necessary, adjust the height of the hood stops.


This article is available at russian, bulgarian, belarusian, ukrainian, serbian, croatian, romanian, polish, slovak, hungarian
This article has been reviewed: Kirill Dementyev
Share with friends:
◀ Previous
Lada Vesta 1: Exterior (external elements)
Next ▶

Body maintenance
Body — technical condition check
General description of the car body
Reference data about the car body
Front bumper — removal and installation
Front mudguard — removal and installation
Fuel filler cap — removal and installation
Rear bumper — removal and installation
Trunk lock — removal and installation
More articles with information from manuals for Lada:

• The hood lock does not open Lada Kalina Hatchback (2004-2013, VAZ-1119)
• Hood lock — removal, installation and adjustment Lada Granta 1 (2011-2023, VAZ-2190)
• Removal and installation the hood lock and safety hook Lada Priora 1 (2007-2018, VAZ-2170)
• Anti-lock braking system ABS Lada Largus 1 (2012-2023)
• Locking and unlocking doors with electric door lock drives deactivated Lada X-Ray 1 (2015-2022)
Link to this article in various formats
Reviews and comments of visitors
No comments yet


Add up two numbers: 21 + 48


Vesta 1 (2015-2023) 
  • General information
  • Governing bodies
  • User manual
  • Maintenance
  • Troubleshooting
  • Power unit
  • Engine repair
  • Control system
  • Supply system
  • Cooling system
  • Exhaust system
  • Transmission
  • Clutch
  • Mechanical gearbox
  • Automatic gearbox
  • Drive shafts
  • Chassis (running gear)
  • Wheels, tires and hubs
  • Front suspension
  • Rear suspension
  • Steering
  • Brake system
  • Body and interior
  • Exterior (external elements)
  • Doors, locks and windows
  • Heating and ventilation
  • Electrical equipment
  • Equipment and devices
  • Power devices
  • Breakers and switches
  • Lighting and signaling
  • Electrical circuits
LadaMan.ru © 2018–2026 | Mobile version | About Lada | Sitemap: EN BG BY UA RS HR RO PL SK HU | Contacts with admin | | Add to bookmarks
Kalina Hatchback (2004-2013) | Kalina Sedan (2004-2013) | Granta 1 (2011-2023) | Priora 1 (2007-2018) | Vesta 1 (2015-2023) | Largus 1 (2012-2023) | X-Ray 1 (2015-2022) |
This site uses cookies to ensure everything runs smoothly.