



Warning! If during the repair process it was necessary to remove the door stop, be careful. Without limiter (a random push, a gust of wind) the door may swing wide open, resulting in the door frame becoming deformed, its outer panel becoming dented, and damage to other body parts possible.
The case when the limiter breaks is rare. Usually the door opening limiter is subject to replacement if the door stops fixing in the open position. To increase the service life of the limiters and ensure easy and quiet opening and closing of the doors, periodically lubricate the limiters with a special lubricant for locks in an aerosol package (see "Lubrication of hinges and locks").
Note: The work is generally the same for the front and rear doors.
Sequence of execution
1. Prepare the car for work (see "Preparing the car for maintenance and repair").
2. Remove the trim of the front or rear door (see "Front door trim - removal and installation" or see. "Door trim - removal and installation").
3. Using a TORX T40 wrench, unscrew the bolt securing the limiter bracket to the body pillar 1 and using a 10 mm socket wrench, unscrew the two bolts securing it to the door 2.
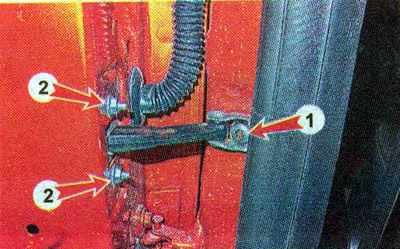
4. Remove the limiter through the technological opening in the door.
5. Install the limiter in the reverse order. Before installation, lubricate the limiter hinge with a special lubricant for locks (see "Lubrication of hinges and locks").