
Removal from JH3 gearbox
Place the vehicle on a two-post lift, brake with the parking brake, turn off the ignition, open the hood and disconnect the wire terminal "masses" from the battery.
Remove gearbox (see here).
Note. When replacing the bearing, you can not completely remove the gearbox, but only move it away from the engine to the required distance. This work is shown Here.
Remove bearing 1, Figure 4-1, disengaging the clutch by turning the fork in direction A.
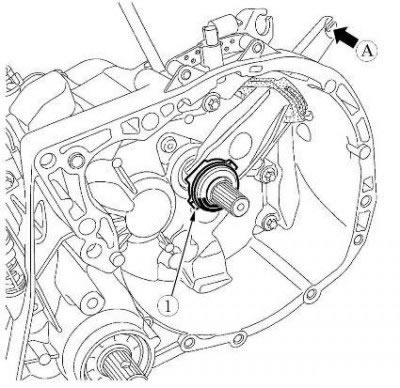
Figure 4-1 - Removing the clutch release bearing from the JH3 gearbox: 1 - clutch release bearing; A - the direction of rotation of the fork to remove the clutch release bearing
Remove the fork 1, Figure 4-2, disengaging the clutch by pulling it inside the clutch housing.
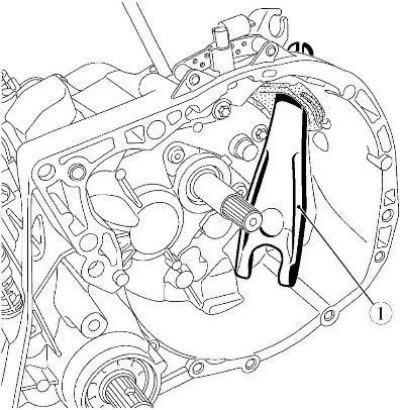
Figure 4-2 - Removing the clutch release fork from the JH3 gearbox: 1 - clutch release fork
Installation on JH3 gearbox
Check that there are no signs of oil leakage at the output of the input shaft, if necessary, replace the front input shaft support assembly.
Apply MOLYKOTE BR2 grease to the guide bushing walls and to the clutch release fork tabs (consumption rate 2 g).
Install fork 1, Figure 4-2, disengaging the clutch onto the gearbox.
Install bearing 1, Figure 4-1, disengaging the clutch on the guide sleeve, inserting the grips 1, Figure 4-3, into the legs of the fork.
Check that the clutch release bearing slides normally on the guide bush.
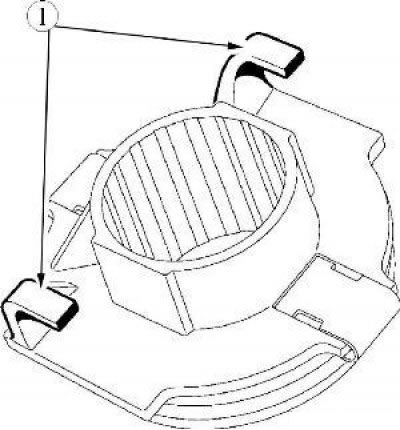
Figure 4-3 - JH3 gearbox clutch release bearing: 1 - clutch release bearing
Install gearbox.
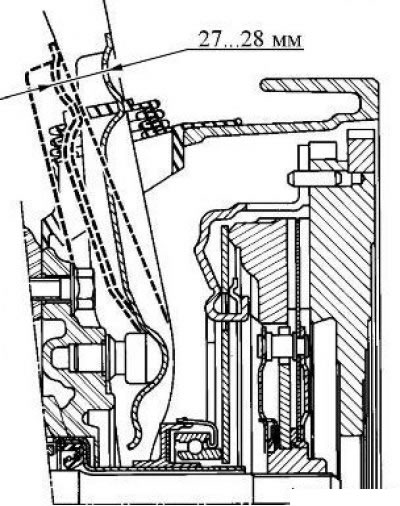
Figure 4-4 - Checking the Travel of the JH3 Clutch Release Fork
After installing the gearbox, check the travel of the clutch release fork. Fork travel must be within 27...28 mm, Figure 4-4 (caliper ШЦ-1-125-0.1).
Adjust the travel of the clutch release fork if necessary.
Removal from the JR5 gearbox
Place the vehicle on a two-post lift, brake with the parking brake, turn off the ignition, open the hood and disconnect the wire terminal "masses" from the battery.
The clutch release bearing on the hydraulic transmission is integral with the clutch slave cylinder.
Before removing the clutch release bearing and the clutch slave cylinder, it is necessary to remove the brake fluid from the reservoir using a syringe (technological syringe).
Remove gearbox (see here).
Note. you can not completely remove the gearbox, but only move it away from the engine to the required distance. This work is shown Here.
Remove two bolts 1, Figure 4-5, fastening the clutch release bearing (interchangeable head 8, extension, crank).
Remove clutch release bearing 2.

Figure 4-5 - Removing the clutch release bearing from the JR5 gearbox: 1 - a bolt of fastening of the bearing of deenergizing of coupling; 2 - clutch release bearing; 3 - gearbox
Installation on JR5 gearbox
Replace the clutch release bearing with a new one.
To remove air from the working cylinder as much as possible, when installing the clutch release bearing, it must first be filled with brake fluid (brake fluid according to the current "Codifier of the main and auxiliary materials used in the maintenance and repair of LADA vehicles" K 3100.25100.00018).
Fit new clutch release bearing 2.
Install and tighten the bolts 1 securing the clutch release bearing to a torque of 21 Nm (2.1 kgf·m) (interchangeable head 10, extension, crank).
Attention! Do not apply grease to the input shaft of the gearbox to prevent failure of the clutch slave cylinder.
Attention! Do not depress the clutch pedal with the slave cylinder removed.
Install gearbox.
Bleed the air from the hydraulic clutch.