
Car repair AvtoVAZ Car repair Renault Car repair Hyundai Car repair Ford Car repair Volkswagen Car repair Audi Car repair Chevrolet
English Русский
Български
Беларускі
Український
Српски
Hrvatski
Română
Polski
Slovenský
Magyar
articles sitemap contacts bookmark
LadaMan.ru


Kalina Granta Priora Vesta Largus XRAY
Largus 1 (2012-2023)

Clutch pedal — removal and installation (Largus 1)

  • Main
  • Largus
  • Largus 1
  • Transmission
  • Clutch
  • Clutch pedal — removal and installation
0
Contents: Removal ⇣ Installation ⇣

Removal


Place the vehicle on a work post, apply the parking brake, turn off the ignition, open the hood and disconnect the ground wire terminal from the battery.

For vehicles with JH3 gearbox


Remove the clutch cable from the socket on the clutch pedal by lifting pedal 1, Figure 7-1, and lifting cable 2 perpendicular to the pedal.
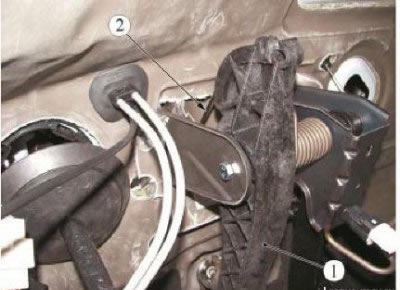
Figure 7-1 - Disconnecting the clutch cable from the clutch pedal: 1 - clutch pedal; 2 - clutch…

Figure 7-1 - Disconnecting the clutch cable from the clutch pedal: 1 - clutch pedal; 2 - clutch drive cable


Disconnect the ball head of the pushrod 1, Figure 7-2, of the clutch master cylinder from the clutch pedal.
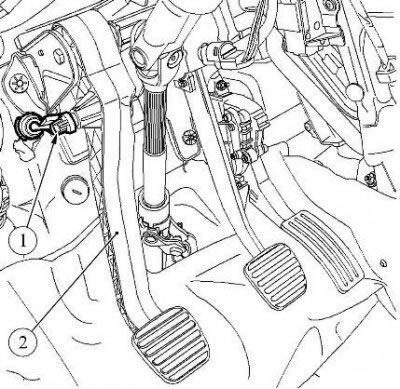
Figure 7-2 - Disconnecting the clutch master cylinder from the clutch pedal: 1 - Clutch master…

Figure 7-2 - Disconnecting the clutch master cylinder from the clutch pedal: 1 - Clutch master cylinder pusher; 2 - clutch pedal


Operations for all vehicle configurations


Unscrew nut 1, Figure 7-3, of the pedal assembly axle (spanner 10, replaceable head 10, ratchet wrench).
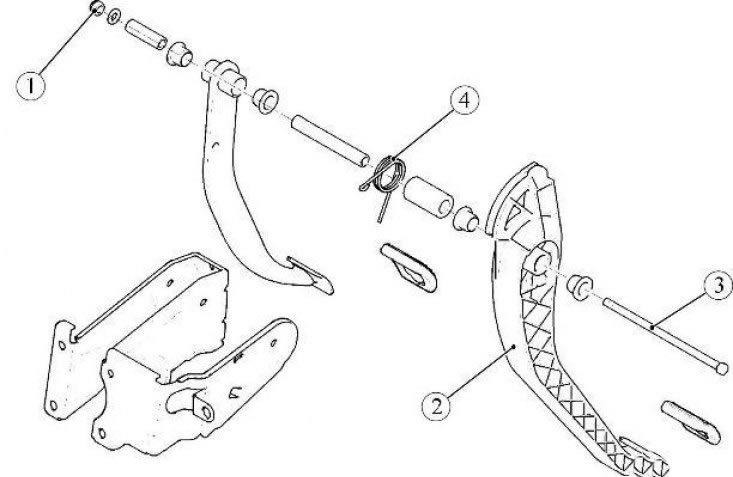


Figure 7-3 - Removing the clutch pedal: 1 - pedal axle nut; 2 - clutch pedal; 3 - pedal assembly…

Figure 7-3 - Removing the clutch pedal: 1 - pedal axle nut; 2 - clutch pedal; 3 - pedal assembly axis; 4 - clutch pedal spring


Remove axle 3 of the pedal assembly and remove the clutch pedal.

Installation


Before installation, lubricate axle 3, Figure 7-3, of the pedal assembly with MOLYCOTE 33M grease (MOLYCOTE 33M grease according to the current "Codifier of main and auxiliary materials used in maintenance and repair of LADA vehicles" K 3100.25100.000 18, consumption rate 2 g).

For vehicles with JH3 gearbox Install clutch pedal 2 with spring 4.

For vehicles with JR5 gearbox Install clutch pedal 2.

Install axle 3 of the pedal assembly.

Tighten nut 1 of the pedal assembly axle (spanner 10, replaceable head 10, ratchet handle).

Tighten the pedal axle nut to 21 N·m (2.1 kgf·m) (spanner 10, replaceable head 10, torque wrench).

For vehicles with JH3 gearbox


Install the clutch cable 2, Figure 7-1, into the socket on the clutch pedal 1 and check that the cable is fully inserted into the groove provided for it on the pedal.

Check and, if necessary, adjust the clutch release fork travel.

For vehicles with JR5 gearbox


Attach the ball head of the pushrod 1, Figure 7-2, of the clutch master cylinder to the clutch pedal 2.


Operations for all vehicle configurations


Check the functionality of the clutch.


This article is available at russian, bulgarian, belarusian, ukrainian, serbian, croatian, romanian, polish, slovak, hungarian
This article has been reviewed: Daniil Markelov
Share with friends:
◀ Previous
Lada Largus 1: Clutch
Next ▶

Clutch cable — removal, installation and adjustment
Replacing clutch parts without removing the gearbox
Clutch release bearing — removal and installation
Clutch — removal and installation
Clutch — device and arrangement of elements
Clutch Hydraulic Drive — bleeding
Clutch Master Cylinder — Removal and Installation
Clutch hydraulic line — removal and installation
More articles with information from manuals for Lada:

• The clutch is slipping (engine speed increases, but the car does not… Lada Kalina Hatchback (2004-2013, VAZ-1119)
• Clutch Pedal Sensor — Replacement Lada Granta 1 (2011-2023, VAZ-2190)
• Checking and adjusting the clutch release drive Lada Priora 1 (2007-2018, VAZ-2170)
• Clutch Pedal Position Sensor — Checking and Replacing Lada Vesta 1 (2015-2023, VAZ-2180)
• Clutch Pedal Position Signal Switch Lada X-Ray 1 (2015-2022)
Link to this article in various formats
Reviews and comments of visitors
No comments yet


Add up two numbers: 33 + 29


Largus 1 (2012-2023) 
  • General information
  • Vehicle device
  • User manual
  • Maintenance
  • Power unit
  • Engine repair
  • Cooling and lubrication system
  • Supply system
  • Ignition system
  • Exhaust system
  • Spare parts catalog
  • Transmission
  • Clutch
  • Car gearbox
  • Drive shafts
  • Spare parts catalog
  • Chassis (running gear)
  • Suspension and wheels
  • Steering
  • Brake system
  • Spare parts catalog
  • Body and interior
  • Exterior (external elements)
  • Interior (internal elements)
  • Doors, locks and windows
  • Heating and ventilation
  • Spare parts catalog
  • Electrical equipment
  • Equipment and devices
  • Power devices
  • Lighting and signaling
  • Spare parts catalog
  • Electrical circuits
LadaMan.ru © 2018–2026 | Mobile version | About Lada | Sitemap: EN BG BY UA RS HR RO PL SK HU | Contacts with admin | | Add to bookmarks
Kalina Hatchback (2004-2013) | Kalina Sedan (2004-2013) | Granta 1 (2011-2023) | Priora 1 (2007-2018) | Vesta 1 (2015-2023) | Largus 1 (2012-2023) | X-Ray 1 (2015-2022) |
This site uses cookies to ensure everything runs smoothly.