
See generator part number. Here.
Useful tips. Recently, many companies have appeared that specialize in the repair of imported starters and generators. They can diagnose a faulty remote control, purchase spare parts for any generator model (starter), get qualified advice. If you are not sure you can repair the generator (starter) independently, it makes sense to contact such a company, where the repair of these units will be performed, as a rule, quickly, with high quality and at an affordable price. However, on high mileage vehicles, it is often more cost effective to replace the assembly with a new one than to replace failed parts.
The engine model does not carry significant differences when working on the removal of the generator. However, there are some differences depending on the vehicle equipment, so the replacement is shown for all trim levels.
Removing
Put the car on a two post lift (electrohydraulic hoist type P-3.2 G with a lifting capacity of 3.2 tons), apply the parking brake, turn off the ignition, raise the hood, disconnect the wire terminal "masses" from battery (wrench "on 10").
For vehicles with K7M engine without climate system and without power steering
Remove the protective cap from the nut 1, Figure 4-1, and disconnect the block 2 of the wiring harness from the generator 3, unscrew the nut 1 (interchangeable head 13, knob, extension, flat screwdriver).
Disconnect the wire lugs from the generator B+ terminal.

Figure 4-1 - Disconnecting the electrical wires from the generator: 1 - nut for fastening the wire to the B + terminal of the generator; 2 - block of the wiring harness to the terminal "D" generator; 3 - generator; 4 - generator mounting bracket; 5 - upper and lower alternator mounting bolts
Have a bite to eat with wire cutters and remove belt 1, Figure 4-2, accessory drive (wire cutters).
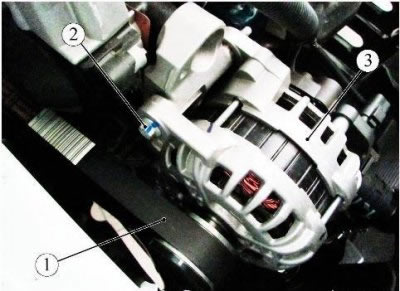
Figure 4-2 - Generator Removal: 1 - auxiliary equipment drive belt; 2 - the top bolt of fastening of the generator; 3 - generator
Unscrew and remove the upper and lower bolts 5, Figure 4-1, fastening the generator to the bracket 4 (interchangeable head 10, ratchet knob).
Remove generator.
For cars with K7M engine with power steering without climate system
Remove the protective cap from the nut 1, Figure 4-3, and disconnect the block 4 of the instrument panel wire harness from the generator 2, unscrew the nut 1 (interchangeable head 13, knob, extension, flat screwdriver).
Disconnect the wire lugs from the generator B+ terminal.
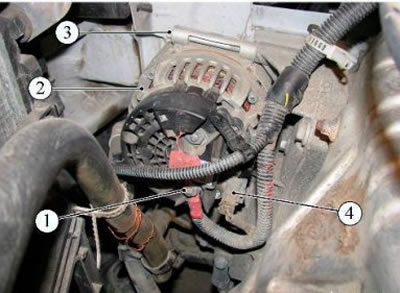
Figure 4-3 - Disconnecting the electrical wires from the generator: 1 - nut for fastening the wire to the B + terminal of the generator; 2 - generator; 3 - the upper bolt of the generator; 4 - block of the wiring harness to the terminal "D" generator
Loosen adjusting bolt 2, Figure 4-4, and bolt 1 by 3...4 turns (interchangeable head 10, knob, extension).
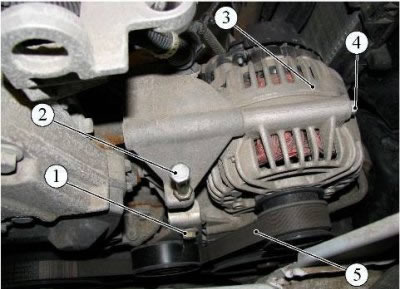
Figure 4-4 - Generator Removal: 1 - upper bolt for fastening the adjusting bar; 2 - adjusting bolt; 3 - generator; 4 - the upper bolt of the generator; 5 - auxiliary equipment drive belt
Remove the right front wheel.
Remove the right engine mudguard.
Remove right front wheel arch cover (see here).
Unscrew the lower bolt 1, Figure 4-5, fastening the adjusting bar to the bracket by 3...4 turns and loosen the tension of the belt 2 of the auxiliary equipment drive (interchangeable head 10, knob, extension).
Remove the accessory drive belt from the pulleys.
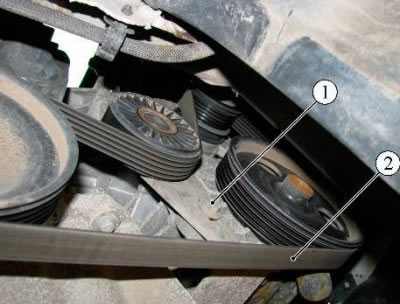
Figure 4-5 - Removing the accessory drive belt: 1 - lower bolt for fastening the adjusting bar; 2 - accessory drive belt
Attention. The removed belt must be replaced.
Attention. When replacing the belt, be sure to replace the tension roller.
Unscrew and remove the two lower bolts 1 and 2, Figure 4-6, fastening the generator 4 to the bracket (interchangeable head 10, ratchet knob and extension).
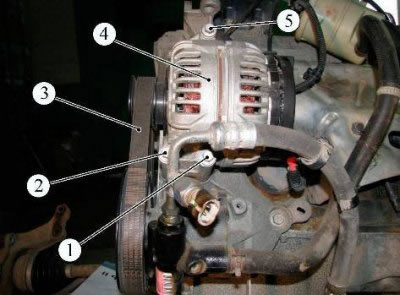
Figure 4-6 - Generator Removal: 1 - alternator mounting bolt; 2 - alternator mounting bolt; 3 - auxiliary equipment drive belt; 4 - generator; 5 - the top bolt of fastening of the generator
Unscrew and remove the upper bolt 5 securing the generator to the bracket (interchangeable head 10, ratchet knob).
Remove generator.
For vehicles with climate control and power steering
Remove the right front wheel.
Remove front bumper (see here).
Attention. Do not turn the engine crankshaft in the opposite direction to the direction of rotation.
Attention. Do not start the engine without the accessory drive belt, as this may damage the crankshaft pulley.
Attention. Do not damage the air conditioning pipes.
Use a wrench to turn the automatic tensioner 1, Figure 4-7, of the accessory drive belt clockwise (ring key 16).
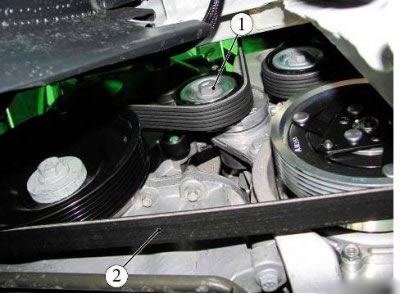
Figure 4-7 - Removing the accessory drive belt: 1 - tension roller; 2 - accessory drive belt
Lock the tension roller with a hex wrench (hex key 6 mm).
Remove accessory drive belt 2.
Attention. The removed belt must be replaced.
Attention. When replacing the belt, be sure to replace the tension and bypass rollers.
Loosen the air deflector mounting screws (screwdriver, nozzle Torx T30). Remove air baffle 1, Figure 4-8.
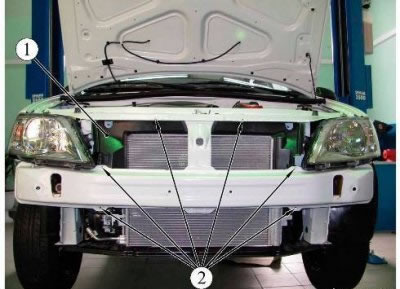
Figure 4-8 - Air baffle attachment points: 1 - air deflector; 2 - air baffle attachment points
Unscrew the upper bolts 1, Figure 4-9, fastening the radiator bracket to the car body (interchangeable head 10, extension, ratchet knob).
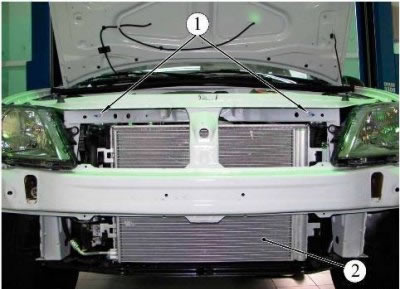
Figure 4-9 - Radiator Top Mount: 1 - a bolt of fastening of an arm of a radiator; 2 - air conditioner condenser
Disconnect the brackets 2, Figure 4-10, fixing the radiator from the radiator.
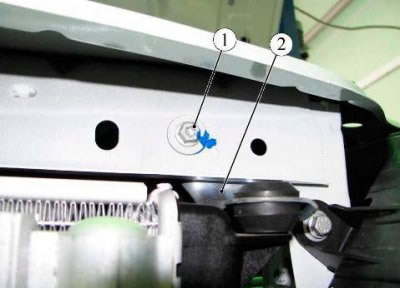
Figure 4-10 - Mounting the radiator: 1 - a bolt of fastening of an arm of a radiator; 2 - radiator mounting bracket
Remove the radiator 1, Figure 4-11, of the engine cooling system assembly with the condenser 2 of the air conditioner from the lower fasteners 3 and move it towards the left wing of the vehicle.
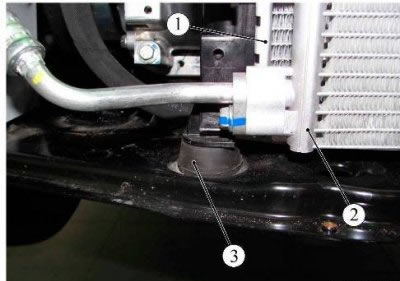
Figure 4-11- Lower radiator mounting: 1 - radiator of the engine cooling system; 2 - air conditioner condenser; 3 - lower radiator mount
Loosen nut 2, Figure 4-12, fastening the generator wire (ring wrench Disconnect the wire from the generator.
Disconnect the instrument panel harness connector 3 from the alternator.

Figure 4-12 - Mounting the generator: 1 - the lower bolt of fastening of the generator; 2 - a nut of fastening of a wire of the generator; 3 - a block of a plait of wires of the panel of devices to the generator
Unscrew the upper bolt 4, Figure 4-4, fastening the generator (interchangeable head 10, extension, ratchet knob).
Unscrew the bolt 1, Figure 4-12, of the lower fastening of the generator and remove the generator together with the lower fastening bolt (interchangeable head 10, extension, ratchet knob).
For cars with K4M engine with power steering without climate system
Remove the front right wheel.
Remove the right engine mudguard.
Remove accessory drive belt (see here).
Unscrew the two nuts 1, Figure 4-13, fastening the fuel rail guard and remove the fuel rail guard 2.
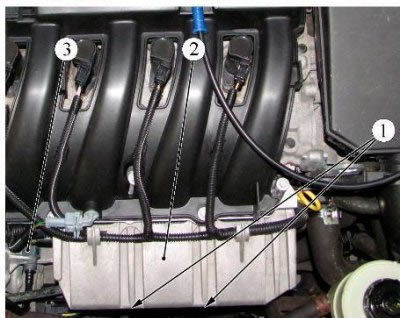
Figure 4-13 - Removing the fuel rail protection: 1 - nut for fastening the protection of the fuel rail; 2 - fuel rail protection; 3 - fuel pipe fitting
Disconnect union 3 for fuel line from fuel rail.
Loosen the nut securing the alternator wire (ring key 13). Disconnect the wire from the generator.
Disconnect the wiring harness connector from the generator.
Move aside the wiring harness branch to the generator.
Remove the bolt securing the power steering tube to the cylinder block (interchangeable head 13, extension, crank).
Unscrew the bolt securing the bracket for attaching the power steering pipeline to the generator and remove the bracket (interchangeable head 10, extension, crank).
Loosen the top alternator mounting bolt (interchangeable head 10, extension, ratchet knob).
Unscrew the bolt of the lower mounting of the generator and remove the generator together with the bolt of the lower mounting (interchangeable head 10, extension, ratchet knob).
Installation
For vehicles with K7M engine without climate system and without power steering
Remove the right front wheel.
Remove the right engine mudguard.
Remove the right front wheel arch cover.
Install the alternator in the reverse order of removal.
In this case, the tightening torques of threaded connections:
- generator mounting bolts to the bracket - 21 Nm (2.1 kgf·m);
- generator wire fastening nut - 14 Nm (1.4 kgf·m) (interchangeable head 10 and 13, torque wrench).
For cars with K7M engine without climate system with power steering
Install the alternator in the reverse order of removal.
In this case, the tightening torques of threaded connections:
- generator mounting bolts to the bracket - 21 Nm (2.1 kgf·m);
- bolt of fastening of an adjusting lath of a tension roller - 21 Nm (2.1 kgf·m) (interchangeable head 10, knob and extension, torque wrench);
- generator wire fastening nut - 14 Nm (1.4 kgf·m) (interchangeable head 13, ratchet knob, extension, torque wrench).
For vehicles with climate control and power steering
Install the alternator in the reverse order of removal.
In this case, the tightening torques of threaded connections:
- generator mounting bolts to the bracket - 21 Nm (2.1 kgf·m);
- generator wire fastening nut - 14 Nm (1.4 kgf·m) (interchangeable head 13, ratchet knob, extension, torque wrench).
For cars with K4M engine with power steering without climate system
Install the alternator in the reverse order of removal.
In this case, the tightening torques of threaded connections:
- generator mounting bolts to the bracket - 21 Nm (2.1 kgf·m);
- bolt of fastening of an arm of the pipeline of the hydraulic booster of a steering to the generator 22 Nm (2.2 kgf·m);
- generator wire fastening nut - 14 Nm (1.4 kgf·m);
- fuel rail protection nuts 21 Nm (2.1 kgf·m) (interchangeable head 10 and 13, torque wrench).
For all vehicle configurations
Install a new accessory drive belt.