
Car repair AvtoVAZ Car repair Renault Car repair Hyundai Car repair Ford Car repair Volkswagen Car repair Audi Car repair Chevrolet
English Русский
Български
Беларускі
Український
Српски
Hrvatski
Română
Polski
Slovenský
Magyar
articles sitemap contacts bookmark
LadaMan.ru


Kalina Granta Priora Vesta Largus XRAY
X-Ray 1 (2015-2022)

Support roller (tensioner) of the drive belt of the mounted units (XRAY 1)

  • Main
  • XRAY
  • X-Ray 1
  • Power unit
  • Engine repair
  • Support roller (tensioner) of the drive belt of the mounted units
0
Contents: Removal ⇣ Installation ⇣

Removal


For all vehicle trim levels


Place the vehicle on a two-post lift, apply the parking brake, turn off the ignition and disconnect the battery ground terminal (electro-hydraulic lift type P-3.2G with lifting capacity of 3.2 t, spanner 10).

Remove the right front wheel in accordance with the requirements of TI 3100.25100.20594.

Raise the vehicle to a height convenient for performing the work.

Remove the right inner wheel arch trim in accordance with the requirements of TI 3100.25100.20599.

Remove the drive belt of the attachments in accordance with the requirements of Section 4 of this TI.

For cars with H4M engine


Remove the engine mudguard in accordance with the requirements of TI 3100.25100.20594.

Loosen the two bolts 1, Figure 5-1, fastening and remove the support roller 2 in the accessory drive belt assembly (replacement head 10, ratchet).
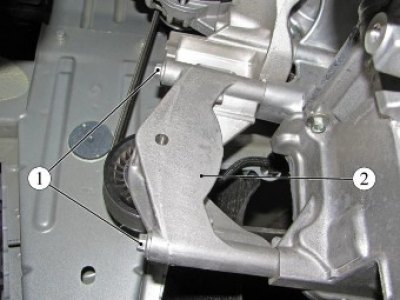
Figure 5-1 - Removing the accessory drive belt support roller on a vehicle with an H4M engine: 1 -…

Figure 5-1 - Removing the accessory drive belt support roller on a vehicle with an H4M engine: 1 - support roller mounting bolt; 2 - support roller assembly


For cars with engines 21129 and 21179


Loosen nut 1, Figure 5-2, securing the tension roller and remove tension roller 2 (replaceable head 13, ratchet).
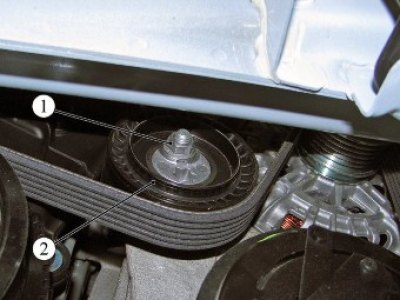


Figure 5-2 - Drive belt for auxiliary units on vehicles with engines 21129 and 21179: 1 - tension…

Figure 5-2 - Drive belt for auxiliary units on vehicles with engines 21129 and 21179: 1 - tension roller fastening nut; 2 - tension roller


Installation


For cars with H4M engine


Install support roller 2, Figure 5-1, on the engine and secure with two bolts 1. Tightening torque of bolts 22.28 N·m (2.2.2.8 kgf·m) (replaceable head 10, ratchet, torque wrench).

Install the drive belt of the attachments in accordance with the requirements of Section 4 of this TI.

Install the engine mudguard in accordance with the requirements of TI 3100.25100.20594.

For cars with engines 21129 and 21179


Install tension roller 2, Figure 5-2, on the stud and secure with nut 1 without tightening (replaceable head 13, ratchet).

Install the drive belt of the attachments in accordance with the requirements of Section 4 of this TI.

The final tightening torque of nut 1 of the tension roller 2 after installing the accessory drive belt is 30.36 N·m (3.0-3.6 kgf·m) (replaceable head 13, ratchet, torque wrench).

For all vehicle trim levels


Install the right inner wheel arch lining in accordance with the requirements of TI 3100.25100.20599.


Install the right front wheel in accordance with the requirements of TI 3100.25100.20594.

Connect the ground wire terminal to the battery in accordance with the requirements of TI 3100.25100.20597.

Present the vehicle to the Quality Control Department. The Quality Control Department will check the vehicle for compliance with the requirements of TU 017200-254-00232934, paragraphs 1.19.5, 1.19.6, 1.19.14.


This article is available at russian, bulgarian, belarusian, ukrainian, serbian, croatian, romanian, polish, slovak, hungarian
This article has been reviewed: Daniil Markelov
Share with friends:
◀ Previous
Lada X-Ray 1: Engine repair
Next ▶

Auxiliary drive belt
Powertrain — installation
Powertrain — removal
Engine — removal and installation of main systems, units and parts
Crankshaft Damper — removal and installation
Timing belt on engines 21129, 21179
Engine Evaporative Canister — removal and installation
Exhaust system — removal and installation
Left Engine Mount — removal and installation
More articles with information from manuals for Lada:

• Generator Drive Belt — Replacing the Belt and Tensioner Roller Lada Kalina Hatchback (2004-2013, VAZ-1119)
• Timing belt drive with automatic tensioner — condition check Lada Granta 1 (2011-2023, VAZ-2190)
• Checking the alternator drive belt tension Lada Priora 1 (2007-2018, VAZ-2170)
• Auxiliary Drive Belt — replacement Lada Vesta 1 (2015-2023, VAZ-2180)
• Timing belt tensioner and roller defects Lada Largus 1 (2012-2023)
Link to this article in various formats
Reviews and comments of visitors
No comments yet


Add up two numbers: 46 + 37


X-Ray 1 (2015-2022) 
  • General information
  • User manual
  • Maintenance
  • Daily care
  • Troubleshooting
  • Power unit
  • Engine repair
  • Fuel system
  • Cooling system
  • Repair H4M engine
  • Transmission
  • Clutch and drive shafts
  • Transmission
  • Chassis (running gear)
  • Front suspension
  • Rear suspension
  • Brake system
  • Steering
  • Body and interior
  • Exterior (external elements)
  • Interior (internal elements)
  • Electrical equipment
  • Equipment and devices
  • Lighting and signaling
LadaMan.ru © 2018–2026 | Mobile version | About Lada | Sitemap: EN BG BY UA RS HR RO PL SK HU | Contacts with admin | | Add to bookmarks
Kalina Hatchback (2004-2013) | Kalina Sedan (2004-2013) | Granta 1 (2011-2023) | Priora 1 (2007-2018) | Vesta 1 (2015-2023) | Largus 1 (2012-2023) | X-Ray 1 (2015-2022) |
This site uses cookies to ensure everything runs smoothly.