
Car repair AvtoVAZ Car repair Renault Car repair Hyundai Car repair Ford Car repair Volkswagen Car repair Audi Car repair Chevrolet
English Русский
Български
Беларускі
Український
Српски
Hrvatski
Română
Polski
Slovenský
Magyar
articles sitemap contacts bookmark
LadaMan.ru


Kalina Granta Priora Vesta Largus XRAY
Granta 1 (2011-2023, VAZ-2190)

Checking the technical condition of the cooling system (Granta 2190)

  • Main
  • Granta
  • Granta 1
  • Power unit
  • Cooling system
  • Checking the technical condition of the cooling system
0
When operating a vehicle, the condition of the cooling system can be assessed by the engine overheating indicator light and the fluid level in the expansion tank. A decrease in the coolant level is usually caused by a leak in the system. If the level drops to the MIN mark or the indicator lamp lights up, there may be a malfunction in the cooling system.

Sequence of execution


1. Prepare the car for work ("Preparing the car for maintenance and repair").

Warning: The coolant level should be checked when the engine is cold. A slight increase or decrease in the coolant level when the engine heats up and cools down is not a malfunction. This is due to the thermal change in the volume of the liquid.


2. Check the coolant level in the expansion tank, which should be 25-30 mm above the MIN mark on the expansion tank body. If the fluid level is at the MIN mark or below, add coolant to the tank ("Coolant - Replacement").
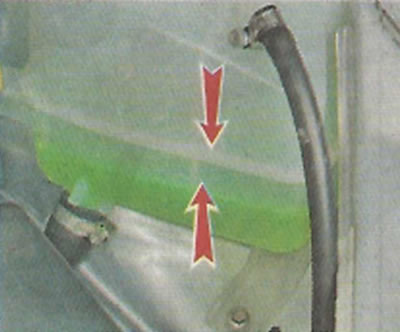
2. Check the coolant level in the expansion tank, which should be 25-30 mm above the MIN mark on…


Recommendation. If you have to top up the coolant regularly, you should check the cooling system for leaks.


3. Check for fluid leaks from the radiator drain holes and engine block, the temperature sensor installation location, the connections of the rubber hoses of the cooling system and their integrity.


Recommendation. You can try to eliminate coolant leaks from under the hoses by replacing the spring clamps with screw ones. However, do not overtighten the clamps, as they may cut the hoses.


4. Check the integrity of the expansion tank housing, engine radiator and heater.

5. Make sure that the thermostat housing and the connection between the coolant pump and the cylinder block are tight.

6. Check for leaks from the pump drain hole (is located at the bottom of the pump), indicating wear of its seal.

7. To check the thermostat, start a cold engine. We control the temperature and circulation of the coolant in the small and large circles by touch, by changing the temperature of the hoses and pipes of the cooling system (in the photo the air filter is removed for clarity).

Article based on information from the website LADAman
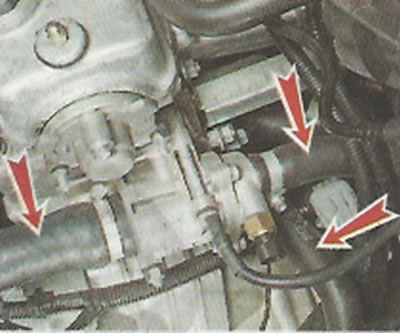
7. To check the thermostat, start a cold engine. We control the temperature and circulation of the…


Note: If the engine cooling system is in good condition, then when the coolant temperature is less than 90°C, the thermostat valve should be closed and the coolant should circulate in a small circle. As a result, the lower radiator hose and the radiator itself will be noticeably colder than the thermostat housing, through which hot coolant circulates. When the coolant temperature reaches about 90°C, the thermostat valve will open and a gradually increasing flow of hot liquid will begin to flow into the radiator. In this case, first the radiator and then its lower hose will begin to heat up.


8. Leave the engine running until the engine radiator electric fan starts to operate. When the coolant temperature rises to a certain value, the electric fan should turn on, and after the temperature drops, it should automatically turn off.

Recommendation. If the electric fan does not turn on in time, the liquid has boiled, it is necessary to check the serviceability of the fan electric motor or the serviceability of the engine control system. Checking the coolant temperature sensor is shown in the section "Coolant Temperature Sensor - Checking and Replacing".


This article is available at russian, bulgarian, belarusian, ukrainian, serbian, croatian, romanian, polish, slovak, hungarian
This article has been reviewed: Polina Kudryashova
Share with friends:
◀ Previous
Lada Granta 1: Cooling system
Next ▶

Description of the design of the cooling system
Reference data on the engine cooling system
Coolant — Replacement
Expansion tank — removal and installation
Thermostat — Removal, Replacement and Installation
Coolant Pump — Replacement
Electric fan — removal, disassembly and installation
More articles with information from manuals for Lada:

• Checking the technical condition of the cooling system Lada Kalina Hatchback (2004-2013, VAZ-1119)
• Checking the cooling system Lada Priora 1 (2007-2018, VAZ-2170)
• Checking the technical condition of the cooling system Lada Vesta 1 (2015-2023, VAZ-2180)
• Cooling system — design description Lada Largus 1 (2012-2023)
• Front brake disc — checking technical condition Lada X-Ray 1 (2015-2022)
Link to this article in various formats
Reviews and comments of visitors
No comments yet


Add up two numbers: 33 + 46


Granta 1 (2011-2023) 
  • User manual
  • Governing bodies
  • Vehicle operation
  • Maintenance
  • Radio receiver
  • Radio receiver (option)
  • Power unit
  • Engine repair
  • Control system
  • Supply system
  • Cooling system
  • Exhaust system
  • Transmission
  • Clutch
  • Car gearbox
  • Drive shafts
  • Chassis (running gear)
  • Wheels, tires and hubs
  • Front suspension
  • Rear suspension
  • Steering
  • Brake system
  • Body and interior
  • Exterior (external elements)
  • Interior (internal elements)
  • Doors, locks and windows
  • Heating and ventilation
  • Electrical equipment
  • Equipment and devices
  • Power devices
  • Breakers and switches
  • Lighting and signaling
  • Electrical circuits
LadaMan.ru © 2018–2026 | Mobile version | About Lada | Sitemap: EN BG BY UA RS HR RO PL SK HU | Contacts with admin | | Add to bookmarks
Kalina Hatchback (2004-2013) | Kalina Sedan (2004-2013) | Granta 1 (2011-2023) | Priora 1 (2007-2018) | Vesta 1 (2015-2023) | Largus 1 (2012-2023) | X-Ray 1 (2015-2022) |
This site uses cookies to ensure everything runs smoothly.